

Are you tired of calling a repairman whenever your security screen door gets damaged? Don’t worry; with the right tools and steps, you can easily repair it yourself.
In this guide, we will walk you through the process of how to repair a security screen door. Repairing a security screen door is essential to maintaining the safety and security of your home.
Over time, wear and tear can take a toll on the door’s components, potentially compromising its effectiveness.
Whether it’s a broken lock, a torn mesh, or a misaligned frame, addressing these issues promptly can prevent further damage and ensure that your security screen door functions optimally.
This guide will walk you through the step-by-step process of identifying common problems and performing basic repairs, helping you restore the door’s integrity and extend its lifespan.
What Will You Need?
Before we dive into the repair process, make sure you have all the necessary tools and materials on hand. This will save you time and frustration later on. Here are some items you may need:
- Screwdriver (Phillips head or flathead)
- Pliers
- Replacement parts (lock, hinges, mesh, etc.)
- Measuring tape
- Screws and/or bolts
- Lubricant spray or oil
Having a helper or an extra pair of hands is also helpful when tackling this project. Some repairs may require holding parts in place while tightening screws, so having someone assist you can speed up the process and make it easier.
10 Easy Steps on How to Repair a Security Screen Door
Step 1: Remove the Door
The first step in repairing your security screen door is to remove it from its frame. Begin by locating the hinges on one side of the door. Using a screwdriver, carefully unscrew the hinges to detach the door from the frame.
It’s important to support the door’s weight as you do this to prevent it from falling and causing further damage. If your door is cumbersome, enlist a helper to assist you in holding it steady.
Once the door is detached, place it on a flat, stable surface like a workbench or a pair of sawhorses. This will make it easier to inspect and work on.
Take this opportunity to thoroughly examine the door for additional damages or areas requiring attention. Identifying all the issues at this stage will help you avoid multiple disassemblies and reassemblies.
Step 2: Inspect the Mesh
With the door removed and placed on a stable surface, the next step is to inspect the mesh for any signs of damage. The mesh is a crucial component of the security screen door, as it keeps insects out and provides an additional layer of security. Look for any tears, holes, or frayed edges.
Pay close attention to the areas around the frame where the mesh might be more susceptible to wear and tear.
If you find any small holes or tears, these can often be repaired with a patch kit available at most hardware stores. To patch the mesh, clean the area around the hole with a damp cloth and allow it to dry completely.
Then, apply the patch according to the kit’s instructions, ensuring it adheres securely to prevent future damage. If the tear is larger or the mesh is extensively damaged, it may be best to replace the entire section.
Step 3: Remove the Damaged Mesh
If the mesh is damaged, you will need to replace it. Start by removing the spline, the rubber strip that holds the mesh in place.
Using a flathead screwdriver or a spline roller, carefully pry the spline out of its groove around the perimeter of the door. Once the spline is removed, you can remove the damaged mesh.
Step 4: Cut the Replacement Mesh
Once you have removed the damaged mesh, it’s time to cut the replacement mesh to the appropriate size. Lay the new mesh over the door frame, ensuring it extends slightly beyond the frame’s edges on all sides.
Using scissors or a utility knife, carefully cut the mesh to fit the door frame, leaving an extra inch around the perimeter to allow for secure installation.
Step 5: Install the New Mesh

To install the new mesh, you must secure it with a new spline. Begin by positioning the mesh over the door frame, ensuring it is flat and without any wrinkles.
Starting at one corner, push the new spline into the groove with a spline roller or the edge of a flathead screwdriver, securing the mesh in place. Work your way around the frame, keeping the mesh taut as you go to avoid any slack or bunching.
Step 6: Trim Excess Mesh
After securing the new mesh with the spline, you must trim the excess mesh to ensure a neat and finished appearance. Using a sharp utility knife or a pair of scissors, carefully cut along the outside edge of the spline, removing the excess mesh that extends beyond the frame.
Be cautious to avoid cutting too close to the spline, as this could cause the mesh to loosen or come out of place. Take your time and make deliberate cuts to achieve a clean and professional look.
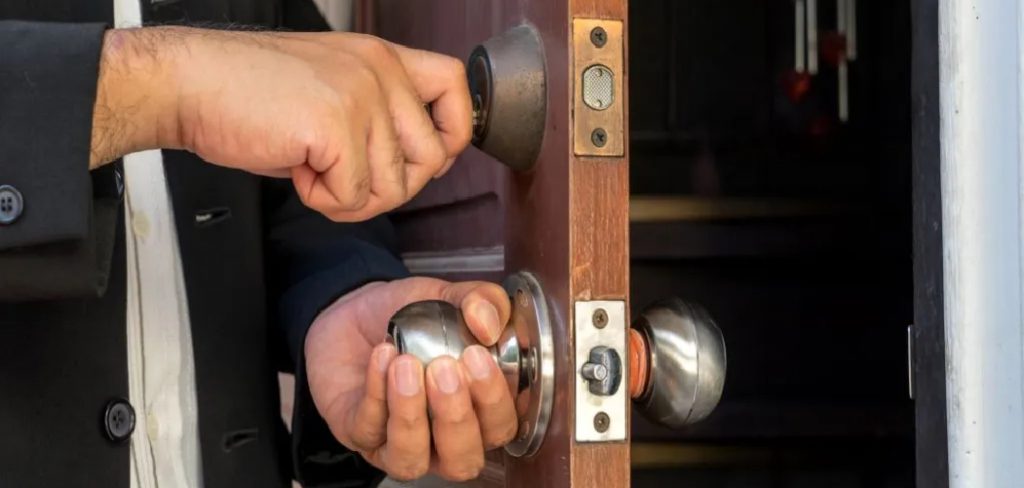
Step 7: Inspect and Replace Other Components
Before reattaching the door, inspect other components such as the lock, hinges, and door frame for any signs of damage or wear. Tighten any loose screws and apply lubricant spray to hinges and other moving parts to ensure smooth operation.
If any parts are broken and need replacement, now is the time to install the new components. Follow the manufacturer’s instructions for replacing locks, hinges, or other specific parts to guarantee proper installation and functionality.
Step 8: Reattach the Door
Once all repairs are completed, it’s time to reattach the door to its frame. If needed, a helper can help carefully align the hinges with their corresponding positions on the frame.
Using a screwdriver, secure the hinges, ensuring the door is properly aligned and operates smoothly. Test the lock mechanism several times to confirm that it is functioning correctly.
Step 9: Test the Door
After reattaching the door, open and close it several times to ensure that it operates smoothly and securely.
Check for any areas where the door might be catching or not aligning properly, and make adjustments as necessary. Make sure the lock engages and disengages effortlessly and that the door closes tightly to maintain security.
Step 10: Perform a Final Inspection
With the door now securely in place, perform a final inspection to ensure all components function correctly and that there are no remaining issues.
Confirm that the mesh is tightly installed without any gaps and that all screws and bolts are firmly secured. This final check will help ensure that your security screen door is fully operational and ready to provide the protection you need.
Successfully repairing a security screen door can be a rewarding project that enhances the safety and aesthetic of your home. By following these steps carefully and methodically, you can extend the life of your door and save money on professional repairs.
6 Additional Tips and Tricks
- Lubricate Moving Parts: Regularly apply a silicone-based lubricant to the door hinges, handle, and any sliding tracks to ensure smooth operation and prevent rusting.
- Tighten Screws and Bolts: Periodically check all screws and bolts on the door frame and hinges. Tighten any that have become loose to maintain the door’s structural integrity.
- Check the Screen Mesh: Inspect the screen mesh for any tears or holes. If damage is found, consider using a patch kit or replacing the mesh entirely to ensure maximum security and functionality.
- Adjust the Door Alignment: If the door is not closing properly or seems misaligned, adjust the screws on the hinges or the strike plate until the door functions correctly.
- Replace Worn Seals: Over time, the seals around the door can wear out, leading to drafts or reduced security. Inspect the seals and replace them as needed to maintain the door’s efficiency.
- Install a Security Bar: For added security, consider installing a security bar inside your door. This can provide an additional layer of protection against forced entry.
These tips and tricks can help prolong the life of your security door and ensure it continues to function properly for years to come. It’s important to regularly inspect and maintain your door to keep it in top condition and provide optimal protection for your home or business.
6 Things You Should Avoid

- Using Inappropriate Tools: Avoid using tools not specifically designed for the task, as this can lead to improper repairs or even further damage to the door. Always use the correct tools, guided by the manufacturer’s instructions.
- Ignoring Manufacturer Instructions: Different doors have specific instructions tailored to their design and materials. Ignoring these guidelines can result in improper repairs that compromise the door’s integrity and safety.
- Overtightening Screws and Bolts: While it is crucial to ensure that screws and bolts are tight, overtightening them can strip the threads or damage the frame, leading to costly repairs or replacements.
- Neglecting Safety Precautions: Repairing a security screen door can involve sharp tools and heavy components. Always wear appropriate safety gear like gloves and safety glasses, and handle all parts with care to avoid injury.
- Procrastinating Routine Maintenance: Regular maintenance is key to the longevity and functionality of your door. Avoid the mistake of only addressing issues when they become problematic. Adopt a proactive maintenance schedule to spot and fix potential problems early.
- Skipping Professional Repairs: Some repairs may require specialized skills or knowledge. Fixing these issues yourself can lead to further damage and costly repairs. It’s best to seek professional help for any major repairs or replacements needed.
By avoiding these common mistakes, you can ensure that your security door remains in top condition and provides the necessary protection for your home or business.
What are the Causes of Damage to Security Screen Doors?
There are various factors that can contribute to damage or wear and tear on security screen doors. These include:
- Harsh weather conditions, such as extreme heat, cold, rain, or wind, can damage the door frame and seals.
- Improper installation can lead to misaligned doors or gaps that compromise the door’s security and efficiency.
- Regular door use, such as constant opening and closing, can cause wear on hinges and handles.
- Lack of routine maintenance and neglecting repairs can also result in damage over time.
When maintaining your security screen door, consider these potential causes to prevent major issues. Overall, regular maintenance and prompt repairs are key to keeping your security door in top condition and providing the necessary protection for your home or business.

Conclusion
How to repair a security screen door might seem daunting at first, but with the right tools, tips, and precautions, it is entirely manageable.
By following the detailed steps for basic repairs, such as lubricating moving parts, tightening screws and bolts, checking the screen mesh, adjusting the door alignment, replacing worn seals, and installing a security bar, you can ensure that your door remains functional and secure.
Additionally, being mindful of potential pitfalls by avoiding inappropriate tools, not ignoring manufacturer instructions, and not procrastinating on maintenance further safeguards your efforts.
Remember, seeking professional help is always a wise and often cost-saving decision for more complex issues.
With regular care and attention, your security screen door can provide long-lasting protection and peace of mind for your home or business.
About
Safety Fic is a distinguished figure in the world of Diy design, with a decade of expertise creating innovative and sustainable Diy solutions. His professional focus lies in merging traditional craftsmanship with modern manufacturing techniques, fostering designs that are both practical and environmentally conscious. As the author of diy, Safety Fic delves into the art and science of Safety Fic-making, inspiring artisans and industry professionals alike.
Education RMIT University
(Melbourne, Australia) Associate Degree in Design (Safety Fic) Focus on sustainable design, industry-driven projects, and practical craftsmanship. Gained hands-on experience with traditional and digital manufacturing tools, such as CAD and CNC software.
Nottingham Trent University
(United Kingdom) Bachelor’s in diyfastly.com and Product Design (Honors) Specialized in product design with a focus on blending creativity with production techniques. Participated in industry projects, working with companies like John Lewis and Vitsoe to gain real-world insights.
Publications and Impact
In diy, Safety Fic his insights on indoor design processes, materials, and strategies for efficient production. His writing bridges the gap between artisan knowledge and modern industry needs, making it a must-read for both budding designers and seasoned professionals.