
Maintaining the functionality of your Schlage lock is essential for ensuring the security of your home. One of the most important upkeep tasks is replacing the lock’s battery when it runs low. A low battery can lead to difficulties with your lock’s operation, including keypad malfunctions or loss of access. Fortunately, changing the battery is a straightforward process that requires just a few simple steps. This guide will walk you through everything you need to know on How to change schlage lock battery.

What is a Schlage Lock?
A Schlage lock is a type of high-quality lock designed to enhance the security and convenience of your home or business. Known for their durability and innovative features, Schlage locks are available in various models, including traditional keyed locks, keypad locks, and smart locks that can be integrated with home automation systems.
These locks are engineered with advanced technology to provide robust protection while offering ease of use, making them a popular choice for homeowners and businesses alike. Whether you’re looking for dependable manual locks or cutting-edge smart security solutions, Schlage provides a wide range of options to suit diverse needs.
Why Change the Schlage Lock Battery?
Changing the battery in your Schlage lock is essential to ensure consistent performance and uninterrupted security for your home or business. A low or depleted battery can lead to functionality issues, such as delayed or failed locking and unlocking operations, which might compromise your safety. Additionally, for smart locks, a fresh battery is crucial for maintaining connectivity with your home automation system and enabling features like remote access. Regularly replacing the battery ensures that your lock continues to operate optimally and provides the reliability you expect from Schlage products.
10 Methods How to Change Schlage Lock Battery
1. Determine the Type of Schlage Lock
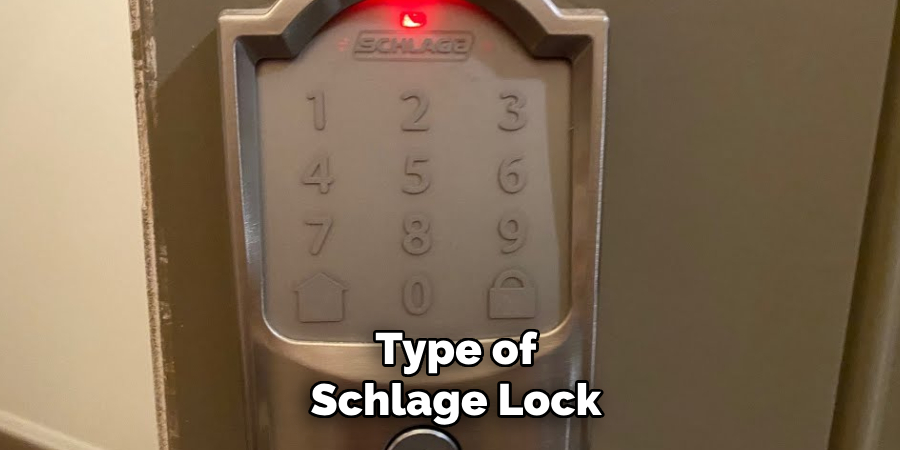
Before you begin the process of changing the battery, it’s essential to know which model of Schlage lock you own. Schlage offers several types of locks, including keyless entry models like the Schlage Encode, Schlage Connect, and Schlage Camelot. Each model may have slightly different battery compartments or battery types, so identifying the model will help ensure you’re following the correct procedure. Typically, Schlage smart locks use either AA or 9-volt batteries. Check the back of your lock or consult the user manual to determine the specific battery type and the lock model.
2. Gather the Necessary Tools
Changing the battery in a Schlage lock is a simple task, but it’s helpful to gather the necessary tools before you begin. Typically, you’ll need a new set of batteries (either AA or 9-volt, depending on your model), and a screwdriver to remove the cover. For some models, you might also need a coin or a flat tool to open the battery compartment. Having everything ready will make the process smoother and prevent unnecessary interruptions. Be sure to have fresh batteries on hand so you can replace them immediately and avoid delays.
3. Unlock the Door and Remove the Lock Cover
To begin, ensure the door is unlocked and open. This will make the process more comfortable and allow you easy access to the lock’s interior. Next, remove the cover of your Schlage lock. Depending on the model, this cover may be located on the front, rear, or side of the lock.
For most Schlage smart locks, there is a small slot or indentation in the cover where you can insert a coin or flathead screwdriver to pry it off gently. Be careful not to damage the cover as you remove it. If you’re unsure how to remove it, refer to the instruction manual for your lock.
4. Locate the Battery Compartment
Once you have removed the cover, you’ll be able to see the battery compartment. The compartment is typically located inside the back of the lock or on the inside of the door near the deadbolt. The battery compartment is usually easy to spot, as it will be designed to hold either AA batteries or a 9-volt battery. Look for any obvious signs of where the batteries are located and ensure you have clear access to the compartment before proceeding with the replacement.
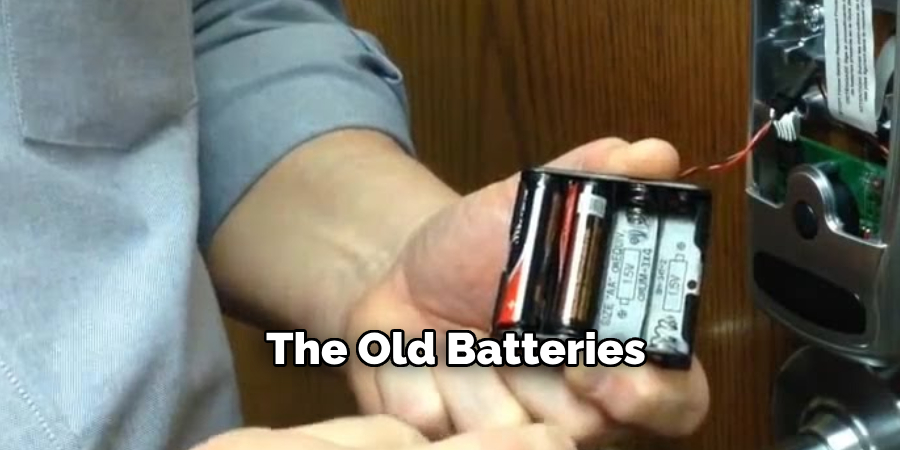
5. Remove the Old Batteries
After locating the battery compartment, the next step is to remove the old, expired batteries. Most Schlage smart locks use AA batteries, which are inserted into a designated slot. Simply remove the batteries by pulling them out of their holders, making sure you don’t damage any surrounding components. If your lock uses a 9-volt battery, simply disconnect the battery connector by pulling the battery away from its contact points. Be cautious not to bend any metal connectors or components inside the battery compartment while doing this.
6. Install the New Batteries
Now it’s time to install the new batteries into the compartment. Make sure you’re using the correct type of battery for your model—either fresh AA batteries or a new 9-volt battery. Insert the new batteries into the compartment, ensuring that each battery is placed with the correct polarity (positive and negative). For AA batteries, the positive (+) end should be facing the springs inside the compartment, while the negative (-) end should be facing the outer edge. For a 9-volt battery, simply reconnect it to the battery connector. Be sure the new batteries are seated securely in their designated slots.
7. Check the Battery Orientation
Before reassembling your Schlage lock, double-check the orientation of the batteries to ensure they are properly installed. Incorrect battery placement is a common mistake and can prevent your lock from functioning. Take a moment to verify that each battery is facing the correct direction. The user manual for your specific lock model will provide clear illustrations on how to correctly insert the batteries, so consult it if you’re unsure.
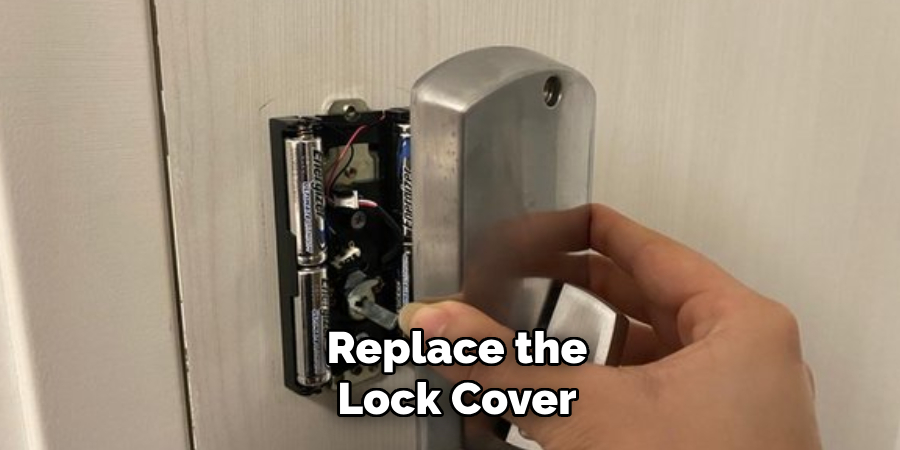
8. Replace the Lock Cover
Once the new batteries are installed and properly seated in the compartment, replace the lock cover. Line up the cover with the lock mechanism and snap it back into place. Be sure it fits securely and that no parts of the cover are misaligned. For locks with a removable cover, it should click into position easily. If you encounter any resistance, check that the cover is oriented correctly. Securing the cover properly ensures that the lock’s internal components are protected and the battery compartment remains closed.
9. Test the Lock to Ensure Proper Functionality
After replacing the cover, it’s important to test the lock to ensure it’s functioning correctly. Enter your code or use the key to lock and unlock the door. If the lock operates smoothly and the keypad responds properly, this indicates that the new batteries are working as expected.
Additionally, most Schlage smart locks will display a light or sound when the batteries are low. After replacing the batteries, confirm that there are no error messages or low battery warnings. If the lock doesn’t work after the battery replacement, double-check the battery installation and make sure the cover is properly reattached.
10. Dispose of the Old Batteries Properly
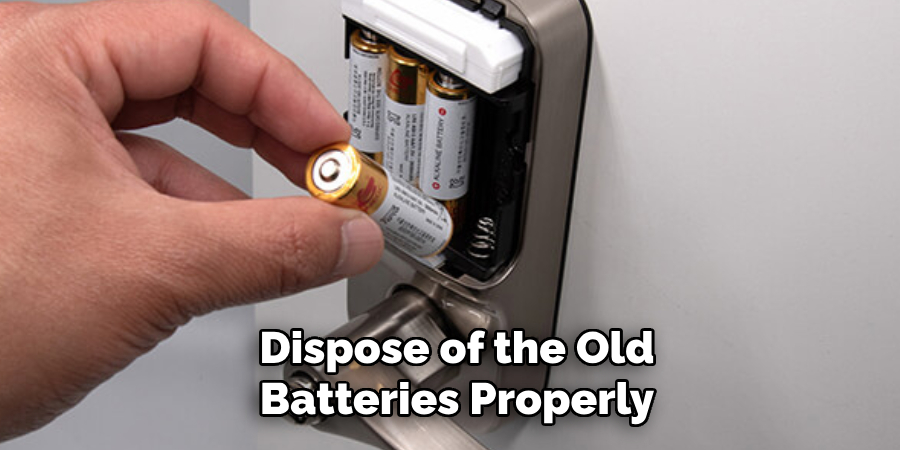
Once you’ve successfully changed the battery and tested the lock, don’t forget to dispose of the old batteries. Batteries contain chemicals that can be harmful to the environment if not disposed of properly. Most communities offer recycling programs for used batteries, and you can drop them off at designated recycling centers. Some retail stores also provide battery recycling bins. Properly disposing of your old batteries helps ensure they don’t contribute to environmental damage.
Things to Consider When Choosing Batteries
When selecting batteries for your electronic devices, it’s essential to consider several factors to ensure optimal performance and longevity. First, confirm the correct battery type required for your device, as using the wrong type can damage the unit or void warranties.
Check the expiration date on the packaging to make sure you’re purchasing fresh batteries with a long shelf life. Additionally, opting for rechargeable batteries can save money and reduce waste in the long run. Consider the brand reputation as well—reliable brands often provide consistent power and safety features. Lastly, store your batteries in a cool, dry place to preserve their lifespan and prevent leakage.
Common Mistakes to Avoid
When handling batteries, there are several common mistakes that can lead to reduced performance or even safety hazards. One frequent error is mixing old and new batteries in the same device, which can cause uneven power distribution and damage the device. Another mistake is using batteries of different brands or types together, as they may have varying voltage levels and capacities, leading to inefficient performance.
Overcharging rechargeable batteries is also a common pitfall, which can reduce their lifespan or cause them to overheat. Failing to dispose of batteries properly is another issue—always follow local regulations for battery recycling or disposal to avoid environmental harm. Lastly, neglecting to check for signs of corrosion or leakage can result in damaged devices and potential safety risks. Being mindful of these mistakes can help you prolong battery life and ensure safe usage.
Conclusion
Changing the battery in your Schlage lock is a simple but essential task that ensures your lock remains functional and secure. By following these 10 methods, you can easily change the battery and restore your lock to full working order. Regularly replacing the battery will help avoid malfunctions, low battery warnings, or being locked out of your home. Thanks for reading, and we hope this has given you some inspiration on How to change schlage lock battery!