
The camshaft position sensor, commonly referred to as the cam sensor, is a critical component in modern vehicle engines. It monitors the position and speed of the camshaft, helping to ensure proper timing for fuel injection and ignition. Over time, this sensor can wear out or fail, leading to poor engine performance, difficulty starting, or even stalling. Removing and replacing the cam sensor can seem intimidating, but with the right tools and guidance, it can be accomplished efficiently. This guide will walk you how to remove cam sensor.
What Is a Cam Sensor?
A cam sensor, or camshaft position sensor, is an essential component in an internal combustion engine. Its primary function is to monitor the position and rotational speed of the camshaft and relay this information to the engine control unit (ECU). This data allows the ECU to synchronize fuel injection and ignition timing accurately, ensuring optimal engine performance and efficiency.
By working in tandem with the crankshaft position sensor, the cam sensor helps maintain proper engine timing, which is crucial for smooth operation. A faulty cam sensor can disrupt this synchronization, leading to decreased performance, reduced fuel efficiency, and potential engine damage if not addressed promptly.
Common Reasons for Removal
There are several reasons why a cam sensor may need to be removed and replaced. One of the most common issues is sensor failure, which can occur due to wear and tear over time. Symptoms of a failing sensor include engine misfires, reduced fuel efficiency, and trouble starting the vehicle.
Additionally, the cam sensor might be damaged by debris or exposure to extreme temperatures, which can compromise its accuracy. Another reason for removal might be to inspect or replace the sensor as part of routine maintenance or during diagnostics if the check engine light is triggered. Addressing these issues promptly is crucial for maintaining optimal engine performance.
Symptoms of a Bad Camshaft Position Sensor
A faulty camshaft position sensor can lead to various performance issues in a vehicle. One of the most common symptoms is difficulty starting the engine, as the sensor plays a key role in providing accurate timing information. Drivers may also notice engine stalling or misfires, especially during acceleration or at idle.
Additionally, a significant drop in fuel efficiency can occur because the engine’s timing and fuel injection may be off without the proper data from the sensor. Another clear sign is the illumination of the check engine light on the dashboard, often accompanied by error codes related to the sensor. Rough idling, a noticeable loss of power, or hesitation when accelerating are also indicative of a failing camshaft position sensor. Addressing these symptoms promptly can prevent further damage to the engine or other components.
10 Methods How to Remove Cam Sensor
1. Begin with Proper Preparation and Safety Measures
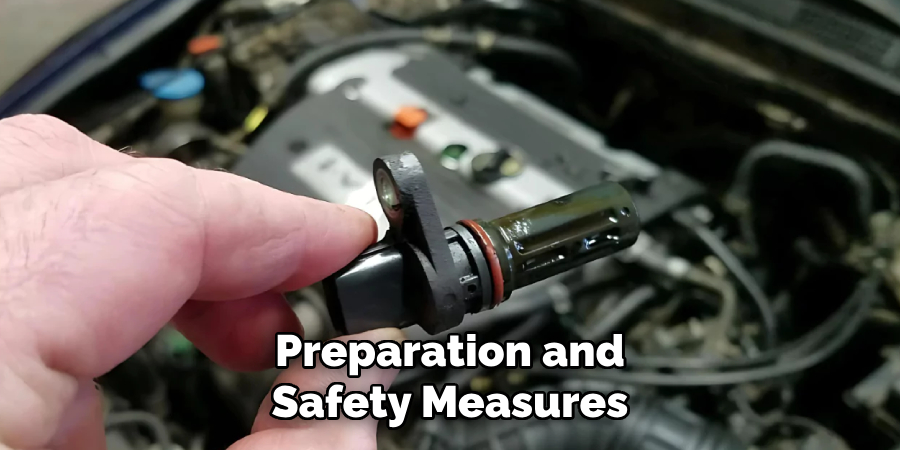
Before approaching any engine component, especially one as critical as the camshaft position sensor, it is vital to prioritize safety and preparation. Start by ensuring the vehicle is parked on a level surface and the engine is completely cool. Disconnect the negative terminal of the battery to prevent accidental electrical shorts or system resets.
Equip yourself with the necessary tools, including a ratchet set, screwdrivers, and potentially a torque wrench. Preparing your workspace with good lighting and laying out tools ahead of time will make the removal process smoother and safer.
2. Locate the Camshaft Position Sensor Specific to Your Engine
The location of the cam sensor varies depending on the make and model of the vehicle. In most engines, it’s found either on the cylinder head, near the valve cover, or mounted on the timing cover. Consult the vehicle’s service manual or a reliable online diagram to find the exact location. In some engines, the sensor may be obstructed by intake components, hoses, or other parts that may need to be carefully removed for clear access. Knowing the sensor’s position helps you plan your approach and prevents unnecessary disassembly.
3. Disconnect Any Coverings or Components Blocking Access
With the sensor located, the next step is to remove any components that might block your reach. This may include the engine cover, air intake hose, or plastic shrouds that limit visibility or access. Use a flathead screwdriver or ratchet to remove screws and clamps gently. Take care to note the orientation of each component for reassembly. If applicable, label vacuum lines or wire connections with masking tape. Keeping the area clear ensures you have room to work without accidentally damaging nearby parts.
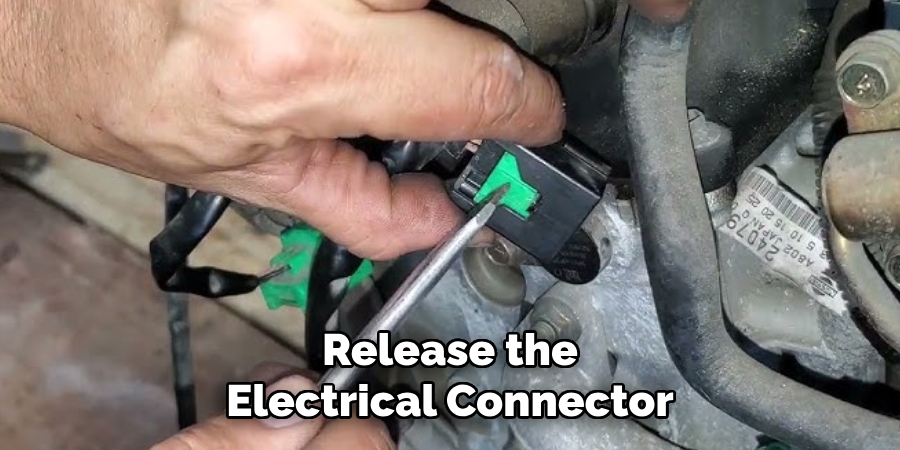
4. Examine and Release the Electrical Connector
The cam sensor is typically connected to the engine’s electrical system via a snap-lock connector. Before removing the sensor itself, carefully unclip or unplug the electrical harness attached to the sensor. These clips are often fragile, especially after heat cycles have made them brittle. Use a pick tool or a small flat screwdriver if needed to gently lift the locking tab. Tug lightly on the connector to separate it—do not force it or pull on the wires, as this can damage the connection.
5. Remove Sensor Mounting Bolts with the Correct Tool
The sensor is commonly held in place with one or two small bolts, usually 8mm or 10mm in size. Use the appropriate socket and ratchet to remove them, being cautious not to strip or drop them into the engine bay. In some cases, a small extension may be required to reach the bolts, especially if the sensor is mounted in a recessed area. Once loosened, set the bolts aside in a container or magnetic tray so they don’t get lost. The sensor may now be free to move or require gentle persuasion to release.
6. Gently Wiggle and Pull the Sensor from Its Mount
Once the bolts are out, the cam sensor may still be stuck in its seat due to grime, corrosion, or a tight O-ring seal. Carefully wiggle the sensor back and forth while pulling it outward. Avoid using metal tools to pry it loose, as this can damage the sensor housing or the engine block. If needed, spray a small amount of penetrating oil around the base and allow it to soak in. After it’s loosened, remove the sensor slowly and take note of its orientation for when you install the new one.
7. Inspect the Removed Sensor and Mounting Area
With the sensor removed, take a moment to inspect both the sensor and the mounting area. Look for signs of oil contamination, cracked plastic, or worn-out O-rings that could indicate why the sensor was failing. Also, inspect the sensor bore or mounting port for debris, corrosion, or buildup. Clean the area with a lint-free cloth and some electronic parts cleaner if necessary. This step ensures a clean surface for the new sensor and helps avoid poor contact or oil leaks.
8. Replace the Sensor if Necessary or Prepare for Cleaning

If the sensor removal was part of diagnostic work, now is the time to test it with a multimeter to determine if it is functioning properly. However, if you’re replacing the sensor outright, unpack the new part and confirm it matches the old one in size, shape, and electrical connector. Apply a light coat of dielectric grease to the O-ring of the new sensor if required, which will help it seat more smoothly and resist moisture. Ensure the replacement part is high quality and vehicle-specific for best performance.
9. Reinstall and Secure the New or Cleaned Sensor
Once you’re ready to install the new or cleaned sensor, align it carefully with the bore and gently press it in place. Reinsert the mounting bolts and tighten them securely but not excessively—over-torquing can crack the housing or damage the engine head. Refer to the vehicle’s service manual for specific torque values if you’re using a torque wrench. Reconnect the electrical connector until it clicks into place and double-check that the harness is routed away from hot or moving components.
10. Test the Repair and Clear Error Codes If Needed
Reconnect the battery, start the engine, and observe its operation. A properly installed cam sensor should result in smoother engine performance, improved timing, and no stalling or hard starts. If the check engine light was on prior to the sensor replacement, use an OBD-II scanner to clear any stored codes.
Monitor for reappearance of the error code or any misfires. It’s also wise to take the vehicle for a short test drive to ensure everything is functioning as expected. If problems persist, recheck the sensor connection and look for related faults such as wiring issues or timing chain misalignment.

Conclusion
Removing a camshaft position sensor is a manageable task with the right preparation, tools, and a bit of patience. By following these ten thorough methods, you ensure a safe removal process that preserves engine integrity and paves the way for a successful sensor replacement or cleaning. With careful attention to each step, you’ll not only restore optimal engine performance but also deepen your understanding of your vehicle’s timing and sensor systems. Thanks for reading our blog post on how to remove cam sensor! We hope you found it helpful and informative.