
Are you having trouble with your garage door not opening or closing as it should? One of the main reasons for this could be a faulty garage door sensor.

Garage door sensors are an essential safety component of any automatic garage door system. They ensure the door does not close on objects, pets, or people, preventing accidents and damage. However, when a sensor malfunctions, it can create inconvenience and even pose safety risks. Identifying whether your garage door sensor is faulty is crucial for resolving issues promptly and maintaining a properly functioning system.
This guide on how to tell if garage door sensor is bad will help you recognize the signs of a bad garage door sensor and provide insights into troubleshooting the problem effectively.
What Are the Benefits of a Garage Door Sensor?
Before diving into the ways to detect a bad garage door sensor, let’s first understand the importance and benefits of having one.
A garage door sensor is an essential safety feature that detects any obstruction or movement in the path of the closing garage door. It immediately stops or reverses the door’s movement, preventing accidents and damage to property or vehicles.
Aside from safety, a functioning garage door sensor also brings convenience. You no longer have to manually check if anything is blocking the door before closing it. The sensor does it for you, making your daily routine easier and faster.
What Will You Need?
To install a garage door sensor, you will need the following tools and materials:
- Garage door sensor kit (usually includes sensors, wires, and mounting hardware)
- Screwdriver
- Drill (if required for installation on concrete or brick walls)
- Electric drill (if wiring is necessary)
- Wire strippers (if wiring is needed)
- Screws or adhesive strips (depending on the type of mounting)
- Power source for wired sensors (such as an outlet or battery)
It’s important to note that the specific tools and materials needed may vary depending on the type and brand of garage door sensor you choose. It’s best to read the manufacturer’s instructions carefully before purchasing or starting installation.
8 Signs on How to Tell if Garage Door Sensor is Bad
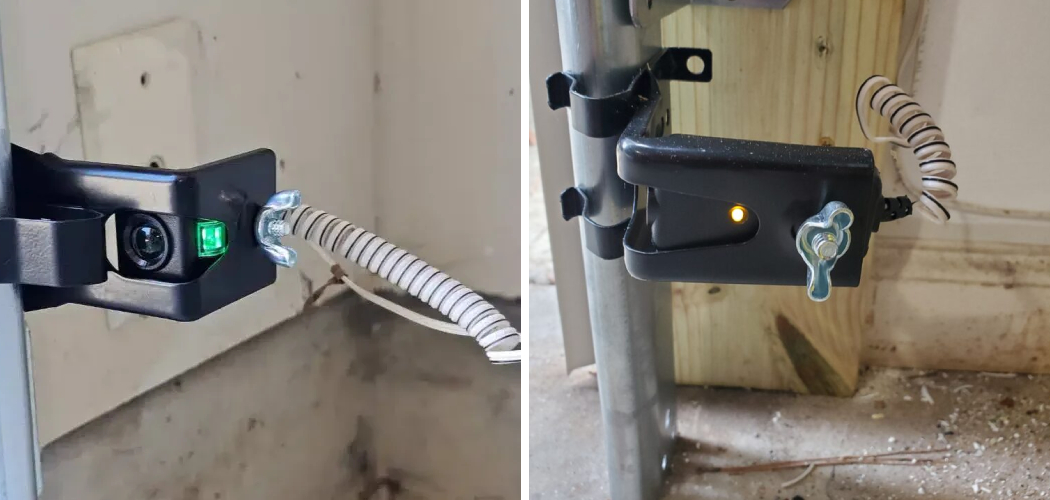
Step 1: Check Sensor Lights
The sensor lights are usually the first indicator of whether your garage door sensor functions correctly. Most garage door sensors have small LED lights on each sensor unit. These lights are a status indicator and can provide vital clues about potential issues. To check them, inspect both sensors positioned on either side of the garage door, near the floor.
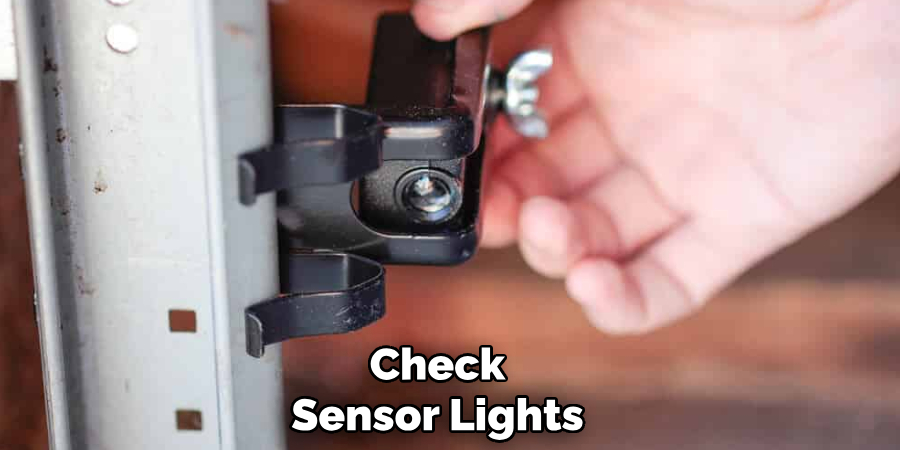
A steady, solid light indicates that the sensors are aligned and working as expected. However, if one or both lights are flickering, dim, or off entirely, it could mean there’s an issue. Misalignment is one common cause of this problem, where the sensors may not be directly aligned to create the necessary infrared beam. Dirt or debris covering the lenses can also obstruct the light beam, causing malfunction.
Step 2: Test with a Different Sensor
If cleaning and realigning the sensors do not resolve the issue, testing with a different sensor can help identify whether the problem lies with the device itself. Begin by obtaining a compatible replacement sensor from the manufacturer or an authorized dealer.
Disconnect the power supply before installing the new sensor to ensure safety during the process. Swap out the potentially faulty sensor with the replacement, ensuring it is properly secured and aligned. Reconnect the power and observe whether the indicator lights return to their normal steady state.
If the new sensor works correctly, the original sensor is likely defective and must be permanently replaced. On the other hand, if the issue persists despite replacing the sensor, the problem may be related to the wiring or the garage door opener unit.
Step 3: Test the Garage Door Operation
After addressing the sensor issue, test the garage door’s operation to ensure it functions properly. Use the garage door remote or wall-mounted control to open and close the door. Observe its movement closely, checking for any unusual noises, erratic behavior, or incomplete closure.
Additionally, ensure that the safety reverse mechanism activates correctly by placing an object in the sensor’s path. If the door reverses as it should, the system is working as intended. If problems persist, further troubleshooting or professional assistance may be required.
Step 4: Lubricate Moving Parts
Regular lubrication of the garage door’s moving parts is essential to maintaining smooth operation and extending its lifespan. Use a high-quality garage door lubricant on the rollers, hinges, tracks, and springs. Avoid applying excessive lubricant, as this can attract debris and create build-up.
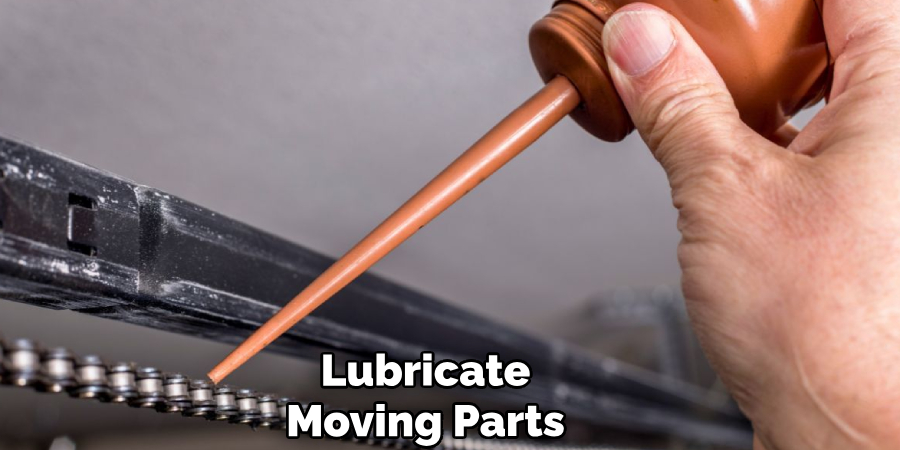
After applying, operate the door a few times to distribute the lubricant evenly. Proper lubrication reduces friction and minimizes noise, ensuring the system functions efficiently.
Step 5: Check and Tighten Hardware
Over time, the hardware on a garage door can loosen due to frequent use and vibrations. Inspect all bolts, screws, and brackets holding the door and its tracks in place.
Use a socket wrench to tighten any loose fasteners, but avoid over-tightening, as this could damage the hardware. Ensuring secure hardware will enhance your garage door’s stability and smooth operation.
Step 6: Inspect Safety Features
Garage door systems are equipped with safety features such as auto-reverse sensors, which detect any obstruction in the path of the closing door and reverse its direction. It is crucial to regularly test these safety features to ensure they are functioning correctly.
To do this, place a small object, like a roll of paper towels, in the path of the closing door and see if it reverses upon contact. You may need to clean or adjust the sensor if it doesn’t.
Step 7: Inspect and Maintain Your Garage Door
Regularly inspecting and maintaining your garage door are crucial to ensure it operates safely and efficiently. Begin by visually examining all components, including the springs, cables, rollers, and tracks. Look for signs of wear, rust, or damage, which could indicate the need for repairs or replacement.
Lubricating moving parts, such as hinges and rollers, with a suitable garage door lubricant can reduce friction and prolong the lifespan of these components. Additionally, check the door’s balance by disconnecting the automatic opener and manually lifting the door halfway. The springs may need adjustment or replacement if they don’t stay in place. Lastly, clean the tracks to remove any dirt or debris that could obstruct the smooth movement of the door.
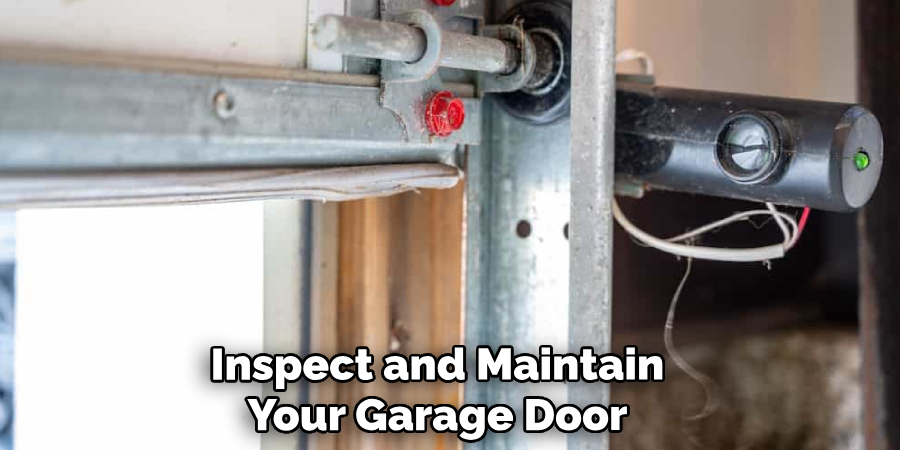
By performing these maintenance tasks regularly, you can prevent potential issues, reduce repair costs, and ensure the safety and reliability of your garage door system.
Step 8: Keep an Eye on Your Garage Door
Regularly inspecting your garage door can also help prevent potential issues and ensure its smooth operation. Look for any signs of wear and tear, such as frayed cables or loose hardware, and address them promptly to avoid further damage.
Pay attention to any unusual noises or jerky movements when opening or closing the door is also important. These could indicate underlying problems that must be addressed before becoming more serious.
In addition, make sure to check the safety features of your garage door, such as the sensors that detect objects in its path. These should be tested periodically to ensure they function properly and will stop the door from closing if something is in the way.
By following these tips and regularly maintaining your garage door, you can ensure its smooth operation and extend its lifespan.
5 Things You Should Avoid
- Ignoring Warning Signs
Avoid ignoring clear indications that the sensor might malfunction, such as the garage door not closing properly or reversing unexpectedly. Address these issues as soon as they arise to prevent potential damage or accidents.
- Performing Unnecessary Force on the Door
Forcing the garage door to close manually when the sensor malfunctions can lead to further damage to the door or the motor. Always troubleshoot and resolve sensor issues before attempting to close the door.
- Neglecting to Clean the Sensors
Dust, dirt, or cobwebs can block the sensor’s beam, leading to improper functioning. Avoid neglecting regular cleaning of the sensors to ensure they operate correctly.

- Bypassing or Disabling the Sensors
It can be tempting to bypass or override garage door sensors when they are malfunctioning. However, this compromises the door’s safety features and can pose significant hazards, such as injury or property damage.
- Skipping Professional Inspection
Attempting complex repairs on your own without adequate knowledge can worsen the problem. Avoid skipping professional inspection and repair when the sensor issues go beyond basic troubleshooting.
Conclusion
Identifying a faulty garage door sensor requires observing for key signs such as unresponsive door movement, blinking sensor lights, or misaligned components.
Regular maintenance and cleaning can resolve minor issues, but persistent problems indicate that the sensor may need to be repaired or replaced. Always prioritize safety by seeking professional assistance for complex sensor issues to ensure optimal functionality and prevent potential hazards.
Hopefully, the article on how to tell if garage door sensor is bad has provided valuable information on identifying and resolving sensor problems.