

Sliding doors are a convenient and space-saving feature in many homes, but over time, their rollers can wear out, making the door difficult to open or close smoothly. Replacing the rollers is a practical solution to restore functionality and ensure the door operates effortlessly. This guide will walk you through the steps of how to replace rollers on a sliding door, even if you’re new to DIY projects.

Importance of Rollers
Rollers are a crucial component of sliding doors as they enable smooth and effortless movement along the track. High-quality rollers ensure that the door glides easily, reducing strain on the frame and preventing unnecessary wear on the track. When rollers are in good condition, they contribute to the overall energy efficiency of the door by ensuring it closes securely, which can help maintain indoor temperatures. Additionally, functional rollers enhance safety by preventing the door from jamming or sticking, which could pose a hazard during emergencies. Proper maintenance and timely replacement of worn-out rollers are essential to keep your sliding door in optimal condition.
Signs That Your Sliding Door Rollers Need Replacing
Over time, sliding door rollers can wear out or become damaged, leading to a variety of performance issues. Here are some common signs that indicate it may be time to replace your sliding door rollers:
Difficulty Opening or Closing the Door
If your sliding door feels heavy or requires excessive force to move, the rollers may be worn or misaligned.
Unusual Noises
Grinding, squeaking, or other unusual sounds when operating the door are often caused by damaged or dirty rollers.
Door Sticking or Jamming
A door that gets stuck or does not slide smoothly along the track might have deteriorating rollers that need attention.
Visible Damage or Wear
Inspect the rollers for cracks or deformation. Any visible signs of wear suggest they are no longer functioning as intended.
Door Misalignment
If the sliding door appears uneven or out of alignment, faulty rollers might be the source of the problem.
Types of Rollers for Sliding Doors
Sliding door rollers come in various types to suit different door designs and weight capacities. Understanding the types of rollers available can help in selecting the most suitable option for your door. Below are some common types:
Single-Wheel Rollers
These are the most basic type of rollers, featuring a single wheel that supports and guides the door along the track. They are typically found in lightweight sliding doors.
Double-Wheel Rollers
Designed for heavier doors, double-wheel rollers provide increased support and stability. They distribute the door’s weight more evenly, reducing wear on the track and enhancing durability.
Ball-Bearing Rollers
Ball-bearing rollers are engineered for smooth and quiet operation. The built-in bearings reduce friction, making them ideal for frequently used doors.
Nylon Rollers
These rollers feature nylon wheels that glide quietly and are well-suited for applications where noise reduction is essential. They also resist corrosion, making them a good option for humid or outdoor environments.
Metal Rollers
More robust and long-lasting, metal rollers are typically used for heavy-duty sliding doors. They can withstand significant weight and are resistant to wear and tear.
10 Methods How to Replace Rollers on a Sliding Door
1. Assess the Condition of the Rollers
Before you begin replacing the rollers on your sliding door, it’s important to assess their condition. Look for any signs of wear, such as cracks, chips, or flattening of the roller wheels. Also, check for any visible debris or dirt that may be obstructing the movement of the rollers. If the door is sticking, unevenly aligned, or making noise, these could be signs that the rollers need to be replaced. Once you confirm the issue, you can proceed with the replacement process.

2. Gather the Necessary Tools
Before starting the roller replacement, ensure you have all the necessary tools. Common tools required include a flathead screwdriver, a Phillips screwdriver, pliers, a hammer, and a new set of rollers compatible with your door model. You may also need a measuring tape to ensure the replacement rollers fit properly. Additionally, having a towel or blanket on hand to protect the door and floor from damage during the removal process is a good idea.
3. Remove the Sliding Door from Its Track
To replace the rollers, you’ll need to remove the sliding door from its track. Begin by unlocking the door and opening it slightly. If there are screws securing the door to the frame, use your screwdriver to remove them. Some doors may have a stop or retention bracket at the top or bottom that prevents the door from being lifted out of the track. Carefully remove any screws or clips that hold these stops in place. Once the door is free from the track, gently lift it out and place it on a soft surface like a towel or blanket to avoid scratches.
4. Inspect the Track for Damage
While the door is off the track, take the time to inspect the track for any signs of damage, dirt, or debris. A damaged or obstructed track can prevent the new rollers from functioning properly. If you find any dirt or buildup, clean the track thoroughly with a soft cloth and a cleaning solution. You can also use a vacuum to remove debris from the track’s interior. If the track is bent or damaged, it may need to be repaired or replaced before installing the new rollers.

5. Remove the Old Rollers
Next, remove the old rollers from the door. Rollers are typically secured with screws, which you can remove using a screwdriver. If the roller is stuck, you may need to use pliers to gently pry it out of its housing. Some sliding doors have rollers that are adjustable, allowing you to change the height or tension. If your door has adjustable rollers, you’ll need to lower them as far as they will go to remove them. Take note of how the old rollers are installed, as this will guide you in installing the new ones.
6. Measure and Select the Right Replacement Rollers
Choosing the right replacement rollers is essential for ensuring smooth operation of the sliding door. Measure the diameter and width of the old rollers to find a suitable replacement. It’s important that the new rollers match the specifications of the original ones to ensure compatibility with the track and door frame. You can purchase replacement rollers at most home improvement stores or online, and many manufacturers offer specific rollers for sliding doors of different models. Make sure to select high-quality rollers for a smooth and long-lasting operation.
7. Install the New Rollers
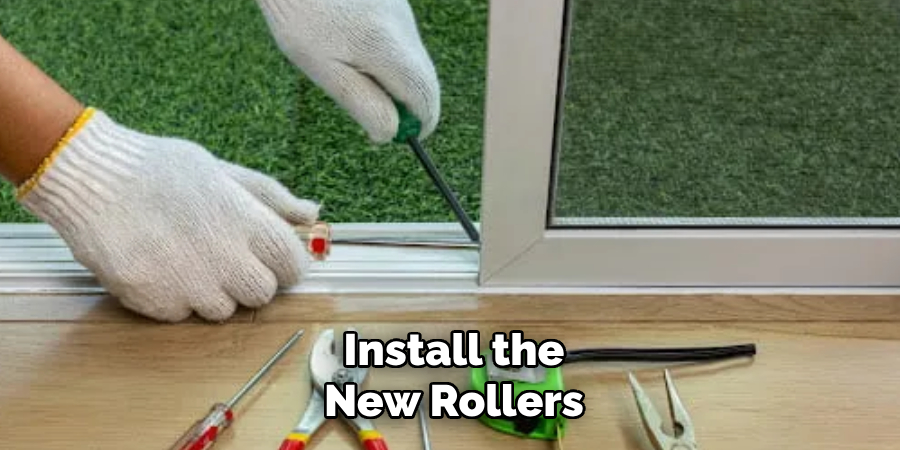
Once you have the correct replacement rollers, it’s time to install them onto the door. Begin by positioning the new rollers in the same way the old ones were installed. Most rollers have a mounting bracket or housing that fits into a slot on the bottom of the door. Use a screwdriver to secure the rollers in place, ensuring that they are tightly fastened. If your new rollers are adjustable, make sure to set them to the correct height to ensure the door will slide smoothly along the track.
8. Reinstall the Door onto the Track
After the new rollers are securely in place, it’s time to reinstall the sliding door onto the track. Carefully lift the door and position the rollers onto the track. Make sure the rollers are aligned with the track’s grooves, and slowly lower the door onto the track. You may need to adjust the height of the door to ensure it sits properly within the track. Once the door is in place, test its movement to check if it slides smoothly and evenly. If the door is not moving smoothly, you may need to adjust the roller height or check the track for any obstructions.
9. Check and Adjust the Roller Height
To ensure optimal performance, it’s important to check and adjust the roller height after reinstalling the door. Sliding doors are often adjustable, allowing you to raise or lower the rollers to achieve the correct door alignment. Use the adjustment screws on the rollers to make these changes. Lower the rollers if the door is sitting too high and raise them if the door is sitting too low. The door should glide smoothly along the track without any wobbling or binding. Test the door’s movement after each adjustment to ensure it’s operating correctly.
10. Secure the Door and Perform a Final Test
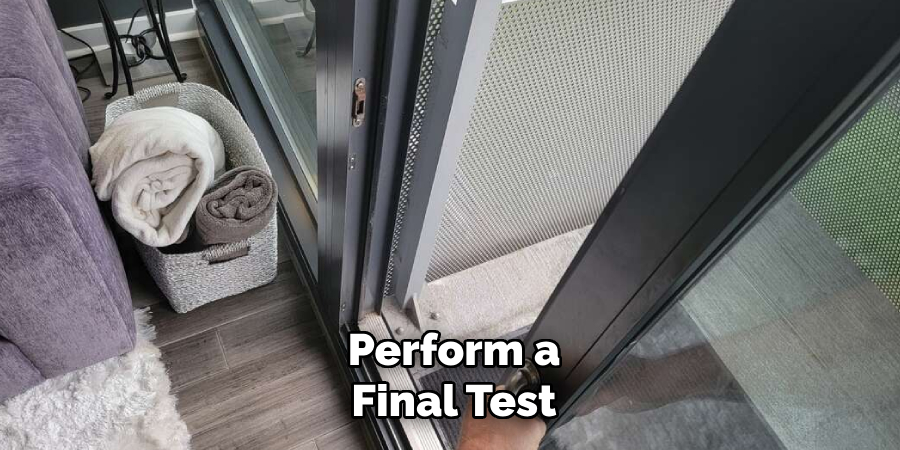
Once the rollers are adjusted, and the door is moving smoothly, secure any retaining clips, screws, or stops that were removed earlier. Reattach any stops or brackets that were holding the door in place. Finally, perform a final test of the door’s functionality by sliding it open and closed several times. Ensure that it operates smoothly and that the rollers are functioning as expected. If the door continues to make noise or feels difficult to slide, recheck the roller installation and track condition for any issues.
Conclusion
Replacing the rollers on a sliding door is a straightforward process that can significantly improve the door’s performance. By following these ten methods, you can successfully replace the old rollers and restore smooth operation to your sliding door. Remember to assess the condition of the rollers before starting, choose the correct replacement parts, and ensure proper installation to achieve the best results. So, there you have it – a quick and easy guide on how to replace rollers on a sliding door.
About
Safety Fic is a distinguished figure in the world of Diy design, with a decade of expertise creating innovative and sustainable Diy solutions. His professional focus lies in merging traditional craftsmanship with modern manufacturing techniques, fostering designs that are both practical and environmentally conscious. As the author of diy, Safety Fic delves into the art and science of Safety Fic-making, inspiring artisans and industry professionals alike.
Education RMIT University
(Melbourne, Australia) Associate Degree in Design (Safety Fic) Focus on sustainable design, industry-driven projects, and practical craftsmanship. Gained hands-on experience with traditional and digital manufacturing tools, such as CAD and CNC software.
Nottingham Trent University
(United Kingdom) Bachelor’s in diyfastly.com and Product Design (Honors) Specialized in product design with a focus on blending creativity with production techniques. Participated in industry projects, working with companies like John Lewis and Vitsoe to gain real-world insights.
Publications and Impact
In diy, Safety Fic his insights on indoor design processes, materials, and strategies for efficient production. His writing bridges the gap between artisan knowledge and modern industry needs, making it a must-read for both budding designers and seasoned professionals.