

The oxygen sensor, often called an O2 sensor, is a crucial component in modern vehicles. It monitors the level of oxygen in the exhaust gases and provides feedback to the engine control unit (ECU) to optimize fuel combustion and reduce emissions. A malfunctioning O2 sensor can cause poor fuel efficiency, higher emissions, and even engine performance issues.
Replacing an oxygen sensor yourself can save money compared to taking your car to a mechanic, while also allowing you to learn valuable automotive repair skills. With proper tools, safety precautions, and step-by-step guidance on how to replace oxygen sensor, even a beginner can successfully replace an O2 sensor and restore optimal vehicle performance.
Why Replace an Oxygen Sensor?
1. Maintain Fuel Efficiency
A failing oxygen sensor can send incorrect signals to the engine control unit (ECU), causing the engine to burn more fuel than necessary. This leads to reduced fuel efficiency and higher fuel costs. Replacing the sensor restores proper fuel-air mixture, improving mileage.
2. Reduce Harmful Emissions
Oxygen sensors monitor exhaust gases to ensure complete combustion. A faulty sensor can cause the engine to run rich or lean, increasing harmful emissions. Replacing the sensor helps your vehicle meet emission standards and reduces environmental impact.
3. Protect the Catalytic Converter
A malfunctioning O2 sensor can cause excessive unburned fuel to enter the catalytic converter, potentially damaging it over time. Since catalytic converters are expensive to replace, maintaining a functioning oxygen sensor prevents costly repairs.
4. Improve Engine Performance
Symptoms like rough idling, misfires, or hesitation during acceleration are often linked to a failing oxygen sensor. Replacing it ensures smoother engine operation, better acceleration, and overall improved performance.
5. Prevent Check Engine Light Issues
A faulty oxygen sensor often triggers the check engine light. Timely replacement eliminates false alerts and allows you to monitor other potential issues accurately.
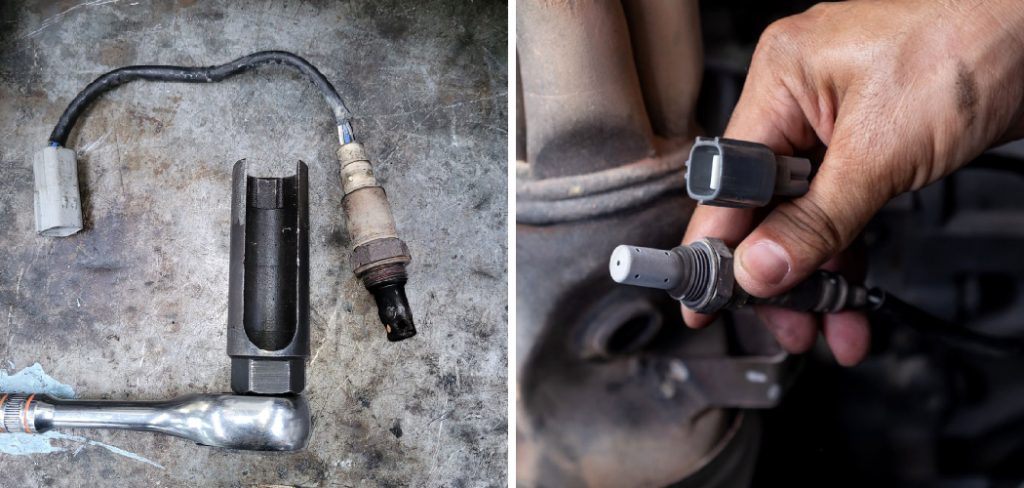
Tools and Materials You’ll Need
- Replacement oxygen sensor (ensure it matches your vehicle’s make and model)
- Oxygen sensor socket or open-ended wrench
- Ratchet and socket set
- Penetrating oil (like WD-40)
- Anti-seize compound (usually comes with the new sensor)
- Jack and Jack stand on ramps
- Safety goggles and gloves
- Torque wrench (optional but recommended)
- Vehicle repair manual or OBD-II scanner (optional for diagnostics)
9 Simple Step-by-step Guidelines on How to Replace Oxygen Sensor
Step 1: Identify the Faulty Oxygen Sensor
Before replacing the sensor, determine which one is malfunctioning. Modern cars typically have multiple O2 sensors—one or more upstream (before the catalytic converter) and one or more downstream (after the catalytic converter).

Use an OBD-II scanner to read diagnostic trouble codes (DTCs) from the ECU. Codes such as P0130 or P0150 indicate O2 sensor issues. Identifying the correct sensor ensures you replace only the faulty one and avoid unnecessary work or expense.
Step 2: Prepare Your Vehicle
Park the vehicle on a flat surface and engage the parking brake. Allow the engine and exhaust to cool completely before working under the car, as the exhaust system can become extremely hot.
Use jack stands or ramps to elevate the vehicle safely if the sensor is located underneath. Safety is paramount; never work under a vehicle supported only by a jack. Gloves and goggles protect you from sharp edges and debris.
Step 3: Locate the Oxygen Sensor
Consult your vehicle manual to find the exact location of the faulty O2 sensor. Most are threaded into the exhaust manifold or exhaust pipe and have a wire leading to a connector near the engine bay.
Familiarize yourself with the sensor’s orientation and wiring path. Proper identification avoids mistakes and reduces the risk of damaging other components during removal.
Step 4: Disconnect the Sensor Wiring
Unplug the electrical connector that connects the oxygen sensor to the vehicle’s wiring harness. Inspect the connector for corrosion, dirt, or damaged pins, as this can affect the new sensor’s performance.
Handle the connector carefully. Forcing it apart can damage the wiring, leading to additional repairs or replacement. Clean the connector if necessary using electrical contact cleaner.

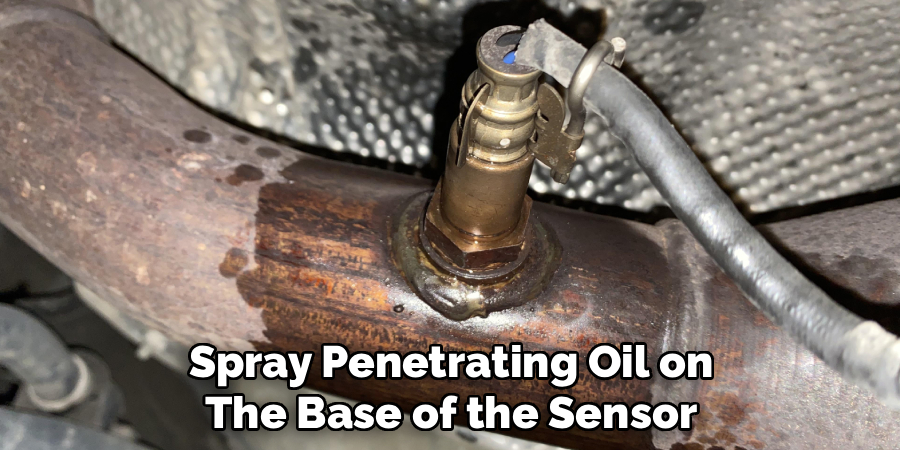
Step 5: Apply Penetrating Oil
Spray penetrating oil on the base of the sensor where it threads into the exhaust. Let it soak for several minutes to loosen rust, corrosion, or seized threads.
This step makes sensor removal easier and reduces the risk of breaking the sensor or damaging the exhaust. If the sensor is extremely corroded, you may need to allow the oil to soak longer or gently tap the sensor with a wrench to loosen it.
Step 6: Remove the Old Oxygen Sensor
Use an oxygen sensor socket or open-ended wrench to unscrew the sensor from the exhaust manifold or pipe. Turn counterclockwise carefully and maintain steady pressure to avoid stripping threads.
Once removed, compare the old sensor with the new one to ensure they match. Inspect the threads on the exhaust pipe for damage; if the threads are damaged, consider using a thread repair kit.
Step 7: Prepare the New Sensor
Apply a thin layer of anti-seize compound to the threads of the new oxygen sensor. Avoid getting any compound on the sensor tip, as this can interfere with proper readings.
This step ensures easy removal in the future and prevents the sensor from seizing in the exhaust. Check the manufacturer’s instructions, as some sensors come pre-coated with anti-seize.
Step 8: Install the New Sensor
Thread the new sensor into the exhaust carefully, turning clockwise by hand to avoid cross-threading. Once hand-tightened, use the sensor socket to snug it down. Do not overtighten, as this can strip threads or damage the sensor.
Reconnect the electrical connector securely. Ensure the wiring is routed safely away from hot or moving parts to prevent melting or disconnection.
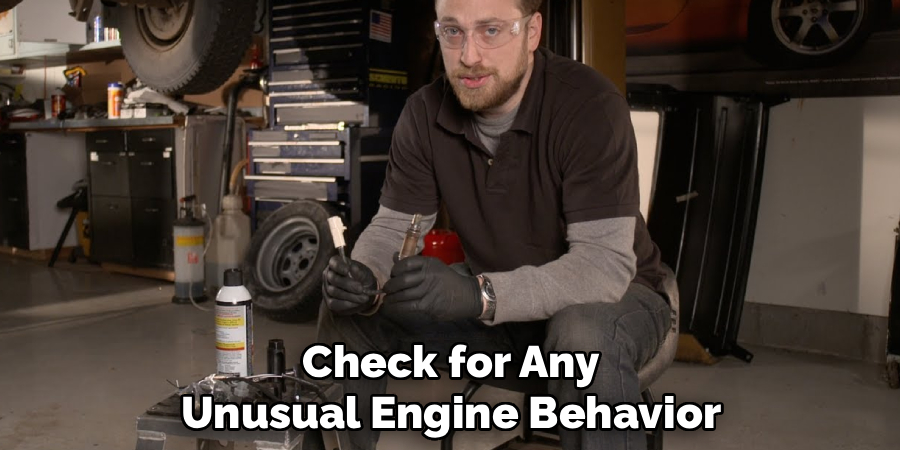
Step 9: Test the Installation
Lower the vehicle and start the engine. Use an OBD-II scanner to clear any existing trouble codes and monitor live data from the new sensor. Check for error codes, engine warning lights, or unusual engine behavior.
Allow the engine to run for several minutes while observing the sensor’s readings. Proper operation confirms that the sensor replacement was successful and your vehicle is ready for normal use.
Following these steps on how to replace oxygen sensor on your vehicle will ensure that you have a properly functioning sensor, which is crucial for the efficient operation of your vehicle. Regularly checking and replacing faulty oxygen sensors can help improve fuel efficiency, reduce emissions, and prevent potential engine damage.
Additional Tips
- Always work with a cool engine to avoid burns from hot exhaust components.
- Label the sensor wiring if multiple connectors are nearby to avoid confusion.
- Use a torque wrench to tighten the sensor to the manufacturer’s specifications for proper sealing.
- Keep penetrating oil and anti-seize compound handy for future maintenance.
- Consider replacing multiple sensors if they are the same age to prevent repeated labor.
- Use OBD-II diagnostics to confirm the new sensor is functioning correctly.
Common Mistakes to Avoid
- Attempting to remove the sensor without cooling the exhaust first.
- Damaging the sensor wiring or connector while unplugging it.
- Over-tightening the new sensor wan strip threads or breaking it.
- Applying anti-seize compound to the sensor tip can cause inaccurate readings.
- Failing to clear diagnostic codes after replacement keeps the check engine light on.
Do You Need To Use Professionals?
While replacing an oxygen sensor is often a manageable DIY task, professional help may be needed in some cases. Complications can arise if the sensor is corroded, located in a hard-to-reach area, or if your vehicle has advanced emissions systems.
Professional mechanics have specialized tools, including oxygen sensor sockets and diagnostic equipment, to ensure safe removal and installation. They can also test for exhaust leaks, wiring issues, or other related problems that could affect sensor performance.
If you are not confident with electrical or exhaust system work, or if the sensor is seized, hiring a professional is recommended. It reduces the risk of injury, vehicle damage, or future sensor failures.
How Much Will It Cost?
The cost of replacing an oxygen sensor varies by vehicle make, model, and the type of sensor. Basic sensors range from $20–$50, while high-performance or OEM sensors can cost $100–$250.
If hiring a mechanic, labor charges can range from $50–$150, depending on the complexity and location of the sensor. Overall, DIY replacement saves money and allows you to learn valuable maintenance skills, but professional installation provides assurance and convenience.
Frequently Asked Questions
Q1: How Do I Know If My Oxygen Sensor Needs Replacement?
A1: Common signs include poor fuel efficiency, rough idling, engine misfires, or a check engine light. OBD-II scanners can provide specific trouble codes indicating a failing O2 sensor. Early replacement prevents damage to the catalytic converter.
Q2: Can I Drive With a Faulty Oxygen Sensor?
A2: While the vehicle may still run, driving with a malfunctioning sensor can reduce fuel efficiency, increase emissions, and potentially damage the catalytic converter. Prompt replacement is recommended for safety and optimal performance.
Q3: How Long Does an Oxygen Sensor Last?
A3: Most oxygen sensors last between 60,000–100,000 miles. Factors like fuel quality, driving habits, and engine conditions can affect longevity. Regular inspection helps detect early signs of failure.
Q4: Is It Safe to Replace an Oxygen Sensor Myself?
A4: Yes, with proper tools, safety precautions, and guidance. Make sure the engine is cool, the vehicle is securely elevated, and you follow the step-by-step process. For complicated installations or hard-to-reach sensors, professional help is advisable.
Conclusion
Replacing an oxygen sensor is a vital maintenance task that ensures proper engine performance, fuel efficiency, and reduced emissions. By following step-by-step instructions on how to replace oxygen sensor, using the right tools, and taking safety precautions, you can successfully replace the sensor yourself.
DIY replacement saves money, builds mechanical skills, and allows you to maintain your vehicle proactively. Whether you choose to do it yourself or hire a professional, a timely replacement ensures your vehicle runs efficiently and avoids costly damage to other components.
About
Safety Fic is a distinguished figure in the world of Diy design, with a decade of expertise creating innovative and sustainable Diy solutions. His professional focus lies in merging traditional craftsmanship with modern manufacturing techniques, fostering designs that are both practical and environmentally conscious. As the author of diy, Safety Fic delves into the art and science of Safety Fic-making, inspiring artisans and industry professionals alike.
Education RMIT University
(Melbourne, Australia) Associate Degree in Design (Safety Fic) Focus on sustainable design, industry-driven projects, and practical craftsmanship. Gained hands-on experience with traditional and digital manufacturing tools, such as CAD and CNC software.
Nottingham Trent University
(United Kingdom) Bachelor’s in diyfastly.com and Product Design (Honors) Specialized in product design with a focus on blending creativity with production techniques. Participated in industry projects, working with companies like John Lewis and Vitsoe to gain real-world insights.
Publications and Impact
In diy, Safety Fic his insights on indoor design processes, materials, and strategies for efficient production. His writing bridges the gap between artisan knowledge and modern industry needs, making it a must-read for both budding designers and seasoned professionals.