
In a modern workspace, organizing and managing cables is essential for both functionality and aesthetics. Tangled wires and an excessive number of cables not only create a cluttered environment but also pose safety hazards, such as tripping and electrical shocks. One practical solution to these problems is learning how to mount a power strip under a desk. This technique significantly reduces clutter by keeping cables off the floor and out of sight, thus improving the overall accessibility of power sources.
Furthermore, it enhances safety by preventing accidental unplugging or cramming of cables in confined spaces. The steps involved include assessing your workspace and power needs, gathering necessary tools and materials, preparing the desk area, installing mounting brackets or adhesive strips, attaching the power strip, managing cables, and finally testing the setup to ensure everything works perfectly.
Understanding the Workspace and Power Needs
Before mounting a power strip under your desk, it is crucial to assess the number and types of devices that require power. Take inventory of all the electronic equipment you regularly use in your workspace, such as computers, monitors, printers, and chargers. Identify their power requirements and note any special needs, like devices that demand continuous power or have higher wattage consumption. This assessment ensures you choose a power strip that accommodates all your devices efficiently.
Next, select the right power strip by considering factors such as the number of outlets, surge protection, and additional features like USB ports. A power strip with enough outlets to support all your devices helps avoid overloading and minimizes the need for additional extensions. Surge protection is vital for safeguarding your electronics against voltage spikes, while USB ports offer convenient charging options for mobile devices.

Finally, decide on the optimal location for the power strip under your desk. Aim for a spot that balances accessibility and minimal cable visibility. The power strip should be easy to reach for plugging and unplugging devices without being exposed to foot traffic or accidental kicks. Position it so that cables can be neatly routed and secured, enhancing your workspace’s functionality and aesthetics.
Tools and Materials Needed
List of Tools:
- Screwdriver
- Drill
- Measuring tape
- Pencil
List of Materials:
- Power strip
- Mounting brackets or adhesive strips
- Screws
- Cable ties
Optional:
- Level
- Power drill bits
- Double-sided tape
Preparing the Desk and Work Area
To mount a power strip under your desk, first clear the area beneath the desk. Remove any items or obstacles hindering access or impairing the installation process. A clear workspace ensures ease of movement and prevents accidental damage to existing equipment or cables.
Next, use a measuring tape and pencil to measure and mark the exact location where you intend to mount the power strip. This step ensures precision, allowing for a more organized and aesthetically pleasing setup. Carefully align these markings with the edge of the desk to maintain symmetry and ease of access.

Finally, inspect the chosen location to ensure it is free from obstructions or hazards. Check for any structural components, hidden cables, or other elements that might interfere with mounting the power strip. You can confidently proceed to the mounting stage by ensuring a clean and safe workspace.
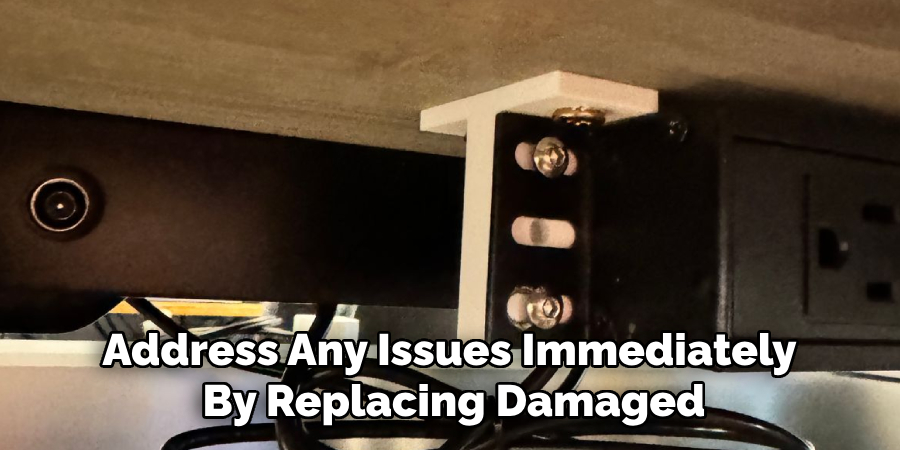
Installing the Mounting Brackets or Adhesive Strips
Step-by-Step Guide to Installing Mounting Brackets
- Holding the Brackets Against the Marked Location:
Begin by positioning the mounting brackets against the previously marked locations under the desk. Ensure the brackets align perfectly with the markings to maintain symmetry and balance.
- Drilling Pilot Holes if Necessary:
If your desk is made of sturdy material like wood, pilot holes may be required to facilitate the insertion of screws. Use a drill and appropriately sized drill bit to create pilot holes at the marked locations. This will help prevent the wood from splitting and make it easier to secure the brackets.
- Securing the Brackets with Screws:
Once the pilot holes are drilled, position the brackets again and secure them using screws. Use a screwdriver or a power drill to tighten the screws, ensuring the brackets are firmly and securely attached to the desk. Double-check their stability before proceeding to attach the power strip.
Step-by-Step Guide to Using Adhesive Strips
- Cleaning the Surface of the Desk and the Power Strip:
Adhesive strips require clean surfaces for proper adhesion. Use a damp cloth or an appropriate cleaning solution to wipe down the desk’s underside and the power strip’s mounting side. Allow the surfaces to dry completely.
- Applying the Adhesive Strips to the Power Strip:
Remove the protective backing from one side of the adhesive strips and apply them to the power strip. Press the strips firmly against the power strip to ensure they adhere properly.
- Pressing the Power Strip Firmly onto the Marked Location:
Remove the remaining protective backing once the adhesive strips are securely attached to the power strip. Align the power strip with the marked locations under the desk and press it firmly against the surface. Hold it in place for a few seconds to ensure the adhesive bonds well with the desk.
By following these steps, you’ll successfully install the mounting brackets or adhesive strips, creating a secure base for your power strip.
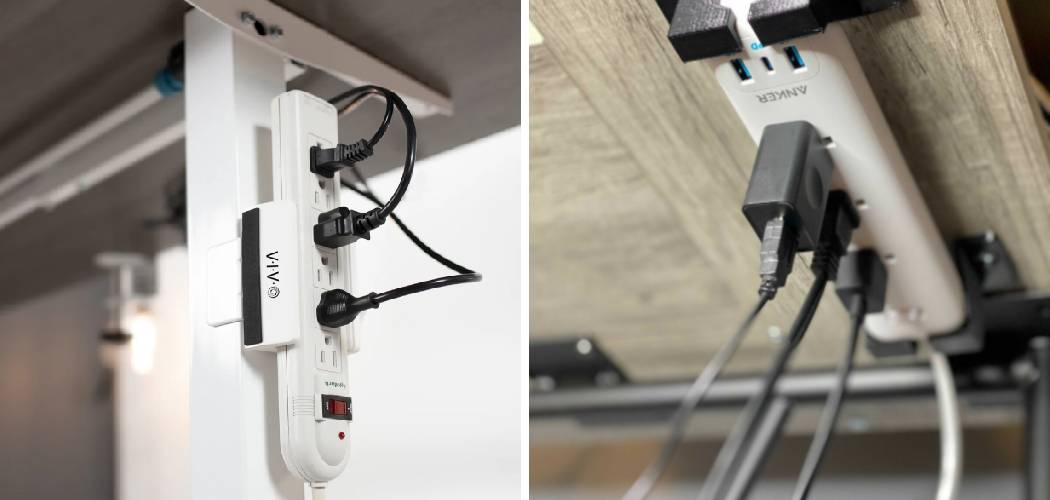
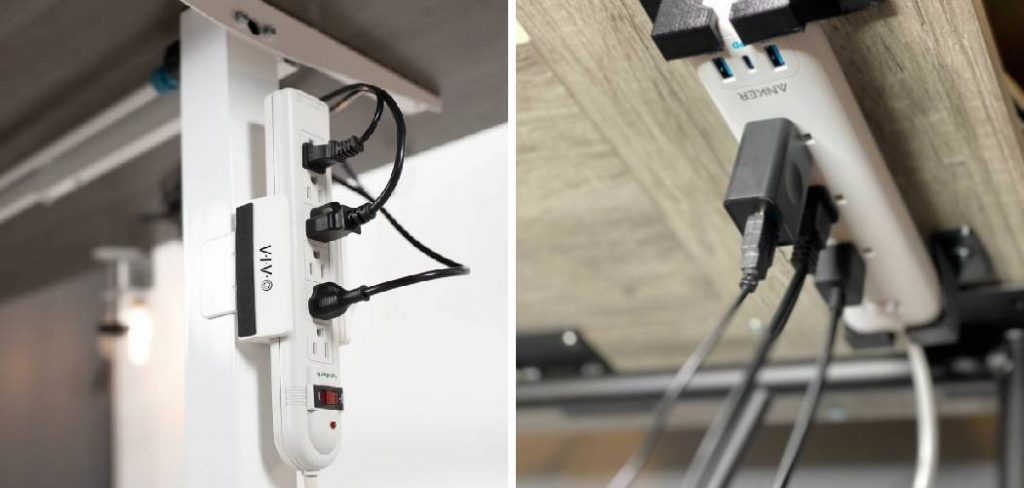
How to Mount a Power Strip Under a Desk: Mounting the Power Strip
Attaching the Power Strip to the Mounted Brackets or Adhesive Strips
It’s time to securely attach the power strip with the mounting brackets or adhesive strips. If you’ve opted for mounting brackets, align the power strip’s mounting holes with the brackets. Once aligned, slide or snap the power strip into place, ensuring it fits snugly against the brackets. For power strips without dedicated mounting holes, use cable ties to secure the power strip to the brackets, threading the ties through the brackets and around the power strip to hold it firmly in position.
When using adhesive strips, carefully align the power strip with the marked locations under the desk, ensuring that the adhesive side faces the desk surface. Press the power strip firmly against the adhesive strips, applying even pressure along the entire strip length. Hold it in place for several seconds to ensure the adhesive bonds strongly with the desk.
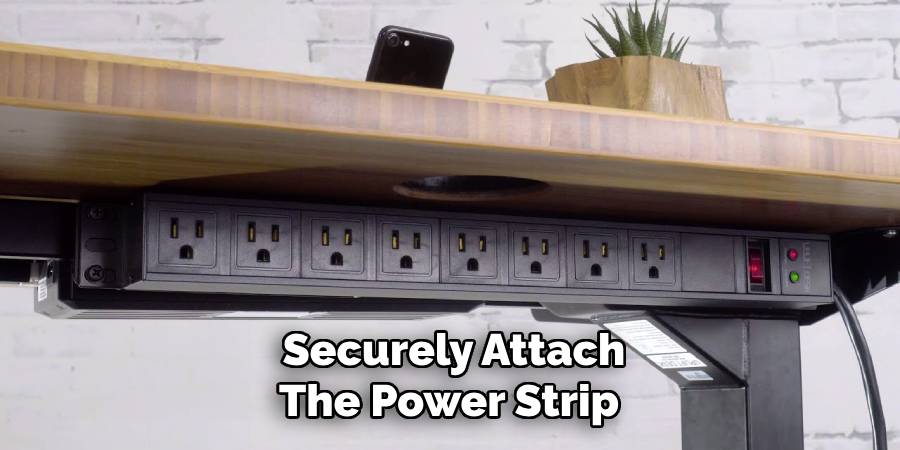
Ensuring the Power Strip is Securely Fastened and Does Not Wobble
After attaching the power strip, gently test its stability by giving it a slight tug. The power strip should remain firmly in place without wobbling. If any movement occurs, re-secure the brackets or adhesive strips as needed.
Checking the Positioning to Ensure It Is Easily Accessible
Finally, check the positioning of the power strip to ensure it is easily reachable for plugging and unplugging devices. This accessibility is crucial for maintaining a functional and convenient workspace. Ensure the power strip is within arm’s reach but not in a position where it might be accidentally kicked or obstructed.
Managing Cables and Wires
Organizing Cables to Prevent Tangling and Clutter
Maintaining an organized workspace is critical to managing cables to prevent tangling and clutter. Start by identifying all the cables connected to your devices and assign each one a designated path to follow. This systematic approach helps reduce the risk of cables intertwining or becoming chaotic.
Using Cable Ties to Bundle and Secure Cables
Cable ties are indispensable tools for bundling and securing cables. After mapping out the cable paths, gather cables that run in the same direction and bundle them together with cable ties at regular intervals. This keeps the cables neatly bundled and prevents them from becoming a tangled mess over time. Ensure the ties are tight enough to hold the cables firmly but not so tight that they damage them.
Routing Cables Along the Underside of the Desk Using Clips or Adhesive Holders
To keep cables off the floor and out of sight, route them along the underside of the desk using clips or adhesive holders. Attach the clips or holders strategically along the desk’s underside, allowing cables to be guided smoothly from one point to another. This arrangement minimizes clutter and maintains a clean appearance while also protecting the cables from potential damage.
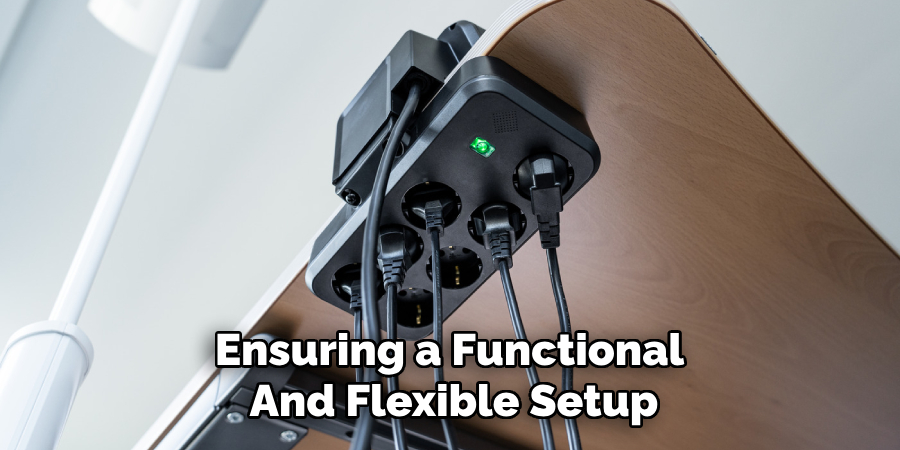
Ensuring That Cables Are Long Enough to Reach Devices Without Being Too Tight
While organizing the cables, ensure they are long enough to reach their respective devices comfortably. Too tight cables can strain the connectors and create unnecessary stress on the devices. Leave a little slack in the cables to accommodate any adjustments or movements, ensuring a functional and flexible setup.
Testing the Setup
Plugging in Devices to the Mounted Power Strip
Begin by plugging your essential devices into the newly mounted power strip. Carefully insert each plug, ensuring a secure connection.
Ensuring That All Devices Receive Power and the Setup is Functional
Switch on the power strip and verify that all connected devices receive power. Check for indicator lights or functionality to confirm that each device is operational.
Checking for Any Loose Connections or Stability Issues
Finally, inspect the power strip and connections for any signs of looseness or instability. Gently tug on each plug and the power strip itself to ensure everything remains securely in place. Make any necessary adjustments to maintain a stable and efficient setup.
Safety Tips and Considerations
Ensuring the Power Strip is Not Overloaded with Too Many Devices
Avoid plugging too many devices into the power strip at once to prevent electrical hazards. Each power strip has a maximum load capacity, typically indicated in amps or watts. Ensure the combined wattage of all connected devices does not exceed this limit. Utilizing a wattage calculator can help estimate the total power usage.
Regularly Checking for Signs of Wear or Damage to the Power Strip and Cables
Make it a routine to inspect the power strip and cables for signs of wear or damage. Look for frayed wires, scorch marks, or loose connections. Address any issues immediately by replacing damaged components. This proactive approach can prevent potential electrical failures or fire risks.
Keeping the Area Under the Desk Free from Clutter to Avoid Tripping Hazards
Maintain a tidy space under the desk to minimize the risk of tripping over exposed cables or other items. As previously described, organizing and securing cables along the desk’s underside helps keep the area clear. This enhances safety and contributes to an efficient and clean workspace.
Conclusion
Mounting a power strip under a desk offers numerous benefits, significantly enhancing a workspace’s functionality and aesthetics. Following proper “how to mount a power strip under a desk” guidelines allows users to enjoy a clutter-free area and convenient access to power sources. Regular maintenance and organization of cables are essential to sustaining a tidy workspace, reducing the risks of tripping hazards, and ensuring a smooth workflow.
This organizational solution is practical and easy to implement, making it a worthwhile investment for maintaining an efficient and visually pleasing environment. Embrace these tips and transform your workspace into a well-organized haven of productivity.