

Are you looking to add a rustic touch to your home or barn? Building exterior barn doors is a great way to achieve that classic farmhouse look.

Not only do they add character and charm, but they also serve as functional doors for larger openings. In this guide, we will walk you through the process of how to build exterior barn doors.
Building exterior barn doors can be a rewarding DIY project, adding rustic charm and functionality to your home. Whether you’re looking to enhance the aesthetic of a barn, garage, or other outbuilding, crafting your own doors allows for customization to fit your exact specifications.
This guide will walk you through the essential steps, from selecting materials and tools to constructing and installing your doors.
With a bit of planning, patience, and elbow grease, you can create beautiful, durable barn doors that will last.
What Will You Need?
Before starting any project, gathering all the necessary materials and tools is important. Here are the items you will need for building exterior barn doors:
- Wood Planks or Panels: Choose a durable and weather-resistant wood such as cedar, redwood, or cypress.
- Saw: A circular saw is recommended for cutting straight lines, while a jigsaw can be used for more intricate designs.
- Measuring Tape and Pencil: These basic tools will help you accurately measure and mark your cuts.
- Drill and Screws: You will need these to assemble your door frame.
- Hinges and Hardware: Select sturdy hinges and hardware that can withstand heavy use.
- Barn Door Track and Rollers: These will be used to hang your doors, allowing for smooth sliding motion.
- Paint or Stain: Choose a finish that complements the overall look of your home or barn.
Once you have all your materials and tools ready, you can proceed to the next step.
10 Easy Steps on How to Build Exterior Barn Doors
Step 1: Measure Your Opening
The first step is to measure the opening where you will install the barn doors. This will determine how large your doors need to be. Typically, exterior barn doors are slightly larger than the opening to provide adequate coverage and weather protection. Remember to measure twice before making any cuts!

Step 2: Cut the Wood Panels
Once you have measured your opening and determined the required dimensions for your barn doors, it’s time to cut the wood panels to size.
Mark the dimensions on the wood planks or panels using your measuring tape and pencil. Double-check all measurements to ensure accuracy, as precise cuts are crucial for a proper fit.
For straight and clean cuts, use a circular saw; for more intricate designs or curved edges, a jigsaw is recommended. Ensure to follow all safety guidelines when operating these tools, including wearing protective eyewear and gloves. Cutting the wood properly will give you a solid foundation for building your doors.
Place your wood panels on a stable work surface, securing them with clamps to prevent movement. Proceed to cut along the marked lines, maintaining a steady hand to ensure even edges.
If your design includes diagonal or horizontal board patterns, cut those pieces accordingly at this stage. After cutting, lightly sand the edges of the wood panels to remove any rough spots or splinters.
Step 3: Assemble the Door Frame
With your wood panels cut to the correct dimensions, the next step is to assemble the door frame.
Lay out the vertical and horizontal wood planks on a flat surface, arranging them in the desired configuration for your barn door. Double-check the alignment to ensure everything fits together correctly.
Using a drill, create pilot holes for the screws at each joint where the vertical and horizontal planks meet. This will help prevent the wood from splitting when you insert the screws. Once the pilot holes are made, use screws to securely fasten the planks together, forming the basic frame of your barn door.
Step 4: Attach the Panels

After the frame is assembled, it’s time to attach the wood panels to complete the door. Lay the panels over the frame in the desired pattern, ensuring they fit snugly against each other. For a stronger bond, apply wood glue along the edges of each panel before fastening them to the frame with screws.
Make use of clamps to hold the panels in place while you insert the screws. Place screws at regular intervals along the edges and through the center of the panels to ensure even distribution of support.
Step 5: Sand and Finish the Door
With the door fully assembled, the next step is to sand all surfaces to create a smooth, even finish. Start with a coarse-grit sandpaper to remove any rough edges or imperfections, then switch to a finer-grit paper for a smoother result. Pay special attention to the corners and edges where the panels meet the frame.
Once sanding is complete, it’s time to apply paint or stain to protect the wood and enhance the door’s appearance. Choose a finish that complements your home or barn’s overall look, and apply it evenly.
Allow the finish to dry completely according to the manufacturer’s instructions before moving on to the next step. This process improves the look of your barn door and extends its lifespan.
Step 6: Install the Hinges
With your barn door fully constructed and finished, the next step is installing the hinges. Position the hinges along one side of the door, ensuring they are evenly spaced for balanced support. Generally, it’s a good idea to use three hinges: one near the top, one near the bottom, and one in the middle.
Step 7: Mount the Door
After attaching the hinges to the door, it’s time to mount the door to the opening. Have a friend or family member assist you with this step, as barn doors can be heavy and difficult to handle alone.
Lift the door into position and align the hinges with the corresponding spots on the door frame. Secure the hinges to the frame using screws, ensuring they are tightly fastened.
Step 8: Install the Barn Door Track and Rollers
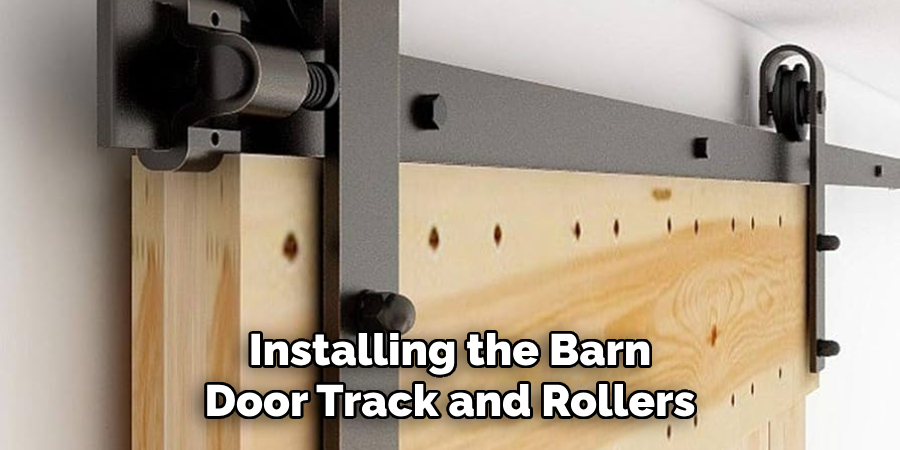
Now that the door is hung, installing the barn door track and rollers is time. First, measure and mark the placement of the track above the door frame, ensuring it’s level. Follow the manufacturer’s instructions to securely attach the track to the wall, ensuring it can support the door’s weight.
Once the track is in place, attach the rollers to the top edge of the door and carefully lift the door onto the track. Ensure the door glides smoothly along the track before proceeding.
Step 9: Test the Door Movement
With the door mounted and the track installed, testing the door’s movement is crucial to ensure it operates smoothly. Slide the door back and forth along the track, checking for any sticking points or irregularities in its motion.
Make any necessary adjustments to the track or rollers to achieve smooth operation. Secure any additional hardware per the manufacturer’s instructions to keep the door safely in place.
Step 10: Add Final Touches
The final step is to add any finishing touches to your barn door. This may include installing a door handle or pull, adding decorative hardware, or applying additional touch-up paint or stain to enhance the door’s appearance.
Make sure all elements are securely attached and functional. Stand back and admire your handiwork—you’ve successfully built and installed your own exterior barn doors!
By following these steps and investing time and effort into constructing your own barn doors, you can add a touch of rustic charm to your home while also saving money on pre-made doors.
5 Things You Should Avoid
- Using Low-Quality Wood: One of the biggest mistakes you can make is opting for low-quality or improperly treated wood. Poor quality wood is likely to warp, crack, or suffer from pest damage, compromising the durability and appearance of your barn door. Always invest in high-grade, exterior-grade wood panels and planks.
- Skipping the Sealant: Neglecting to adequately seal your barn door can lead to moisture infiltration, compromising the wood’s structural integrity over time. Always apply a waterproof sealant to all sides of the wood, including the edges, to protect it from weather elements.
- Incorrect Measurements: Precision is key when building exterior barn doors. Inaccurate measurements can lead to ill-fitting doors that do not hang or slide properly. Double-check all your measurements before cutting and ensure everything aligns correctly during assembly.
- Improperly Installing Hardware: The hardware, such as hinges, tracks, and rollers, plays a crucial role in the door’s functionality. Improper installation can result in a dysfunctional door that does not open or close smoothly. Follow manufacturer instructions carefully and ensure all hardware is securely attached.
- Neglecting Maintenance: Once your barn door is installed, it’s important not to neglect regular maintenance. Periodically inspect the wood and hardware for signs of wear or damage and address any issues promptly. Regularly reapply sealant and finish to extend the door’s lifespan and maintain its aesthetic appeal.

Conclusion
How to build exterior barn doors is a rewarding project that combines both functionality and aesthetic appeal.
By carefully selecting high-quality materials, accurately measuring and cutting your wood, and properly installing all hardware, you can ensure your barn doors are both durable and stylish.
Following each step meticulously—from assembling the frame and panels to finishing and mounting the door—will help you avoid common pitfalls and achieve professional results. Regular maintenance will further enhance the longevity and appearance of your doors, making this investment more worthwhile.
With patience and attention to detail, you can create beautiful and functional barn doors that add a rustic charm to your home.
About
Safety Fic is a distinguished figure in the world of Diy design, with a decade of expertise creating innovative and sustainable Diy solutions. His professional focus lies in merging traditional craftsmanship with modern manufacturing techniques, fostering designs that are both practical and environmentally conscious. As the author of diy, Safety Fic delves into the art and science of Safety Fic-making, inspiring artisans and industry professionals alike.
Education RMIT University
(Melbourne, Australia) Associate Degree in Design (Safety Fic) Focus on sustainable design, industry-driven projects, and practical craftsmanship. Gained hands-on experience with traditional and digital manufacturing tools, such as CAD and CNC software.
Nottingham Trent University
(United Kingdom) Bachelor’s in diyfastly.com and Product Design (Honors) Specialized in product design with a focus on blending creativity with production techniques. Participated in industry projects, working with companies like John Lewis and Vitsoe to gain real-world insights.
Publications and Impact
In diy, Safety Fic his insights on indoor design processes, materials, and strategies for efficient production. His writing bridges the gap between artisan knowledge and modern industry needs, making it a must-read for both budding designers and seasoned professionals.