

The oxygen sensor plays a critical role in the functioning of a vehicle’s engine by monitoring the air-to-fuel ratio and ensuring optimal performance. Over time, dirt, debris, and carbon deposits can accumulate on the sensor, reducing its efficiency and potentially leading to poor fuel economy or increased emissions. Cleaning the oxygen sensor can help restore its functionality and improve overall engine performance. This guide will walk you through the steps of how to clean oxygen sensor safely and effectively.
Can You Clean an Oxygen Sensor?
Yes, it is possible to clean an oxygen sensor, but it must be done carefully to avoid damaging the component. Cleaning the sensor can help remove contaminants like carbon deposits that accumulate over time, potentially restoring its performance. However, it’s important to note that cleaning is not always a guaranteed fix, and some sensors may need to be replaced if they are heavily worn or damaged. Before attempting to clean an oxygen sensor, ensure you have the right tools and follow appropriate safety precautions to prevent harm to yourself or the sensor. Always consult your vehicle’s manual or a trusted mechanic to determine if cleaning is a suitable solution for your oxygen sensor issues.
Tools and Materials Needed
To properly clean an oxygen sensor, you will need the following tools and materials:
- Safety gloves – To protect your hands from harmful chemicals.
- Protective eyewear – To shield your eyes from debris or splashes.
- Socket wrench or oxygen sensor socket – For removing the sensor from the vehicle.
- Cleaning solution – Such as carburetor cleaner or a specialized oxygen sensor cleaner.
- A soft-bristle brush – To gently remove residue without damaging the sensor.
- A container or jar – To soak the sensor in the cleaning solution.
- Compressed air or a clean dry cloth – For drying the sensor after cleaning.
Make sure you gather all the necessary items before starting the process, as having the right tools and materials will make the task safer and more efficient.
10 Methods How to Clean Oxygen Sensor
1. Understand What an Oxygen Sensor Does Before Cleaning
Before attempting to clean your vehicle’s oxygen sensor, it’s essential to understand its role in the engine system. Oxygen sensors (O2 sensors) monitor the level of oxygen in the exhaust gases and help the engine control unit (ECU) adjust the air-fuel mixture for optimal combustion. A dirty or failing sensor can cause poor fuel economy, engine misfires, and increased emissions. However, cleaning an O2 sensor is generally a temporary fix and may not restore full functionality, especially if the sensor is aged or damaged. Still, it can help improve performance or delay replacement if done correctly.
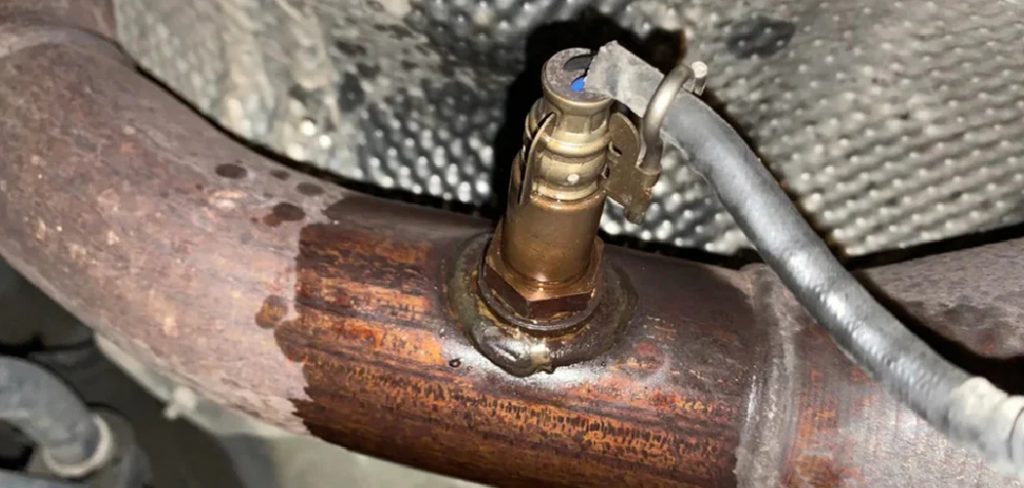
2. Safely Locate and Remove the Oxygen Sensor
To clean an O2 sensor, the first step is to locate it. Most modern vehicles have at least two: one upstream (pre-catalytic converter) and one downstream (post-catalytic converter). Use a car jack and jack stands to safely elevate the vehicle if the sensors are underneath. Disconnect the sensor wiring harness and use a special O2 sensor socket or a 7/8-inch wrench to remove the sensor from the exhaust pipe. Handle it carefully—oxygen sensors are sensitive, and rough handling can easily damage the ceramic element inside.
3. Inspect the Sensor for Visible Damage
Once removed, inspect the oxygen sensor closely. If the sensor tip is covered in white powder, it may indicate silicone contamination, while black soot could suggest a rich fuel mixture. A reddish tint can signal lead contamination—often fatal for the sensor. If the sensor is broken, cracked, or corroded, cleaning won’t help; replacement is the only option. However, if it’s only dirty or slightly carbon-fouled, a careful cleaning might restore some of its function.
4. Avoid Using Harsh Abrasives or Wire Brushes
It may be tempting to scrub the sensor tip with a wire brush or sandpaper, but that approach can damage the delicate ceramic and metal components. Instead, gently clean off loose carbon deposits with a soft-bristled toothbrush or cloth. The sensor’s sensing element is highly sensitive and can be ruined by excessive force. The goal here is to loosen light buildup without abrading the surface. If the sensor is stubbornly fouled, chemical soaking is a better approach than physical abrasion.
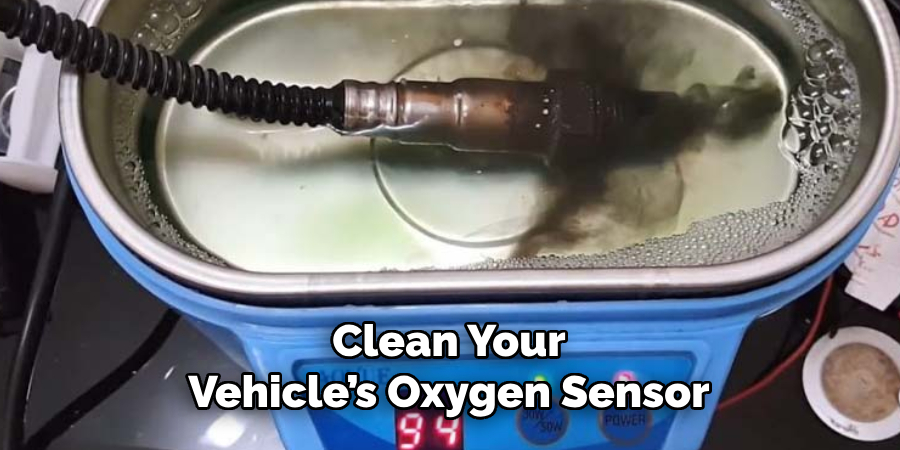
5. Soak the Sensor in a Cleaning Solution Overnight
One of the most effective ways to clean an oxygen sensor is to soak it in a solution designed to dissolve carbon and fuel residue. Fill a non-metal container (preferably plastic or glass) with a mixture of gasoline or carburetor cleaner—both are strong enough to break down grime. Submerge only the sensing end of the sensor and avoid getting liquid on the connector or wiring. Let it soak for at least 8 hours or overnight in a well-ventilated area. This slow process ensures deeper cleaning without harming the sensor.

6. Use a Gentle Agitation Method After Soaking
After soaking overnight, gently swirl the container or carefully agitate the sensor in the solution to help loosen any remaining debris. You may use a soft toothbrush at this point to gently scrub the exterior. Do not use power tools or any aggressive method. Rinse the sensor in fresh gasoline or cleaner to remove loosened particles. This secondary rinsing step can remove any film that may remain and helps to ensure a cleaner surface for reinstallation.
7. Let the Sensor Dry Completely Before Reinstalling
Before reinstalling the oxygen sensor, allow it to air dry completely. Any leftover moisture from cleaning fluids can cause shorts or errors when the sensor heats up. Place the sensor in a dry, warm area for a few hours, or use compressed air (lightly) to help evaporate the fluid faster. Never reinstall the sensor while it’s still damp or saturated, as this can damage internal circuitry or skew its initial readings.
8. Reinstall the Sensor with Anti-Seize Compound (If Recommended)
When reinstalling the cleaned oxygen sensor, apply a small amount of anti-seize compound to the threads—only if specified by the manufacturer or included with the original part. Be extremely cautious to avoid getting the compound on the sensor tip. Thread contamination can interfere with readings. Carefully screw the sensor back into the exhaust bung and tighten it securely using the proper torque specifications (usually around 30–35 ft-lbs). Reconnect the electrical connector, ensuring a snug fit.
9. Clear Any Stored Error Codes and Monitor Sensor Activity

After reinstalling the sensor, it’s important to reset any stored engine codes using an OBD-II scanner. This will clear the check engine light and give the ECU a fresh reading from the cleaned sensor. Start the engine and allow it to reach operating temperature. Then, monitor the live data from the oxygen sensor using the scanner. You should see a fluctuating voltage reading between 0.1V and 0.9V on a properly functioning sensor. If the readings are flat, extremely erratic, or missing, the cleaning may not have restored it, and a replacement is likely needed.
10. Know When It’s Time to Replace Instead of Clean
Cleaning an oxygen sensor can offer temporary improvement, but it’s not a permanent fix. O2 sensors have a finite lifespan, typically 60,000–100,000 miles, and cleaning doesn’t reverse sensor aging or internal wear. If your sensor continues to send poor signals, causes persistent error codes, or results in rough engine performance or poor gas mileage, it’s time to replace it. New sensors are more efficient and reliable, and modern replacements often come with a warranty. Don’t rely on repeated cleanings to avoid necessary maintenance—they’re best used as a stopgap measure.

Things to Consider When Replacing an O2 Sensor
Identifying the Faulty Sensor
Modern vehicles often come equipped with multiple O2 sensors. Use a diagnostic tool to determine which sensor is malfunctioning before purchasing a replacement.
Quality of the Replacement Sensor
Purchase sensors from reputable brands or original equipment manufacturers (OEM). Cheaper alternatives might not last as long or function as effectively.
Compatibility
Ensure the new sensor is compatible with your vehicle’s make, model, and year. Using an incompatible sensor can result in improper readings and further issues.
Professional Installation vs. DIY
While replacing an O2 sensor is a task many capable DIYers can handle, hiring a professional can reduce the risk of improper installation or damaging other components.
Warranty and Support
Opt for sensors that come with a warranty. This provides peace of mind and coverage in case of defects or premature failures.
By considering these factors, you can ensure a safer, more effective replacement and maintain your vehicle’s performance.
Conclusion
Cleaning an oxygen sensor can breathe temporary life into a sluggish vehicle and improve fuel efficiency or emissions in the short term. However, this process requires care, patience, and the right cleaning techniques to avoid damaging the sensor further. Use gentle tools, safe chemicals, and precise reinstallation practices to maximize results. Thanks for reading our blog post on how to clean oxygen sensor! We hope you found it helpful and informative.
About
Safety Fic is a distinguished figure in the world of Diy design, with a decade of expertise creating innovative and sustainable Diy solutions. His professional focus lies in merging traditional craftsmanship with modern manufacturing techniques, fostering designs that are both practical and environmentally conscious. As the author of diy, Safety Fic delves into the art and science of Safety Fic-making, inspiring artisans and industry professionals alike.
Education RMIT University
(Melbourne, Australia) Associate Degree in Design (Safety Fic) Focus on sustainable design, industry-driven projects, and practical craftsmanship. Gained hands-on experience with traditional and digital manufacturing tools, such as CAD and CNC software.
Nottingham Trent University
(United Kingdom) Bachelor’s in diyfastly.com and Product Design (Honors) Specialized in product design with a focus on blending creativity with production techniques. Participated in industry projects, working with companies like John Lewis and Vitsoe to gain real-world insights.
Publications and Impact
In diy, Safety Fic his insights on indoor design processes, materials, and strategies for efficient production. His writing bridges the gap between artisan knowledge and modern industry needs, making it a must-read for both budding designers and seasoned professionals.