
Frosting safety glass is a practical and stylish way to enhance privacy without sacrificing natural light. Whether it’s for a bathroom window, a glass door, or an office partition, frosting provides a sleek and modern solution to obscure visibility.
This guide on How to frost safety glass for privacy will walk you through the process of frosting safety glass, offering tips and techniques to ensure a professional-looking finish that enhances both functionality and aesthetics.
What is Frosting?
Frosting is a technique of treating glass to make it opaque, thus limiting visibility. It involves the application of a translucent layer on the surface of the glass, creating an appearance similar to ice or frost. This process can be done using various materials such as films, spays, or etching creams.
If you are looking for a cost-effective and temporary solution, frosted films or sprays might be the best option. On the other hand, etching creams offer a more permanent solution but require skill and precision during application.
Importance of Frosting Safety Glass
Frosting safety glass offers several benefits, making it a popular choice for both residential and commercial spaces. Some of these include:
Privacy:
As mentioned earlier, frosting safety glass provides a level of privacy by blocking visibility from the outside. This is especially useful for areas such as bathrooms, bedrooms, and conference rooms.

Natural Light:
Unlike other privacy solutions such as curtains or blinds, frosting safety glass allows natural light to pass through while still obscuring visibility. This helps create a bright and airy atmosphere in any room.
Aesthetics:
The frosting gives a modern and sleek appearance to glass surfaces, making them more visually appealing. It also adds an element of texture and dimension to an otherwise plain surface.
Materials Needed
To frost safety glass for privacy, you will need the following materials:
Frosted Film, Spray, or Etching Cream:
As mentioned earlier, there are various options for frosting safety glass. Choose the one that best fits your needs and budget.
Water and Soap mixture:
This will be used to clean the glass surface before applying the frosting material.
Measuring tape and ruler:
These tools will come in handy to ensure accuracy during application.
Masking Tape:
This is used to create a border or design on the glass surface if desired.
Squeegee or Trowel:
Use this to smooth out air bubbles and ensure an even application of the frosting material.
Protective gear:
If using etching cream, make sure to use protective gloves, goggles, and a mask to avoid skin and eye irritation.
8 Steps on How to Frost Safety Glass for Privacy
Step 1: Measure the Glass Surface
Before starting the frosting process, accurately measure the glass surface on which you intend to frost. Use a measuring tape and ruler to determine both the height and width of the glass area.
This step is crucial to ensure you cut the frosted film or apply the frosting material with the right dimensions, avoiding unnecessary waste or uneven coverage.
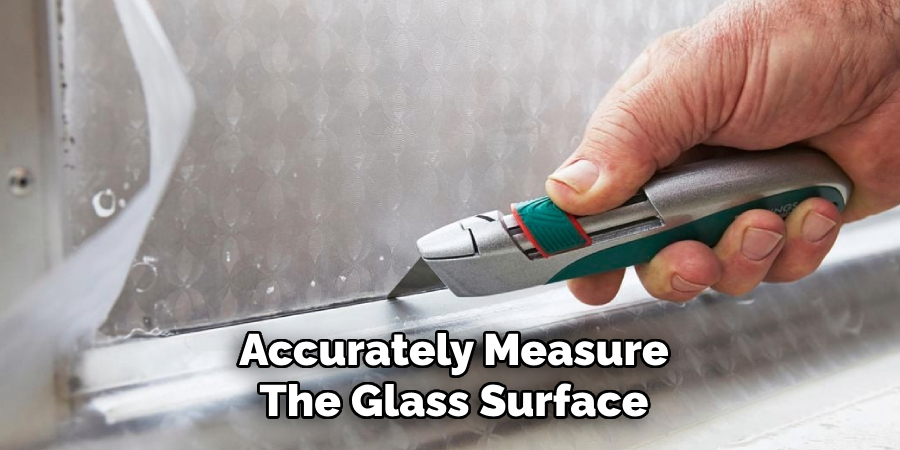
If you’re creating a specific design with masking tape, plan and mark the areas carefully during this stage. It’s also helpful to draw a rough sketch of the design on paper for reference.
Step 2: Clean the Glass Surface
Thoroughly clean the glass surface to ensure the frosting material adheres properly and uniformly. Use a mixture of water and soap to gently remove any dirt, dust, grease, or fingerprints. A clean microfiber cloth or sponge works best for this step, as it minimizes streaks and scratches.
After cleaning, rinse the surface with plain water to remove any soap residue, and dry it completely with a lint-free cloth. Proper cleaning is essential to achieve a smooth, professional finish without imperfections.
Step 3: Prepare the Frosting Material
If using a frosted film, carefully cut it to the appropriate size and shape according to your measurements. If using a spray or etching cream, follow the instructions on the product label for preparation.
For sprays, shake well before use and make sure you’re in a well-ventilated area. For etching creams, put on protective gear and stir the cream thoroughly before application.
Step 4: Apply Masking Tape (Optional)
If you want to create designs, borders, or patterns on the frosted glass, use masking tape to outline the desired areas. Carefully apply the masking tape to the glass surface, pressing down firmly to ensure no gaps between the tape and the glass. This will help prevent the frosting material from seeping underneath and create clean, defined lines.
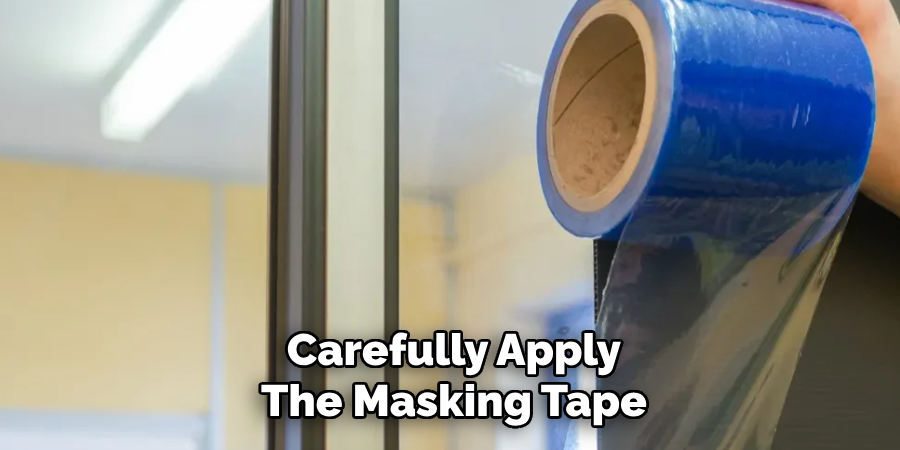
For complex patterns, you can use a stencil along with the masking tape to achieve more intricate designs. Make sure the tape is straight and aligned properly to avoid distortions during the application process. Double-check your design before moving on to the next step to ensure it matches your vision.
Step 5: Apply the Frosting Material
For frosted films, carefully peel off the backing and position it on the glass surface. Use a squeegee or trowel to smooth out any air bubbles and ensure an even application. If using sprays or etching creams, follow the instructions on the product label for application techniques.
Avoid applying too much material at once to prevent drips or uneven coverage. Work in small sections, starting from one side of the glass and moving across. Make sure to cover all areas evenly and thoroughly.
Step 6: Wait for the Material to Dry
For frosted films, wait for at least 24 hours before removing any backing or masking tape. For sprays, wait for the recommended drying time before removing any masking tape. For etching creams, follow the instructions on the product label for the recommended waiting time, usually around 15 minutes.
Avoid touching or disturbing the frosting material while it dries to prevent imperfections.
Step 7: Remove Masking Tape (Optional)
If you used masking tape to create a design or outline, carefully remove it once the frosting material is dry. Use a steady and even motion to avoid pulling off any of the frosted films or removing parts of the design accidentally.
The design or pattern should now be visible on the frosted glass. If you’re not happy with the outcome, you can try again by repeating the previous steps.
Step 8: Enjoy Your Newly Frosted Safety Glass!
Congratulations, your safety glass is now frosted for added privacy and aesthetic appeal. It’s important to maintain your frosted glass regularly by cleaning it with a mixture of water and soap to avoid any build-up of dirt or smudges.
Following these steps, you can easily and affordably frost safety glass for privacy in your home or office. With a little creativity and the right materials, you can transform plain safety glass into an elegant and functional design element. Explore different frosting options to find the one that best suits your needs and style. Happy frosting!
Additional Tips and Recommendations
- If using etching cream, always wear protective gear to avoid any potential skin or eye irritation.
- When applying frosted film, make sure to smooth out air bubbles carefully to achieve an even and professional finish.
- For added privacy, you can apply multiple layers of frosting material or a darker shade of film.
- Experiment with different designs and patterns using masking tape to create unique and personalized frosted glass surfaces.
- If you’re not confident in your design skills, consider purchasing stencils or pre-cut frosted film for easier application.
- Regularly clean and maintain your frosted glass to preserve its appearance and effectiveness. You can also use specific cleaners made for frosted glass to remove stubborn stains or residue.
- Consider the direction of light when applying frosting material. Placing it on the inside of a window facing out will provide more privacy during daylight hours. Applying it on the outside facing in will achieve the opposite effect.
- If you’re applying frosting material to a large surface, consider recruiting help from another person for smoother and faster application.
- For safety purposes, avoid frosting any glass surfaces that could obstruct visibility, such as car windows or doors.

Frequently Asked Questions
Q1: Can I Remove the Frosting Material if I Change My Mind or Want to Try a Different Design?
A1: Yes, frosted films can easily be removed by carefully peeling them off the glass surface. For sprays or etching creams, specific products are available to dissolve and remove the frosting material. It’s always recommended to test a small area first before applying any removal products on a larger surface.
Q2: Can I Use Frosted Glass in High-Moisture Areas Such as Bathrooms?
A2: Yes, frosted glass is suitable for high-moisture areas. However, regular cleaning and maintenance may be needed to prevent build-up of moisture or soap scum. Consider using specially made cleaners for frosted glass in bathrooms to make the task easier.
Q3: How Long Will the Frosting Material Last?
A3: The durability of frost material varies depending on factors such as the quality of the product, environmental conditions, and frequency of cleaning. With proper care, frosted glass can last for several years before needing to be reapplied.
Conclusion
Frosting safety glass is an effective and versatile way to enhance privacy, improve aesthetics, and add a touch of creativity to your spaces. By following the step-by-step process outlined in this guide, you can achieve professional-looking results with minimal effort and cost.
Whether you choose frosted films, sprays, or etching creams, the key to success lies in careful preparation, attention to detail, and proper maintenance. With a little patience and creativity, frosted glass can transform ordinary surfaces into elegant, functional design elements that meet your unique needs and style.