
Are you looking to access the live video stream from your IP camera? One way to do that is using the RTSP (Real Time Streaming Protocol) URL.
When working with IP cameras, accessing the Real-Time Streaming Protocol (RTSP) URL is essential for integrating the camera’s video feed into other systems, applications, or media players. The RTSP URL serves as the pathway to stream the live video directly from the camera by utilizing its IP address and network credentials. Understanding how to obtain this URL is crucial for setting up video surveillance systems, monitoring solutions, or simply connecting your IP camera to third-party software.
This guide on how to get RTSP URL from IP camera will walk you through the process of finding the RTSP URL for your IP camera, along with tips to ensure a seamless configuration.
What Are the Benefits of Obtaining the RTSP URL?
Obtaining the RTSP URL for your IP camera opens up a world of possibilities. Here are some of the benefits you can expect from knowing how to get the RTSP URL from the IP camera:
- Live Streaming: With the RTSP URL, you can easily stream live video from your IP camera, allowing for real-time monitoring and surveillance.
- Customization: Knowing the RTSP URL gives you more control over how you want to access and use the video footage from your IP camera. You can customize settings and configure third-party software according to your specific needs.
- Compatibility: The RTSP protocol is widely supported by various software and devices, making it easy to integrate your IP camera into different systems and platforms.
- Security: RTSP supports credential-based authentication, ensuring only authorized users can access the live stream from your IP camera. This adds an extra layer of security and prevents unauthorized access.
What Will You Need?
To successfully set up an IP camera using RTSP, you will need the following:
- An IP camera that supports RTSP protocol.
- A stable internet connection.
- Network video recording software (optional).
- Third-party software for live streaming or remote viewing (optional).
Once you have these requirements, you can proceed with setting up your IP camera using RTSP.
8 Easy Steps on How to Get RTSP URL From IP Camera
Step 1: Access the Camera’s Web Interface
Accessing the camera’s web interface is typically the first step in retrieving the RTSP URL of your IP camera. To do this, ensure that your IP camera is powered on and connected to the same local network as your computer or mobile device.
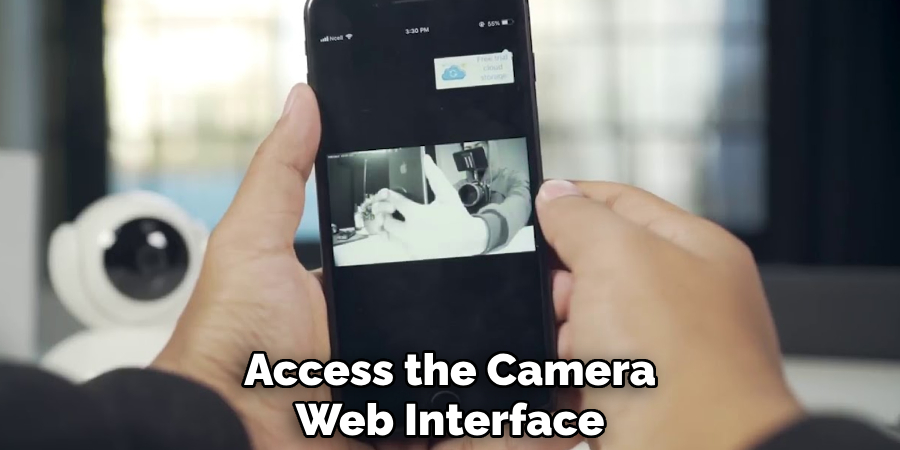
Open a web browser and enter the IP address of your camera into the address bar. If you’re unsure of the camera’s IP address, you can often find it in your router’s DHCP client list or the camera’s companion app. Once you access the web interface, you may be prompted to log in using the default username and password provided with the camera or a username and password that you have previously set. Make sure to have this information handy to proceed.
Step 2: Configure Camera Settings
Locate the settings or configuration menu after logging into the camera’s web interface. This section typically allows you to adjust various options, such as video resolution, frame rate, motion detection sensitivity, and storage preferences.
Configure these settings according to your needs, ensuring optimal performance for your desired application. If your camera supports advanced features like remote access or scheduled recording, take the time to set them up as well. Once finished, make sure to save your changes before exiting the menu.
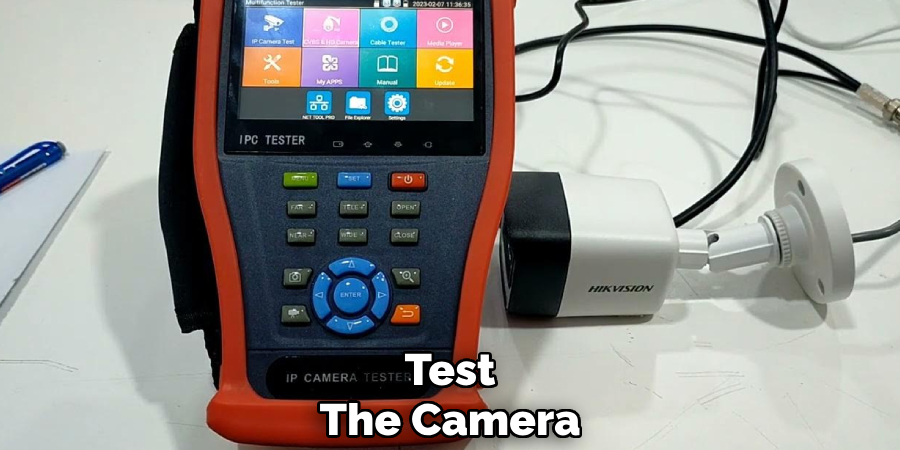
Step 3: Test the Camera
After configuring the settings, the next step is to test the camera to ensure it functions as expected. Begin by positioning the camera in its intended location and verifying the video feed on a connected device. If enabled, check for clear image quality, proper frame rate, and effective motion detection.
Walk through the camera’s field of view to confirm that it captures motion accurately and triggers any alerts or recordings as configured. Adjust the camera’s angle or settings if necessary to optimize coverage. Once satisfied with the performance, your camera is ready for regular operation.
Step 4: Ensure Network Connectivity
Verify that the camera is connected to your Wi-Fi network or an Ethernet connection, depending on your setup. Check the camera’s app or management interface to confirm a stable connection and ensure that live feeds and recordings can be accessed remotely.
Troubleshoot any connectivity issues by checking the router settings, updating the camera firmware, or repositioning the camera to improve signal strength. Reliable network connectivity is essential for consistent performance and access to your security system.
Step 4: Test the Camera’s Features
Once the camera is properly connected and positioned, take the time to test its features to ensure everything is functioning as expected. Check the video resolution and clarity, both during the day and at night if your camera has night vision capabilities.
Test the motion detection sensitivity by walking in front of the camera to confirm it properly detects activity and sends alerts. Additionally, verify that any storage options, such as cloud backups or local SD cards, are saving recordings correctly. Address any performance issues during this step to maximize the security system’s effectiveness.
Step 5: Finalize and Secure the Setup
Once all tests are completed, finalize the positioning of your camera and ensure that it is securely mounted to prevent tampering or accidental dislodging. Use the provided mounting equipment or additional security brackets, if necessary, for added stability.
Double-check all connection points, including power cables and Wi-Fi signals, to confirm uninterrupted functionality. Finally, all user settings, such as notification preferences and password protection, must be reviewed to secure the system against unauthorized access. This final step ensures your security camera is ready to provide reliable protection.
Step 6: Regular Maintenance and Updates
Perform regular maintenance and updates to keep your security camera system functioning optimally. Inspect the camera lenses for dirt, dust, or debris, and clean them with a soft, lint-free cloth as needed. Ensure all connections remain secure and free from damage or wear.
Additionally, check for and install any firmware updates the manufacturer provides to enhance system performance and address potential vulnerabilities. This proactive approach extends the longevity of your equipment and maintains its effectiveness in securing your property.
Step 7: Keep an Eye on Your Security System
It’s important to monitor your security system and make any necessary adjustments regularly. This includes checking the camera lenses for dirt, dust, or debris and cleaning them with a soft, lint-free cloth as needed.
You should also ensure that all connections remain secure and free from damage or wear. Loose or damaged connections can compromise the effectiveness of your security system.

In addition, manufacturers often release firmware updates for their security systems. These updates may enhance system performance and address potential vulnerabilities. Make sure to check for and install any available updates to keep your system running smoothly.
Step 8. Enjoy Your Peace of Mind
With your security system properly installed, maintained, and updated, you can now enjoy the peace of mind of knowing your home or business is protected. Whether you are at home or away, you can rest assured that your security system is constantly monitoring and protecting your property.
Remember to regularly test your system and perform necessary maintenance to ensure it continues to function effectively. And if you ever have any concerns or notice any issues with your security system, don’t hesitate to contact the manufacturer for assistance.
By following these simple tips and investing in a reliable security system, you can greatly increase the safety and security of your home or business.
5 Things You Should Avoid
1. Skipping the Camera’s Documentation
Avoid ignoring the user manual or documentation provided by the camera manufacturer. These documents often contain specific details on configuring and accessing the RTSP URL for that particular model.
2. Using Default Credentials
Never attempt to get the RTSP URL from your IP camera without first changing its default username and password. Default credentials pose a significant security risk as they are commonly known to hackers.
3. Forgetting to Check Your Network Configuration
Ensure your camera is connected correctly to your network and avoid troubleshooting RTSP URL issues without confirming your network settings, including IP addresses and port configurations.
4. Overlooking Firmware Updates
Operating your IP camera on outdated firmware can lead to compatibility problems and bugs when retrieving the RTSP URL. Make sure the camera’s firmware is updated to the latest version.
5. Neglecting Secure Connections
Avoid accessing your RTSP URL over unsecured networks or without enabling encryption and authentication features. Unsecured connections can expose the camera’s feed to unauthorized users.

Conclusion
How to get RTSP URL from IP camera requires careful attention to detail and adherence to proper practices.
Start by identifying the camera’s model and consulting the user manual or manufacturer’s website for specific instructions on accessing the RTSP stream. Ensure the camera is properly configured on your network, and use suitable software or tools to identify the URL. Always keep the firmware updated and prioritize secure connections to protect your camera feed from unauthorized access.
By following these steps methodically, you can successfully retrieve the RTSP URL and secure seamless video streaming.