

Do you ever feel a sense of insecurity while in your own home? You can ease those fears by installing a Brinks interior door locking knob. Installing an interior door lock that is suitable for residential and commercial use provides an added level of protection to maximize safety and security at your residence or workplace.
Not only do interior locks prevent unwanted guests from entering, but they also give the user control over their private space and peace of mind. Follow our simple guide on how to install a brinks interior locking door knob to learn how to install this convenient solution that will provide extra security to any room or hallway!
Needed Materials
Given below is a list of materials that are necessary for this installation:
- Brinks Interior Locking Door Knob
- An Adjustable Spanner (or a Flathead Screwdriver)
- A Phillips Head Screwdriver
- Two 3/8″ Screws (for the Latch Assembly)
- A 2-3/8″ Hole Saw (or a Wood File)
- An Electric Drill
11 Step-by-step Guidelines on How to Install a Brinks Interior Locking Door Knob
Step 1: Prepare the Door
The first step is to prepare the door for installation. Place a piece of tape on the door where you want to install your new locking knob and use a pencil or felt-tipped marker to outline where the hole needs to be cut. But before cutting the hole, make sure that your door is thick enough to accommodate the knob. You can measure the door thickness using a ruler or measuring tape to ensure that the knob will fit correctly.
Step 2: Drill a Hole

Next, use an electric drill and a hole saw a bit of the appropriate size (2-3/8″) to make the necessary hole. Make sure that you drill straight into the wood and do not force the drill bit. This will help ensure that the hole is of the correct size and shape so that your new knob will fit properly. It also helps to place a piece of wood behind the door when drilling so that the drill bit does not cut through the other side.
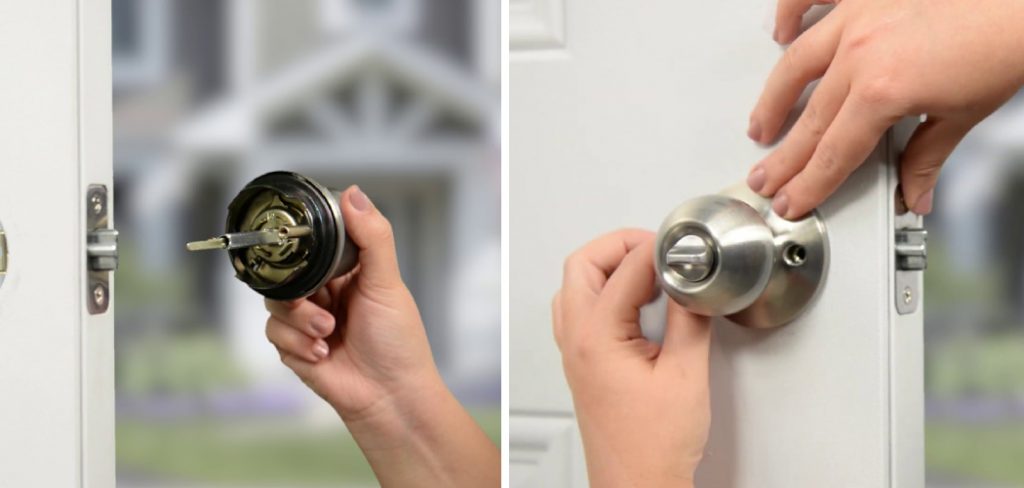
Step 3: Install the Latch Assembly
Once the hole is drilled, insert the latch assembly into it. Secure it in place with two screws that are sized 3/8″. Use a Phillips head screwdriver to secure the screws in place tightly. It is important to make sure that the latch assembly is installed securely, as it will keep the door locked. But make sure not to over-tighten the screws as this could damage the wood.
Step 4: Insert and Fasten the Knob
You are now ready to insert the interior locking knob into the door. Place the knob inside the hole and make sure that it fits securely. Then, take an adjustable spanner (or a flathead screwdriver) and tighten the screws until they cannot be twisted any further.
You should then be able to see that the knob is firmly secured and won’t come loose from the door. It is important to make sure that the knob is fastened tightly, as this will ensure that it does not become loose over time.
Step 5: Test Out the Knob
Once you have finished securing the screws, try out the knob to make sure it functions properly. Open and close the door a few times to make sure that it locks securely each time. This will help ensure that the job was done correctly and that your new knob is secure. It is also a good idea to check the screws every few months to make sure they are still tightly secured.
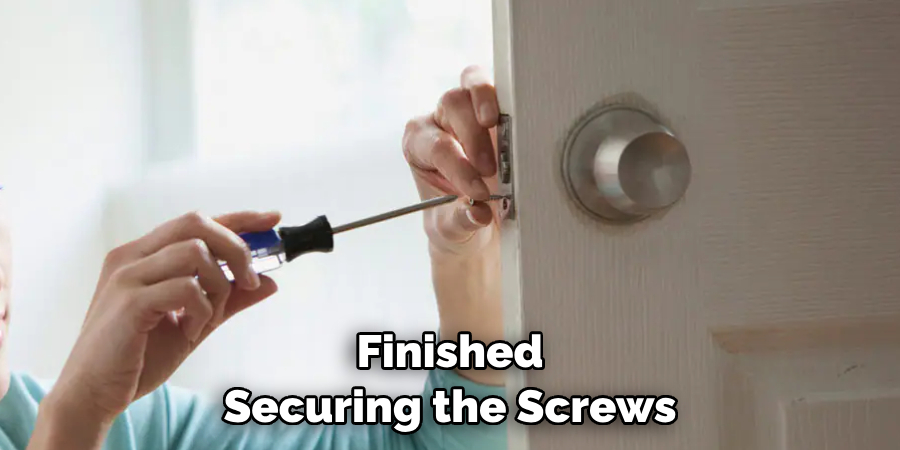
Step 6: Secure the Strike Plate
The strike plate is an important part of your locking door knob as it provides additional security for the latch bolt. Place a piece of tape on the door jamb where you want the strike plate to be installed and mark it with a pencil or felt-tipped marker.
Once that is done, use a Phillips head screwdriver to secure the strike plate into place by using two screws that are sized 3/8″.
Step 7: Test Out the Strike Plate
Once the strike plate is installed, test it out to make sure that it works correctly. Open and close the door a few times to see if the latch bolt functions properly when the door is locked and unlocked. This will help ensure that your new locking knob is secure and functional. It is also a good idea to check the screws every few months to make sure they are still tightly secured.
Step 8: Install the Interior Locking Button
The next step is to install the interior locking button on the inside of the door. Place a piece of tape on the back of the interior locking knob to mark where the button should be installed. Use a Phillips head screwdriver to install two screws that are sized 3/8″ and make sure they are securely fastened.
Step 9: Test Out the Interior Locking Button
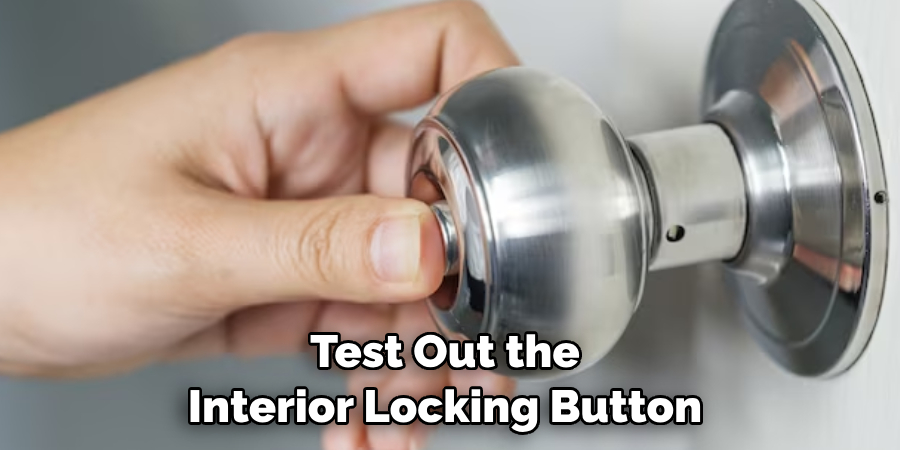
Test out the interior locking button to make sure it works correctly. Push the button in to activate the lock and then push it out to unlock the door. But make sure to also check that the door can be opened from the outside. If everything works properly, you should be able to open and close the door with ease!
Step 10: Make Sure There Are No Gaps
Finally, check that there are no gaps around the interior locking knob or strike plate. If you find any gaps, use a putty knife or wood file to fill them in. It is important to make sure that these areas are completely sealed off as this helps prevent any unwanted intruders from entering the room. This will also help to ensure that your door is as secure as possible.
Step 11: Enjoy the New Security of Your Home
You are now done with your installation! With this Brinks interior locking door knob, you can enjoy an added level of security and peace of mind. Always remember to check the bolts and screws periodically to make sure they are still securely fastened. This will help ensure that your home stays safe and secure at all times!
Following these 11 simple steps on how to install a brinks interior locking door knob will help you install your interior locking door knob quickly and correctly. With a little bit of time and effort, you can enjoy the added security that your new locking knob provides. Have fun and enjoy the extra peace of mind!
Additional Tips
- Make sure to read the manufacturer’s instructions before you begin as there may be some slight variations depending on the type of interior locking door knob you have purchased.
- If you are having difficulties with installation, it is recommended that you hire a professional locksmith to help.
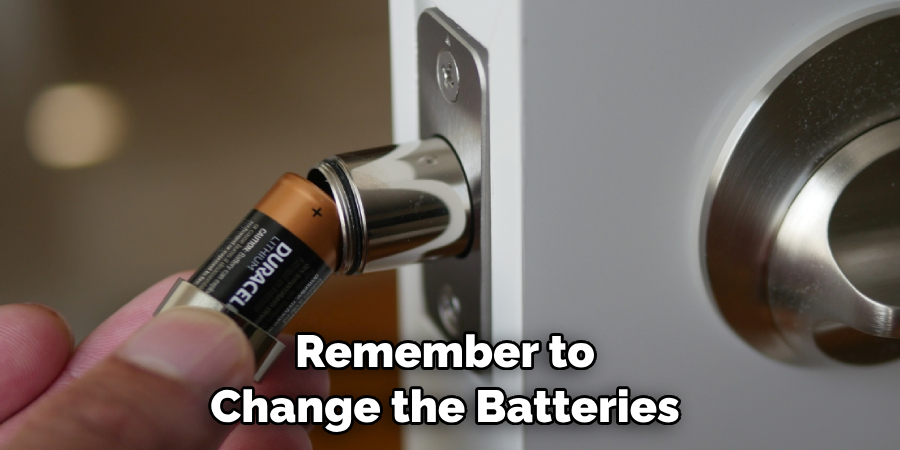
- Remember to change the batteries in your interior lock every six months or so to ensure optimal performance.
- It is also a good idea to keep the key for your Brinks door knob in a secure location such as a key safe, away from any potential intruders.
These simple steps and tips will help you to install a Brinks interior locking door knob with ease. Consider investing in this convenient safety feature for any room or hallway in your home and rest assured knowing that it will provide an added level of security!
Frequently Asked Questions
Q1: Can I Install a Brinks Interior Locking Door Knob Myself?
A1: Yes, you can! Just follow the instructions provided in this guide and you should be able to install it easily. It is recommended that you read the manufacturer’s instructions before starting the installation to make sure that all steps are followed correctly.
Q2: How Long Does It Take to Install a Brinks Interior Locking Door Knob?
A2: Depending on your level of experience, it can take anywhere from 30 minutes to an hour. It is important to read through the manufacturer’s instructions and prepare the door before beginning installation.
Q3: Is It Necessary to Change the Batteries in the Lock?
A3: Yes, it is recommended that you change the batteries in your Brinks interior locking door knob every six months or so for optimal performance. Doing so will ensure that your lock continues to function properly.
Conclusion
To sum up, installing a Brinks interior locking door knob is simple and easy to do on your own. With the right materials and knowledge, you can get the job done in no time. If you are still feeling a bit uncertain about your skill set or worried about taking on this kind of DIY project, consider hiring a professional like a locksmith, contractor, or handyman. It might be worth the extra money to ensure that the job is done correctly.
Whether you take it on yourself or hire a pro to help out, make sure you read all instructions carefully and think through the process step-by-step before starting so that you fully understand how to install a Brinks Interior Locking Door Knob and can feel confident in getting it done properly. Good luck!
About
Safety Fic is a distinguished figure in the world of Diy design, with a decade of expertise creating innovative and sustainable Diy solutions. His professional focus lies in merging traditional craftsmanship with modern manufacturing techniques, fostering designs that are both practical and environmentally conscious. As the author of diy, Safety Fic delves into the art and science of Safety Fic-making, inspiring artisans and industry professionals alike.
Education RMIT University
(Melbourne, Australia) Associate Degree in Design (Safety Fic) Focus on sustainable design, industry-driven projects, and practical craftsmanship. Gained hands-on experience with traditional and digital manufacturing tools, such as CAD and CNC software.
Nottingham Trent University
(United Kingdom) Bachelor’s in diyfastly.com and Product Design (Honors) Specialized in product design with a focus on blending creativity with production techniques. Participated in industry projects, working with companies like John Lewis and Vitsoe to gain real-world insights.
Publications and Impact
In diy, Safety Fic his insights on indoor design processes, materials, and strategies for efficient production. His writing bridges the gap between artisan knowledge and modern industry needs, making it a must-read for both budding designers and seasoned professionals.