

Installing a cam lock may seem like a straightforward task, but its significance in ensuring security and access control cannot be understated. Cam locks are versatile and widely used in various applications, from securing cabinets and mailboxes to safeguarding lockers and electronic enclosures. However, to ensure these locks function optimally, it’s crucial to understand the proper installation process.
In this comprehensive guide, we will delve into the intricacies of how to install a cam lock with precision and efficiency. Whether you’re a homeowner looking to enhance your property’s security or a professional locksmith seeking to master the art of lock installation, this article will equip you with the knowledge and step-by-step instructions needed to successfully install a cam lock. Join us as we unlock the secrets to secure, reliable, and hassle-free lock installation, ensuring peace of mind for your valuable possessions and assets.
What Is a Cam Lock?
A cam lock is a type of fastener used to secure two pieces of material together. It consists of a metal cylinder with two or more pins that are inserted into the corresponding holes in the items being joined. Once the pins are inserted, they can be tightened using an Allen key or similar tool to provide extra security against tampering. Cam locks are often used on doors, windows, drawers and even cabinets.
Installing a cam lock is relatively simple and only requires a few basic tools. Before beginning the installation process, make sure you have all of the necessary materials on hand including the cam lock itself, Allen keys or other fastening tools, and any drill bits or saw blades required for cutting a hole in your material if necessary.
Importance of Installing Cam Locks
When it comes to security, locks are one of the most important components. Whether you’re securing a business or protecting your home, installing high-quality cam locks is essential for keeping valuables and people safe. Cam locks provide an extra layer of protection against burglary, theft, and other unwanted intrusions. They also make it harder for criminals to gain access to your property.

Installing cam locks is not difficult, but it does require precision and care to ensure that the lock is properly installed. It’s important to make sure that the correct tools are used for the job and to follow instructions carefully, paying particular attention to any safety warnings.
To begin, you’ll need a cam lock kit which includes all components needed for installation, such as the cam lock body, mounting screws and keys. Once you have all the components, you can begin by installing the cam lock body in an appropriate location. Depending on where you are securing, this could be a door or gate.
10 Steps How to Install a Cam Lock
Step 1: Gather Your Tools and Materials
Before you start the installation process, make sure you have all the necessary tools and materials at hand. You will typically need the following items:
- Cam lock with keys
- Screwdriver or drill with appropriate bits
- Measuring tape or ruler
- Pencil or marker
- Center punch
- Safety glasses
- Level (optional)
- Spade bit (if using a drill)
Ensure that your workspace is well-lit and organized to facilitate a smooth installation.
Step 2: Choose the Installation Location

Determine the ideal location for your cam lock. Consider factors such as accessibility, convenience, and the object you’re securing. Use a measuring tape or ruler to mark the desired position accurately. If you’re installing multiple cam locks, ensure they are uniformly spaced and aligned.
Step 3: Mark the Drill Points
Using a pencil or marker, mark the center points where you will drill holes for the cam lock barrel and the accompanying nut. It’s crucial to maintain accuracy when marking the drill points, as any misalignment can affect the lock’s functionality.
Step 4: Use a Center Punch
To prevent the drill bit from wandering when you start drilling, use a center punch to create a small indentation at the center of each marked point. This indentation will serve as a guide for your drill bit.
Step 5: Drill the Hole for the Lock Barrel
Depending on your preference and the type of lock you have, you can either use a manual screwdriver or a drill for this step. If using a drill, insert an appropriately sized spade bit or a drill bit into the chuck.
- Carefully drill a hole at the marked point for the lock barrel. Make sure to maintain a straight and perpendicular angle to the surface.
- Drill to the depth recommended by the lock manufacturer or until the barrel fits snugly.
- If you’re using a manual screwdriver, use a bit or screwdriver that matches the slot of the cam lock barrel. Slowly turn it clockwise until it reaches the desired depth.

Step 6: Drill the Hole for the Lock Nut
After drilling the hole for the lock barrel, proceed to create a hole for the lock nut. This hole should be parallel and adjacent to the first hole. It’s important to ensure that the lock nut fits securely.
- Use the same drill bit or spade bit you used for the lock barrel to create the hole for the lock nut.
- Maintain a straight and perpendicular angle to the surface while drilling.
- Drill to the depth recommended by the lock manufacturer or until the lock nut fits properly.
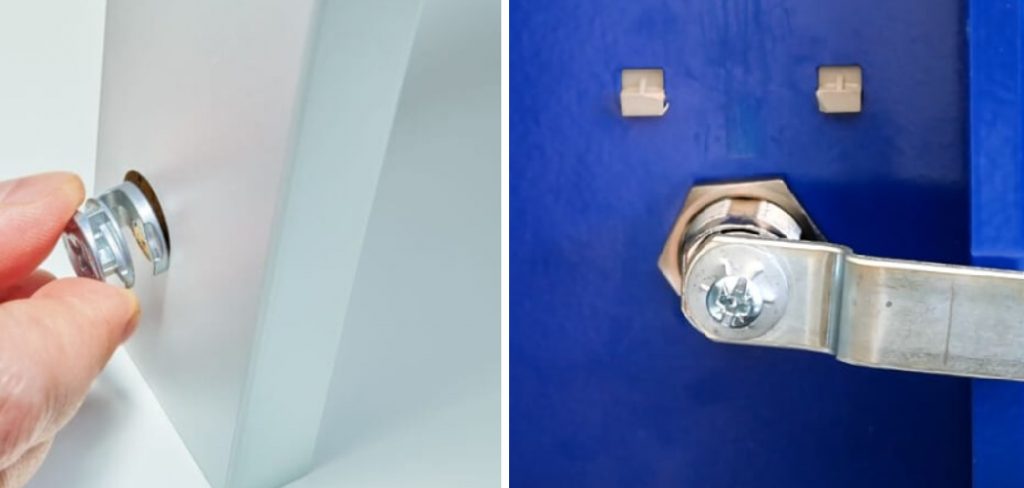
Step 7: Insert the Lock Barrel
With both holes drilled, insert the lock barrel into the hole you created in Step 5. Ensure it fits snugly and sits flush with the surface. If necessary, use a rubber mallet to gently tap it into place.
Step 8: Secure the Lock Nut
Thread the lock nut onto the back of the lock barrel, aligning it with the hole you drilled in Step 6. Tighten the lock nut using a wrench or a pair of pliers. Ensure it is securely fastened to the surface.
Step 9: Test the Lock
Before completing the installation, test the cam lock to ensure it operates smoothly and securely. Insert the key and turn it to lock and unlock the mechanism several times to verify its functionality.
Step 10: Final Adjustments and Cleanup
If the lock operates smoothly, make any necessary adjustments to ensure it aligns correctly with the locking mechanism on the object you are securing. Use a level if needed to ensure the lock is straight and even.
Safety Precautions for Installing Cam Lock
It is important to take safety precautions when installing a cam lock. Before starting, make sure you have all the necessary supplies and tools to complete the installation. Make sure you wear eye protection and gloves while working with any potentially dangerous equipment or materials.

When handling the cam lock, ensure that its parts are in proper alignment before attempting to install it. Make sure the cam lock is facing in the proper direction and that all components are securely fastened. If any parts appear to be damaged or unusable, do not attempt to install them.
When drilling holes for installation, use a drill bit that is appropriate for the material from which you are drilling. Do not force the bit into the material – instead, take your time to make sure the bit is properly aligned and that it drills through the material evenly. Securely fasten the cam lock into place using screws or bolts that are appropriate for the material of your wall.
Some Common Mistakes to Avoid
When installing a cam lock, it’s important to avoid some common mistakes. Make sure you have the right tools for the job and that they are in good condition. If possible, use a torque wrench to ensure that all screws or bolts are tightened correctly.
Ensure that you have the right type of lock for your application and understand how to properly install the lock and how it fits into your project. Be sure to use a lubricant, such as WD-40 or graphite powder, on the first few turns of the cam lock when installing. This will help reduce friction and make installation easier.
Finally, pay close attention to the instructions given with your particular cam lock model. Different models have different requirements for installation and operation, so make sure you read the instructions carefully. If you have any questions during the installation process, don’t hesitate to reach out for help.
Conclusion
As we have discussed, having a cam lock installed is extremely beneficial. It can provide extra security and peace of mind in both personal and professional settings. Cam locks are easy to install and come in many different sizes, shapes, and colors to fit every need. All that’s needed for installation are an Allen wrench and screwdriver.
Now that you know all about cam locks, why not give it a try? You’ll be the one who benefits from the added security and peace of mind brought by installing a cam lock. Don’t wait any longer – if you haven’t already considered how to install a cam lock, now is the time! It’s an affordable and simple way to add extra peace of mind into your life.
About
Safety Fic is a distinguished figure in the world of Diy design, with a decade of expertise creating innovative and sustainable Diy solutions. His professional focus lies in merging traditional craftsmanship with modern manufacturing techniques, fostering designs that are both practical and environmentally conscious. As the author of diy, Safety Fic delves into the art and science of Safety Fic-making, inspiring artisans and industry professionals alike.
Education RMIT University
(Melbourne, Australia) Associate Degree in Design (Safety Fic) Focus on sustainable design, industry-driven projects, and practical craftsmanship. Gained hands-on experience with traditional and digital manufacturing tools, such as CAD and CNC software.
Nottingham Trent University
(United Kingdom) Bachelor’s in diyfastly.com and Product Design (Honors) Specialized in product design with a focus on blending creativity with production techniques. Participated in industry projects, working with companies like John Lewis and Vitsoe to gain real-world insights.
Publications and Impact
In diy, Safety Fic his insights on indoor design processes, materials, and strategies for efficient production. His writing bridges the gap between artisan knowledge and modern industry needs, making it a must-read for both budding designers and seasoned professionals.