

Learning how to install Level Lock gives homeowners a simple, seamless way to upgrade their door into a secure smart lock system without compromising aesthetics. Level Lock is designed to fit within the existing hardware of your door, maintaining its sleek exterior while offering advanced features like Bluetooth connectivity, keyless entry, and remote control.

Before beginning the installation process, ensure you have all the necessary tools and components. You’ll typically need a screwdriver, the Level Lock device, and the accompanying installation guide that comes with it. Start by removing the existing deadbolt from your door, carefully preserving any screws or hardware you may need.
Once the old deadbolt is removed, follow the instructions provided with the Level Lock to align and install the new mechanism, ensuring the components fit snugly within the door’s existing cutouts. After completing the hardware installation, pair the device with the Level app for setup and customization.
Installing your Level Lock might sound complicated, but the process is beginner-friendly and doesn’t require professional tools. With clear steps and an eye for detail, you can easily integrate modern security into your home. This guide will walk you through the installation process, ensuring that everything from preparation to final setup goes smoothly. By the end, you’ll feel confident in your ability to enhance your door with Level Lock.
Why Should You Install Level Lock?
Smart locks have revolutionized home security, and Level Lock takes this convenience to the next level with its discreet design and intuitive functionality. Many smart locks sacrifice aesthetics for technology, but Level Lock eliminates that compromise. Fitting neatly into your door’s existing deadbolt mechanism, it offers advanced security without altering the visual appeal of your entryway.
Not only does Level Lock provide enhanced security, but it also improves your daily routine. Features like keyless entry allow you to lock and unlock your door via a smartphone or keypad, making lost keys a thing of the past. Additionally, the ability to share digital keys with family and guests adds new layers of convenience. Whether you prioritize security, streamlined technology, or style, installing a Level Lock brings these benefits together effortlessly.
For households wanting an upgrade without the hassle of drastic modifications, Level Lock proves that smart lock installations can be both efficient and discreet. Knowing how to install Level Lock yourself gives you control over the process and saves on professional installation fees.
Step-by-Step Guide: How to Install Level Lock
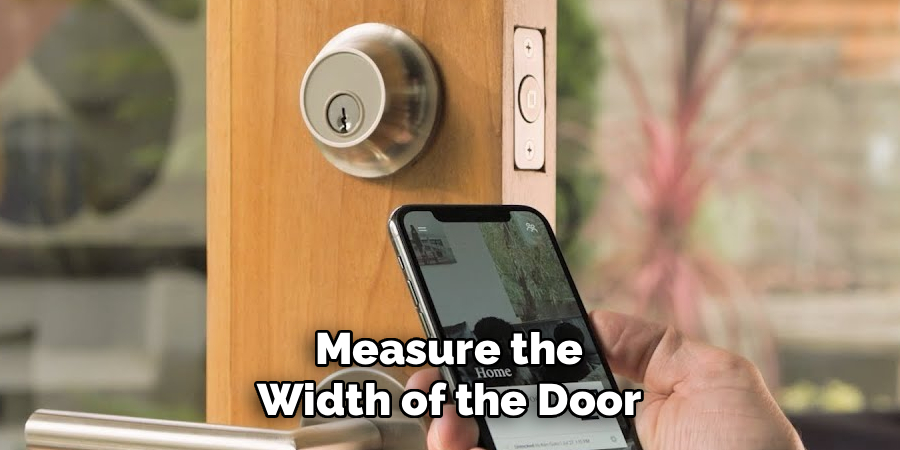
Step 1: Prepare Your Door for Installation
Before installing Level Lock, make sure your door’s existing hardware is compatible. Measure the width of the door and the cutout for the deadbolt. Standard doors with a thickness of 1-3/8” to 2-1/4” typically work well with Level Lock. Remove the old deadbolt hardware using a screwdriver and ensure that the area is clean and free of debris.
Inspect the borehole and strike plate openings to confirm they are properly aligned. Level Lock relies on precise alignment to operate smoothly, so taking a few minutes to double-check ensures no obstacles during installation. Preparing your door for installation lays the groundwork for a seamless process that enhances security and functionality.
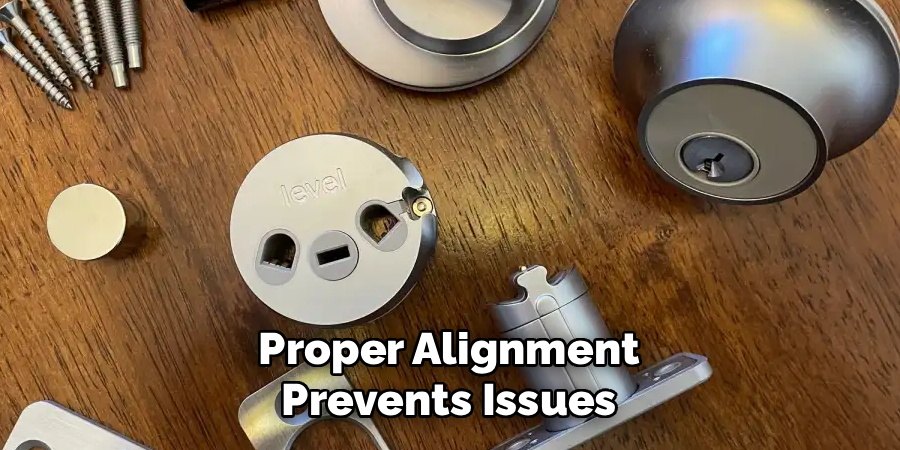
Step 2: Understand the Components of Level Lock
Unpack the Level Lock kit and familiarize yourself with its components. The lock generally includes the main deadbolt, escutcheon plates, tailpiece adapters, and screws for assembly. Having a clear understanding of the pieces ensures that you’re well-prepared once you start the installation.
Review the included manual or quick-start guide so you’re aware of any specific instructions for your lock model. While the design is intuitive, minor assembly steps like choosing the correct tailpiece adapter can vary depending on your door setup. Familiarizing yourself with the lock’s components allows you to move through the process confidently.
Step 3: Install the Deadbolt Mechanism
Begin by inserting the deadbolt mechanism into the prepared cutout on the edge of the door. Ensure the bolt is centered and retracts smoothly when tested. Securing the deadbolt is crucial for ensuring the Level Lock functions correctly, both mechanically and electronically.
Once positioned, use the provided screws to fasten the mechanism securely into place. Avoid overtightening, as this can damage the mechanism. The deadbolt installation marks the start of transforming your door into a secure, Level Lock-equipped entryway.
Step 4: Attach the Exterior Side of the Lock
Take the exterior escutcheon plate and align it with the deadbolt mechanism. Insert the tailpiece into the designated slot on the deadbolt, ensuring it fits snugly and rotates freely. Proper alignment prevents issues when locking and unlocking later.
Hold the exterior plate firmly while positioning the interior components to secure them. The exterior installation not only contributes to the lock’s aesthetics but also sets up the functional hardware that integrates with the internal mechanism.
Step 5: Secure the Interior Components
With the exterior plate in place, attach the interior escutcheon plate and internal hardware. Align these components carefully, ensuring that the internal tailpiece and battery housing connect properly with the deadbolt. Use the provided screws to secure the interior assembly, keeping everything tightened evenly for durability.
Take a moment to check the alignment by manually engaging the deadbolt to confirm smooth rotation. The internal assembly is the brain of the lock, housing the essential electronic features that make the Level Lock smart and reliable.
Step 6: Insert the Batteries
Level Lock operates with replaceable CR2 batteries, which you’ll need to insert into the designated battery compartment inside the lock. Ensure the batteries are inserted correctly based on the polarity indicators in the housing. Once they’re in place, your Level Lock powers on, partially completing the installation.
The insertion of batteries brings the advanced features like Bluetooth connectivity and remote operation to life. With the batteries secured, you’re one step closer to enjoying all the functionality Level Lock has to offer.
Step 7: Calibrate the Lock Using the App
Download the Level Lock app and begin the setup process. The app will guide you through calibrating the lock to ensure it functions seamlessly with your door. Start by connecting the lock via Bluetooth and follow the prompts to test the locking and unlocking mechanisms.
Calibration ensures that Level Lock accurately reads the door’s position and aligns perfectly with the deadbolt. This step is key to enabling features such as auto-locking, remote access, and key sharing. The app’s guidance simplifies the process, even for those new to smart lock technology.
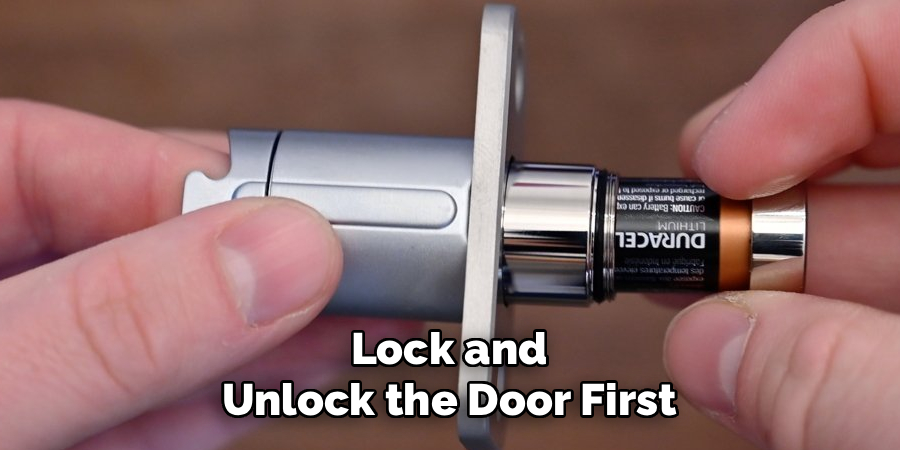
Step 8: Test the Fully Installed Lock
After calibration, perform several tests to confirm both the mechanical and digital functionality of your Level Lock. Manually lock and unlock the door first to ensure no physical obstructions. Then, try locking the door via the app or any connected device to verify Bluetooth connectivity.
Pay attention to any irregularities, like delays or incomplete locking. Addressing these early guarantees a smoother user experience and prevents potential malfunctions. Testing the lock ensures that it’s operational and ready for full-time use in securing your home or space.
Step 9: Finalize Your Smart Lock Setup
Complete your setup by configuring additional features in the Level Lock app, such as scheduling or enabling key sharing. Use the app to personalize user access and explore automation settings, like geofencing, which allows the lock to engage or disengage based on your proximity.
Personalizing the lock ensures it meets your specific needs and maximizes the advantages of integrating smart technology into your home. With everything set up, your Level Lock is now ready to provide seamless security and convenience.
Key Benefits of the Level Lock
Enhanced Security: Provides robust protection for your home with advanced locking mechanisms.
Customizable Access: Manage user access with scheduling, key sharing, and personalized settings through the app.
Convenience: Automation features like geofencing ensure the lock operates seamlessly based on your proximity.
Smart Integration: Combines innovative technology with ease of use for better control over home security.
Discreet Design: Offers a sleek and minimalist appearance while maintaining high functionality.
Frequently Asked Questions
What tools do I need to install Level Lock?
Installing Level Lock usually requires just a screwdriver, as most components fit securely into existing hardware. Depending on your door’s configuration, a measuring tape or drill may be helpful for accurate alignment.

Can Level Lock fit any door?
Level Lock is designed to fit standard door sizes, typically between 1-3/8 inches and 2-1/4 inches thick. Always check your door’s compatibility by measuring both the thickness and the borehole before installation.
How secure is Level Lock compared to traditional locks?
Level Lock offers enhanced security with its precision-engineered mechanism, which fits inside your door to maintain both functionality and discretion. Its smart features, such as real-time access control and encrypted Bluetooth connectivity, add an additional layer of security.
Can I install Level Lock without prior experience?
Yes, Level Lock is designed for easy DIY installation and includes clear instructions and an app to guide you. Even users with minimal tools and experience can successfully install it in under an hour.
What happens if the batteries run out?
If the batteries deplete entirely, Level Lock will no longer operate electronically. However, you can still use a physical key to unlock the door, ensuring you won’t be locked out.
Conclusion
Knowing how to install Level Lock empowers you to combine modern security with sleek design for your home. By following the step-by-step guide, you’ll transform your traditional lock into a smart solution that’s secure, discreet, and user-friendly.
Regular maintenance of your Level Lock is essential to ensure its optimal functionality. Periodically check the batteries and replace them when needed to avoid unexpected disruptions. Additionally, keep the lock’s components clean and free from debris to maintain smooth operation. Taking these simple steps will help extend the life of your smart lock and keep your home secure.
With simple tools and a bit of time, you’ll enjoy the convenience of remote access, keyless entry, and more, all wrapped into a lock that seamlessly fits your lifestyle. Start your installation process today and experience the benefits of a Level Lock—security made effortless!