

Are you tired of searching for your Honda keyfob whenever you need to unlock or start your car? Opening a Honda keyfob is a simple process that can save you time and hassle. In this guide, we will walk you through the steps on how to open Honda keyfob.
Opening a Honda keyfob may initially seem tricky, but it’s a straightforward process once you know the steps. Whether you need to replace the battery or troubleshoot a keyfob issue, understanding how to open it correctly is essential to avoid damage.
This guide will walk you through the process with simple and clear instructions, ensuring you can handle your keyfob with confidence and ease. Always take care when working with your keyfob to maintain its functionality and longevity.
What Are the Benefits of Opening Your Honda Keyfob?
Opening your Honda keyfob has several benefits, including:
- Replacing the Battery: If your keyfob’s battery is dead, you can easily replace it by opening the keyfob.
- Cleaning and Maintenance: Over time, dirt and debris may accumulate inside the keyfob, affecting its functionality. Opening and cleaning the keyfob can help maintain its performance.
- Fixing Issues: If your keyfob is not working correctly, opening it can help you troubleshoot and resolve any issues that may be causing problems.
Knowing how to open your Honda keyfob can save you time and money by avoiding unnecessary visits to the dealership or locksmith. It also gives you a sense of independence and control over your car’s access system.
What Will You Need?
Before you start, make sure you have the following items:
- Replacement Battery: If you need to replace your keyfob’s battery, ensure you have a new one. Check your vehicle’s manual for the correct battery type.
- Small Screwdriver: You need a small screwdriver to open most Honda keyfobs.
- Clean Cloth or Q-tips: These items will come in handy if you need to clean any dirt or debris inside the keyfob.
Once you have all the necessary items, you are ready to begin.
10 Easy Steps on How to Open Honda Keyfob
Step 1. Locate the Keyfob Slot or Groove:
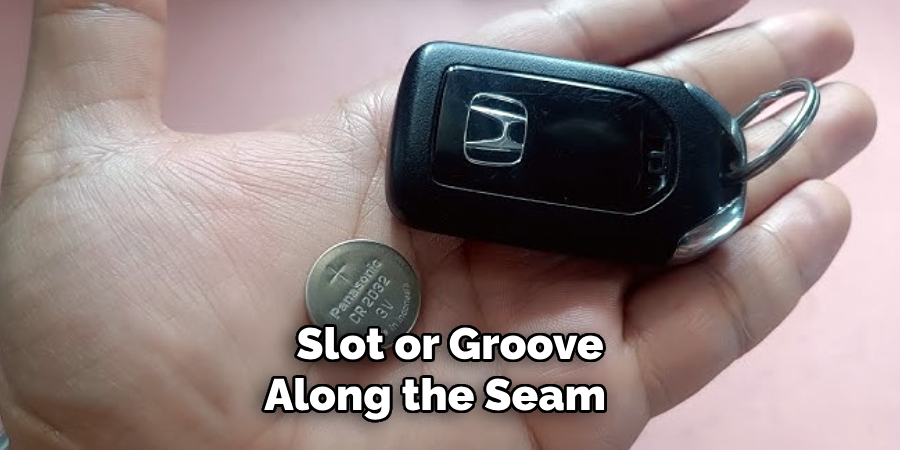
Begin by examining your Honda keyfob closely. Look for a small slot or groove along the seam where the two halves of the keyfob meet. This is typically found on the edge of the keyfob and is designed to assist with opening it. If you’re unsure where it’s located, refer to your vehicle’s manual for guidance. The slot is often subtle, so take your time and ensure you identify the correct part of the keyfob to avoid applying pressure in the wrong area.
Step 2. Insert the Small Screwdriver into the Slot:
Once you have located the slot or groove, take your small screwdriver and carefully insert it into the opening. Be sure to do this gently to prevent scratching or damaging the keyfob. Apply light pressure to start prying the two halves of the keyfob apart. If you feel resistance, avoid forcing the screwdriver and reposition it slightly to ensure you apply pressure at the correct angle. Patience is key at this stage to avoid breaking any components.
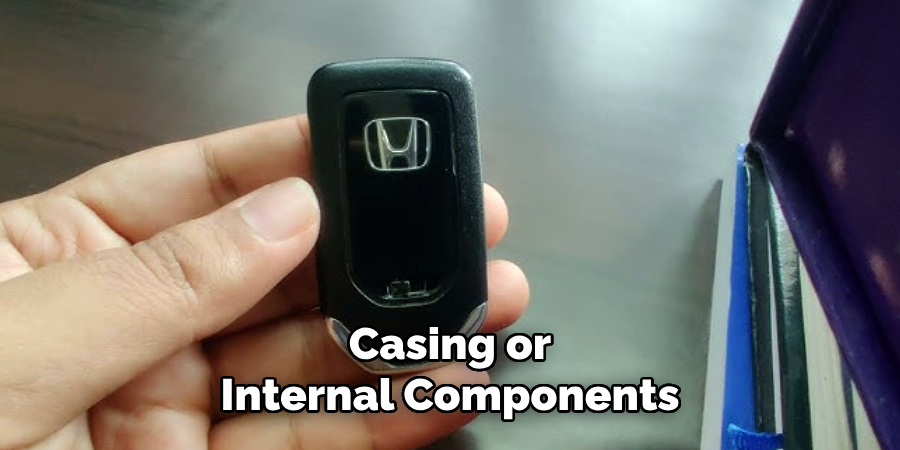
Step 3. Separate the Two Halves of the Keyfob:
With the screwdriver inserted and gentle pressure applied, you should notice the two halves of the keyfob beginning to separate. Continue to work around the edge of the keyfob, carefully prying it open bit by bit. Avoid excessive force, as this could damage the casing or internal components. Once the two halves are entirely separated, set them down on a clean, flat surface to prevent any loss of parts.
Step 4. Remove the Old Battery:
Now that the keyfob is open locate the battery inside. A small, round coin-like battery is typically seated within a designated compartment. Using your fingers or a non-metallic tool, gently remove the old battery by lifting it from its slot. Pay attention to the orientation of the battery as you remove it, noting which side is facing up. This will help ensure the new battery is installed correctly. Dispose of the old battery responsibly by following local recycling guidelines.
Step 5. Insert the New Battery:
Take the new battery and ensure it matches the specifications of the old one, including size and voltage. Carefully place the new battery into the compartment, aligning it in the same orientation as the old battery, with the positive (+) side typically facing up. Ensure the battery is seated firmly and securely in its slot to maintain proper contact, but avoid applying too much pressure that could damage the internal components. Double-check the placement before proceeding to the next step.
Step 6. Reassemble the Device:
Once the new battery is securely installed, reattach any covers or panels you removed earlier. Align the components correctly and ensure they are fastened tightly without overtightening screws or clips, as this could damage the device. Confirm all parts are securely in place before proceeding.

Step 7. Test the Device:
After reassembling the device, turn it on to ensure the new battery functions correctly. The replacement process is successful if the device powers on without issues and operates as expected. If the device does not turn on or behaves unusually, double-check the battery’s placement and ensure all connections are secure. Refer to the troubleshooting section of your device’s manual if problems persist.
Step 8. Dispose of the Old Battery Properly:
To finalize the replacement process, dispose of the old battery responsibly. Many types of batteries contain hazardous materials and should not be thrown in regular trash. Check local regulations and battery recycling programs to find the nearest drop-off location or recycling center. Proper disposal helps protect the environment and complies with safety guidelines.
Step 9. Maintain the Device After Replacement:
To prolong the lifespan of your new battery and ensure your device functions optimally, follow regular maintenance guidelines. Avoid overcharging or fully depleting the battery, as these practices can degrade its performance over time. Store the device in a cool, dry place and avoid exposure to extreme temperatures. Periodically check the battery’s condition and replace it again when necessary to maintain the device’s reliability.

Step 10. Test the Device After Replacement:
Once the new battery is installed, power the device to ensure it functions properly. Check for any issues, such as irregular performance or failure to start. If the device operates as expected, test its features to confirm everything is working as intended. This final step ensures the battery replacement was successful and the device is ready for regular use.
By following these 10 easy steps, you can easily replace your Honda keyfob battery without taking it to a dealership or service center.
5 Things You Should Avoid
- Using Excessive Force: Avoid prying the keyfob open excessively, as this could damage the plastic casing or internal components. Instead, carefully use a small screwdriver or a similar tool to open the fob along its seam gently.
- Ignoring Proper Tools: Do not open the keyfob without the appropriate tools. Using makeshift objects like knives or sharp utensils can cause scratches, break the casing, or even lead to injury.
- Rushing the Process: Impatience or rushing through the process can result in mistakes or damage. Take your time carefully handling the keyfob to ensure smooth disassembly and reassembly.
- Touching the Battery Terminals Directly: Avoid touching the battery terminals with your bare hands. The oils on your skin can lead to corrosion, which may impact the battery’s performance over time. Use gloves or hold the battery by its edges.
- Forgetting to Note the Battery Orientation: When removing the old battery, do not forget to observe its orientation (positive and negative sides). Installing the new battery incorrectly can prevent the keyfob from functioning and may cause further issues.
By avoiding these common mistakes, you can successfully replace your Honda keyfob battery without any complications.
What Battery for the Key Fob?
The type and size of the battery required for your Honda keyfob may vary depending on the model and year. It is essential to check your vehicle’s manual or contact a Honda dealership to confirm the correct battery specifications before purchasing a replacement. Some common battery types used in Honda keyfobs include CR1616, CR1620, and CR1632 lithium coin batteries. Make sure to match the voltage (usually 3V) when selecting a new battery.
Additionally, some Honda keyfobs may require a specific type of battery that can only be purchased from a dealership or authorized retailer. It is best to consult with the experts to ensure you get the correct keyfob replacement.
Conclusion
Opening a Honda keyfob is straightforward if you follow the proper steps. Start by locating the seam or groove along the edge of the keyfob, where the two halves meet. Use a small, flat-head screwdriver or tool to open the casing gently.
Be cautious to avoid applying excessive force to prevent damaging the keyfob or its internal components. Once opened, you can access the battery and other internal parts for replacement or maintenance. Always carefully handle the keyfob components and consult your vehicle’s manual for additional guidance.
Hopefully, the article on how to open Honda keyfob will help you easily replace the battery and maintain your device’s functionality without any hassle. Enjoy using your Honda keyfob with a brand-new battery!
About
Safety Fic is a distinguished figure in the world of Diy design, with a decade of expertise creating innovative and sustainable Diy solutions. His professional focus lies in merging traditional craftsmanship with modern manufacturing techniques, fostering designs that are both practical and environmentally conscious. As the author of diy, Safety Fic delves into the art and science of Safety Fic-making, inspiring artisans and industry professionals alike.
Education RMIT University
(Melbourne, Australia) Associate Degree in Design (Safety Fic) Focus on sustainable design, industry-driven projects, and practical craftsmanship. Gained hands-on experience with traditional and digital manufacturing tools, such as CAD and CNC software.
Nottingham Trent University
(United Kingdom) Bachelor’s in diyfastly.com and Product Design (Honors) Specialized in product design with a focus on blending creativity with production techniques. Participated in industry projects, working with companies like John Lewis and Vitsoe to gain real-world insights.
Publications and Impact
In diy, Safety Fic his insights on indoor design processes, materials, and strategies for efficient production. His writing bridges the gap between artisan knowledge and modern industry needs, making it a must-read for both budding designers and seasoned professionals.