

Ensuring your child’s safety during car rides is a top priority for every parent, and understanding how to recline Safety First car seat models correctly is a crucial part of this process.

This comprehensive guide provides step-by-step instructions to help you adjust the recline angle of your car seat, ensuring optimal safety and comfort for your little one.
From unlocking the recline mechanism to conducting final safety checks, we cover all the essential steps you must follow. By mastering how to recline Safety First car seat models properly, you can provide your child with the best possible protection on every journey.
Understanding Safety First Car Seat Recline Mechanism
Safety First car seats have a recline feature designed to cater to children of varying ages, weights, and heights. This feature allows parents to adjust the angle at which the car seat rests, accommodating both forward-facing and rear-facing positions.
Proper reclining is crucial for a number of reasons: it helps prevent the child’s head from slumping forward, which can obstruct their airway, and it ensures that the seat belt or harness is positioned correctly across the child’s body for optimum safety.
Different models of Safety First car seats offer unique recline mechanisms. Some models utilize a simple pull handle typically located at the front of the seat base, allowing easy adjustments even when the seat is installed.
Others may feature a multi-position recline system that offers several preset angles suitable for different types of vehicles and seating arrangements.
A level indicator, often included, assists in achieving the correct recline angle, displaying whether the seat is appropriately angled according to the manufacturer’s guidelines.
Understanding the specific recline mechanism of your Safety First car seat model is key to ensuring it functions as intended, providing both safety and comfort for your child during every car ride.
Tools and Materials Needed

One advantage of Safety First car seats is that no special tools are required for adjusting the recline. However, having the car seat manual on hand is crucial for reference, as it contains specific instructions and guidelines to ensure proper adjustment and maximum safety.
Preparing the Car Seat for Recline Adjustment
Before adjusting the recline angle of your Safety First car seat, it is essential to ensure that the car seat is properly installed in the vehicle. Begin by confirming that the car seat is securely fastened using either the vehicle’s seat belt or the LATCH system.
An incorrectly installed car seat can compromise the effectiveness of the recline mechanism and jeopardize your child’s safety. It is helpful to refer to both the car seat and vehicle owner’s manual for installation guidelines specific to your situation.
Next, make sure that the car is parked on a level surface. This step is crucial because adjusting the recline angle on an inclined plane can result in an inaccurate recline position, which may not be safe or comfortable for your child.
If your car is not on a flat surface, the level indicator (if present) could provide misleading information, leading to incorrect adjustments.
Finally, the area around the car seat should be cleared of any objects or toys that might obstruct the adjustment process. Loose items can get caught in the recline mechanism, preventing it from functioning correctly.
Ensure that harness straps, seat covers, or other accessories are properly aligned and out of the way. Removing these obstacles creates a clear path for making smooth and accurate recline adjustments.
How to Recline Safety First Car Seat: Adjusting the Recline Angle
To adjust the recline angle of your Safety First car seat, you must first locate the recline adjustment handle or lever.
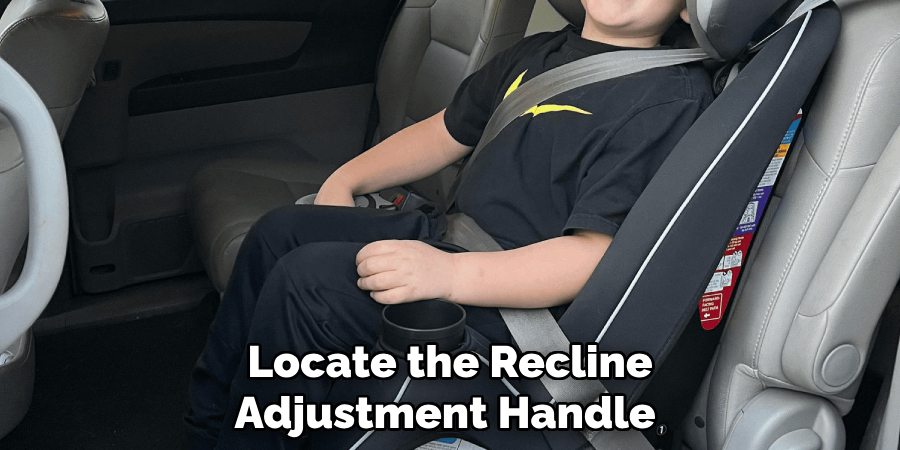
This is typically situated at the front or bottom of the seat base, making it accessible even when the seat is installed in the vehicle. Familiarize yourself with the handle’s location and examine the mechanism to understand how it functions.
Start by pulling or lifting the handle or lever to unlock the recline mechanism. This step is crucial as it disengages the locking mechanism, allowing you to adjust the seat’s angle freely. Ensure you maintain a firm grip on the car seat, as it may shift unexpectedly once the recline mechanism is unlocked.
Next, adjust the seat to the desired angle. Gently push or pull the top of the car seat to reposition it, keeping a close eye on the level indicator (if available) to achieve the recommended angle for your child’s age and weight.
The recline angle should be such that it prevents your child’s head from slumping forward and allows the harness to fit snugly across their body.
Once you have set the desired angle, lock the recline position by releasing the handle or lever. Ensure it clicks back into place, confirming that the recline mechanism is securely engaged.
If your car seat is equipped with a level indicator, double-check the recline angle by referring to it again to verify that the seat is correctly positioned. This meticulous adjustment process ensures optimal safety and comfort for your child during every car ride.
Checking the Recline Angle
Once you have adjusted the recline angle of your Safety First car seat, it is imperative to verify that the angle is correct using the level indicator if your model is equipped with one.
The level indicator is essential as it visually shows whether the seat is at the proper recline angle according to the manufacturer’s guidelines. This typically involves a bubble or liquid indicator that aligns within a marked range when the seat is correctly positioned.
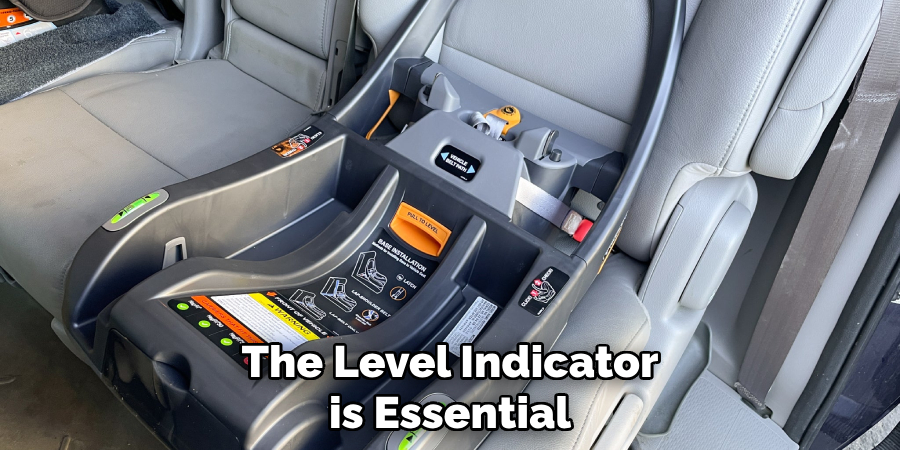
Begin by checking the level indicator to ensure that it displays the recommended angle for your child’s age and weight. The appropriate angle prevents your child’s head from slumping forward and maintains the harness correctly, thus optimizing safety.
If the level indicator shows that the angle is too steep or too shallow, manually adjust the recline by slightly lifting or lowering the seat while keeping an eye on the indicator.
Once you’ve achieved the correct angle, confirming that the recline mechanism is securely locked in the new position is crucial. Release the handle or lever and ensure it clicks back into place, thereby engaging the locking mechanism.
A securely locked seat not only ensures the proper recline angle but also contributes to the overall stability and safety of the car seat. Regularly verifying and adjusting the recline angle as your child grows ensures continual safety and comfort during car rides.
Ensuring Proper Installation After Recline Adjustment
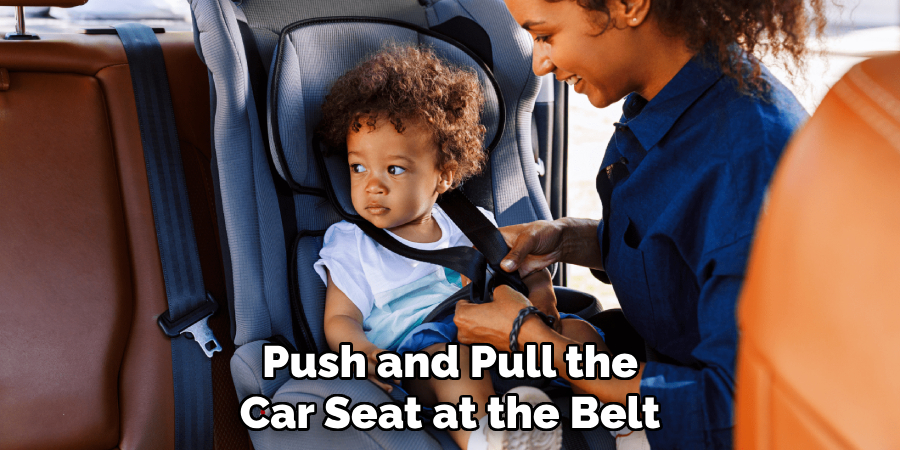
After adjusting your Safety First car seat’s recline angle, double-check the installation to ensure that the seat remains securely fastened. Begin by verifying that the car seat is still correctly positioned using the vehicle’s seat belt or LATCH system.
Carefully examine the seat belt path or LATCH connectors to confirm that they are untwisted and properly threaded through the designated slots on the car seat.
If you find any slack or looseness in the seat belt or LATCH system, re-tighten them to eliminate any movement. Pull firmly on the seat belt or LATCH strap to ensure a snug fit, as a tightly secured car seat significantly enhances safety.
When checked at the belt path, the car seat should not move more than one inch side-to-side or front-to-back. Push and pull the car seat at the belt path to test for excessive movement. If you notice any instability, recheck the installation steps and adjust as needed to achieve a secure fit.
By meticulously ensuring the car seat is securely installed after recline adjustment, you maximize the safety and stability of the car seat, thereby providing optimal protection for your child during each car ride. Regularly monitor and re-tighten the installation as needed to maintain this safety.
Final Safety Checks
After adjusting the recline angle and ensuring the car seat is securely installed, perform final safety checks to guarantee your child’s well-being. Firstly, ensure that the harness straps are properly adjusted for the new recline position.
The straps should lie flat and snugly over your child’s shoulders without any twists. They should be tight enough that you can’t pinch any excess webbing at the shoulders.
Next, check that your child’s head is well-supported and that the harness fits snugly across their body. The new recline angle should prevent their head from slumping forward, ensuring a comfortable and safe ride.
Conduct a quick tug test on the harness straps to ensure they are secure and properly adjusted.
Lastly, consult the car seat manual for any additional specific instructions or recommendations related to your Safety First car seat model.
The manual contains crucial information tailored to your car seat, providing valuable tips for maintaining optimal safety standards. Following these final safety checks ensures maximum protection and comfort for your child on every journey.
Conclusion
In conclusion, understanding how to recline safety first car seat properly is essential for ensuring your child’s safety and comfort during car rides.
By following the detailed steps outlined in this guide, from unlocking the recline mechanism to confirming the proper installation and performing final safety checks, you can confidently adjust your car seat to the optimal angle.
Regularly monitoring and maintaining the correct recline and installation will provide continuous protection and peace of mind, making every journey a safe and pleasant experience for both you and your child.
About
Safety Fic is a distinguished figure in the world of Diy design, with a decade of expertise creating innovative and sustainable Diy solutions. His professional focus lies in merging traditional craftsmanship with modern manufacturing techniques, fostering designs that are both practical and environmentally conscious. As the author of diy, Safety Fic delves into the art and science of Safety Fic-making, inspiring artisans and industry professionals alike.
Education RMIT University
(Melbourne, Australia) Associate Degree in Design (Safety Fic) Focus on sustainable design, industry-driven projects, and practical craftsmanship. Gained hands-on experience with traditional and digital manufacturing tools, such as CAD and CNC software.
Nottingham Trent University
(United Kingdom) Bachelor’s in diyfastly.com and Product Design (Honors) Specialized in product design with a focus on blending creativity with production techniques. Participated in industry projects, working with companies like John Lewis and Vitsoe to gain real-world insights.
Publications and Impact
In diy, Safety Fic his insights on indoor design processes, materials, and strategies for efficient production. His writing bridges the gap between artisan knowledge and modern industry needs, making it a must-read for both budding designers and seasoned professionals.