

Dealing with a stuck deadbolt can be a frustrating situation that compromises the security and accessibility of your home or property. Whether due to aging mechanisms, improper installation, or environmental factors, a stuck deadbolt can be a challenge to resolve without the right knowledge and approach. Removing a stuck deadbolt requires careful steps and the right tools to avoid causing further damage. In this comprehensive guide, we’ll delve into how to remove a stuck deadbolt.
From assessing the situation and identifying the root cause to implementing corrective actions using lubrication, disassembly, or potential replacement, we’ll provide you with the expertise and insights needed to tackle this issue and regain smooth functionality and security for your doors.
Importance of Removing a Stuck Deadbolt
There are a few reasons why it may be important to remove a stuck deadbolt. First, if the lock is damaged, broken or otherwise worn out, replacing it with a new one can help restore security and peace of mind. Additionally, if you’re trying to change locksets or need to replace an existing set with another one that’s compatible, removal of the old deadbolt may be necessary. Finally, if the lock simply won’t open due to corrosion or other issues, removal of the stuck deadbolt is essential in order to gain access.
No matter the reason for removing a stuck deadbolt, it’s important to first understand how these locks work and what tools are needed for a successful removal. Generally speaking, most deadbolts require a drill and an extractor specifically designed to remove them. In some cases, however, it may be possible to manage the removal with just a screwdriver or other common household tools.
Once the proper tools have been gathered, the first step in removing a stuck deadbolt is to access the mounting screws. Depending on the type of lock you have, these screws may be located on the exterior portion of the lock or inside the lock itself. If you’re unable to access them, it’s important to enlist a professional locksmith who can help safely take apart the lock for removal.
Common Reasons for a Deadbolt Getting Stuck
Deadbolts can get stuck for a variety of reasons, such as:
- Rust: If the deadbolt is exposed to moisture and doesn’t have proper protection it can build up rust over time. This will eventually lead to the lock sticking and not being able to open or close properly.
- Dust/Grit: When dust and grit gets inside the lock cylinder, it can cause the deadbolt to stick and not function properly.
- Worn Out Parts: As with any other piece of hardware, over time the parts in a deadbolt can become worn out or broken down due to normal wear and tear. This can also lead to the deadbolt sticking.
10 Steps How to Remove a Stuck Deadbolt
1. Gather the Right Tools
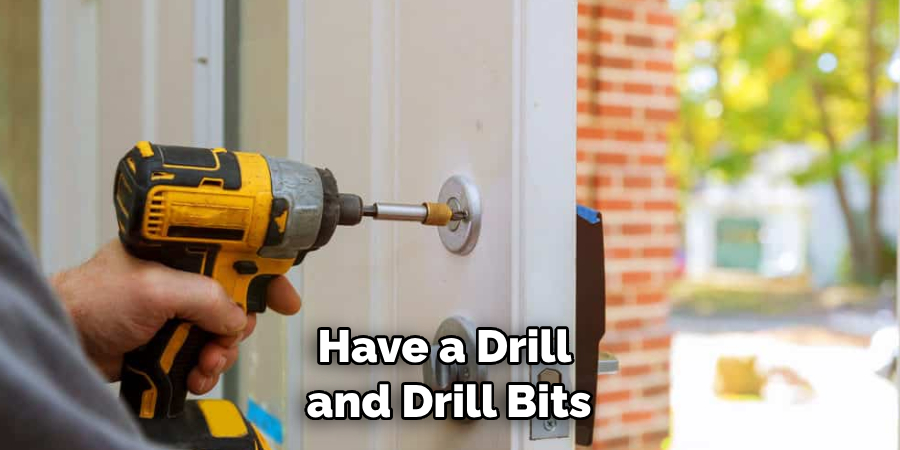
Before attempting to remove a stuck deadbolt, it is important to gather the right tools for the job. This includes a screwdriver, pliers, and a hammer. It may also be helpful to have a drill and drill bits on hand in case extra force is needed. Additionally, you may need some lubricant such as WD-40 or graphite powder to help loosen the bolt.
2. Remove Screws
Once you have gathered the necessary tools, you will need to remove any screws that are holding the deadbolt in place. Use a screwdriver to unscrew any screws that are visible from the outside of the door. If there are no visible screws, then you will need to use a drill bit to bore through any hidden screws that may be holding the deadbolt in place.
3. Apply Lubricant
Once all of the screws have been removed, it is time to apply lubricant to the stuck deadbolt. Spray or pour some lubricant into the keyhole and around the edges of the lock cylinder where it meets with the door frame. This will help reduce friction and make it easier for you to turn or pull out the deadbolt when necessary.
4. Insert Key
Now it’s time to insert your key into the keyhole of your stuck deadbolt and attempt to turn it clockwise and counterclockwise several times in order to break up any corrosion or rust that may be preventing it from turning freely. If this does not work, then try using pliers or a hammer handle wrapped in cloth as an alternative way of applying more force when turning your key in order to break up any corrosion or rust build-up within your lock cylinder mechanism.
5. Tap Around the Lock Cylinder
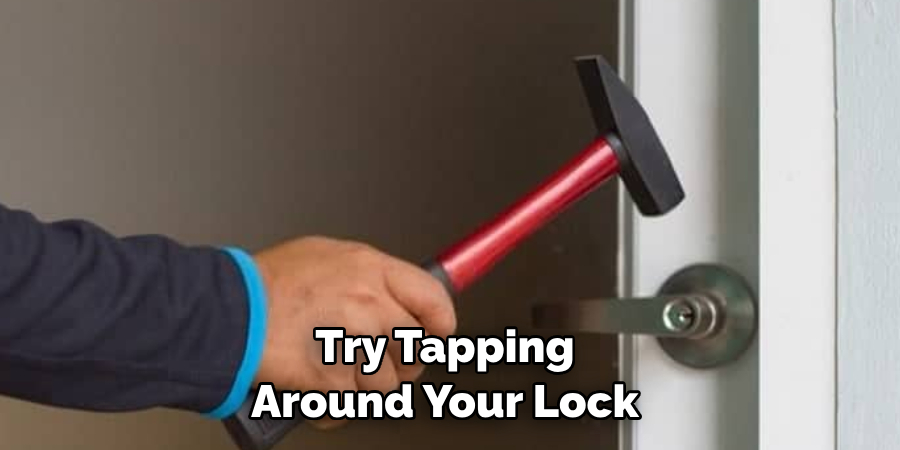
If inserting your key does not work, then you can try tapping around your lock cylinder with a hammer handle wrapped in cloth or even with another tool, such as a chisel or flathead screwdriver, in order to dislodge any dirt or debris that may be preventing your deadbolt from moving freely within its housing unit. Be sure not to hit too hard as this could cause further damage if done incorrectly!
6. Pull Out Deadbolt
If tapping around your lock cylinder does not work then you can try pulling out your stuck deadbolt by grasping onto its sides with pliers and gently wiggling it back and forth until it loosens enough for you to pull out manually without causing further damage. Be sure not to use excessive force when doing this as this could cause further damage if done incorrectly!
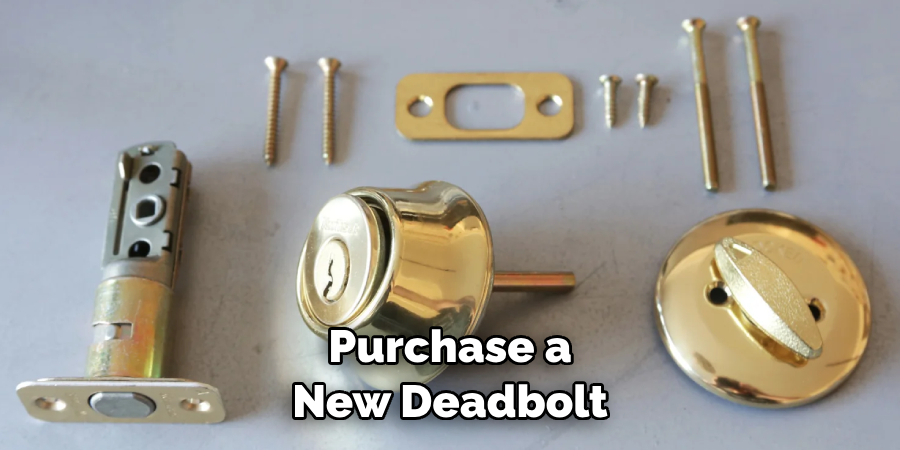
7. Replace Deadbolt
Once you have successfully removed your stuck deadbolt, replace it with either an identical one (if possible) or one that is slightly larger than what was originally installed so that there is no risk of having another stuck deadbolt situation arise due to improper sizing issues. Be sure to also check for any signs of wear and tear on both sides of the new replacement before installing – if there are any noticeable signs then replace immediately!
8. Inspect Door Frame
Once you have replaced your old stuck deadbolt with a new one, inspect both sides of the door frame where the old bolt was installed for possible signs of wear and tear (such as scratches). If there are any visible signs then repair/replace them immediately before installing a new bolt otherwise risk having another stuck situation arise due to improper fitting issues!
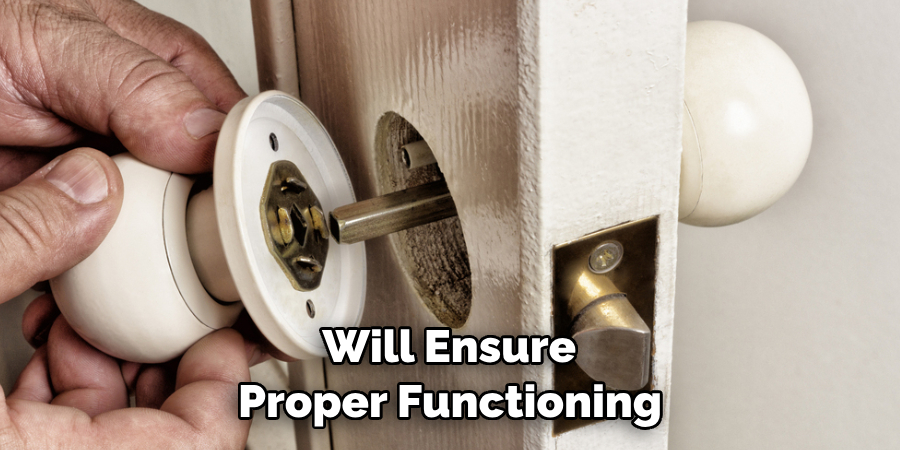
9. Adjust Bolt Positioning
Finally adjust the positioning of the newly installed bolt so that it fits snugly within the door frame without gaps between two surfaces – this will ensure proper functioning & prevent future sticking incidents from occurring due to improper fitting issues!
10. Test New Deadbolt
After properly adjusting positioning & inspecting both sides for wear & tear – test the newly installed bolt by inserting the key into the keyhole & turning clockwise/counterclockwise several times until satisfied with functionality (if still having difficulty unlocking/locking then repeat steps 1-9 again).
Things to Consider When Removing a Stuck Deadbolt
There are some important things to consider when attempting to remove a stuck deadbolt. These include:
- The type of lock used: If you are using an old or antique style lock, there may be special tools and techniques that need to be employed in order to safely remove the deadbolt.
- Damage risk: There is always a chance that you could cause further damage to the lock or even the door itself when attempting to remove a stuck deadbolt. It is best to have an experienced locksmith on call in case of any complications.
- Possibility of breakage: Deadbolts are typically made out of metal, so there is always a chance that it could break while attempting to remove it. If this happens, you will need to purchase a new deadbolt.
- Security: When replacing or installing a new deadbolt, it is important to make sure that it is installed correctly so as to ensure maximum security. Make sure to follow all instructions regarding the installation of the new deadbolt, and if needed, have an experienced locksmith do the job.
When dealing with a stuck deadbolt, it is important to take all of these points into consideration in order to get the best results. Taking the time to do so can help you avoid any unwanted damage or further complications. Additionally, if you are uncertain about how to proceed, it is always best to contact a professional locksmith for assistance. With their expertise and knowledge, they can help you remove the stuck deadbolt safely and efficiently.
Conclusion
The removal of a stuck deadbolt can be intimidating if you are unfamiliar with the process, but if you have the right tools and follow the instructions effectively, it’s relatively easy to remove or replace them. There are several methods to use when dealing with a stuck deadbolt; take your time, have patience, and do some research if necessary.
What’s important is that once you understand the procedure, you will be confident in knowing how to remove a stuck deadbolt in no time. Now that we have reviewed the steps for removing a stuck deadbolt correctly, take action today by trying out each step and see what works best for your situation. Who knows—you may even come up with a solution that was not initially discussed!
About
Safety Fic is a distinguished figure in the world of Diy design, with a decade of expertise creating innovative and sustainable Diy solutions. His professional focus lies in merging traditional craftsmanship with modern manufacturing techniques, fostering designs that are both practical and environmentally conscious. As the author of diy, Safety Fic delves into the art and science of Safety Fic-making, inspiring artisans and industry professionals alike.
Education RMIT University
(Melbourne, Australia) Associate Degree in Design (Safety Fic) Focus on sustainable design, industry-driven projects, and practical craftsmanship. Gained hands-on experience with traditional and digital manufacturing tools, such as CAD and CNC software.
Nottingham Trent University
(United Kingdom) Bachelor’s in diyfastly.com and Product Design (Honors) Specialized in product design with a focus on blending creativity with production techniques. Participated in industry projects, working with companies like John Lewis and Vitsoe to gain real-world insights.
Publications and Impact
In diy, Safety Fic his insights on indoor design processes, materials, and strategies for efficient production. His writing bridges the gap between artisan knowledge and modern industry needs, making it a must-read for both budding designers and seasoned professionals.