

Are you trying to remove a trailer hitch lock from your vehicle but feeling stuck? You’re not alone—installing and removing a trailer hitch lock can be challenging, especially for those who have no prior experience in doing so. But don’t worry! Removing a trailer hitch lock doesn’t have to feel like an insurmountable task.
In this blog post on how to remove a trailer hitch lock, we’ll guide you through the entire process of how to safely remove a trailer hitch lock. With our tips and tricks, you will learn everything you need to know about unlocking your trailer with confidence!
Needed Tools and Materials
Given below are the essential items you’ll need for the job:
- A Ratchet and Socket Set
- Trailer Hitch Lock
- Tow Bar Key (if Applicable)
- Wd40 Lubricant
- Hammer (optional)
Step-by-step Guidelines on How to Remove a Trailer Hitch Lock
Step 1: Locate the Lock
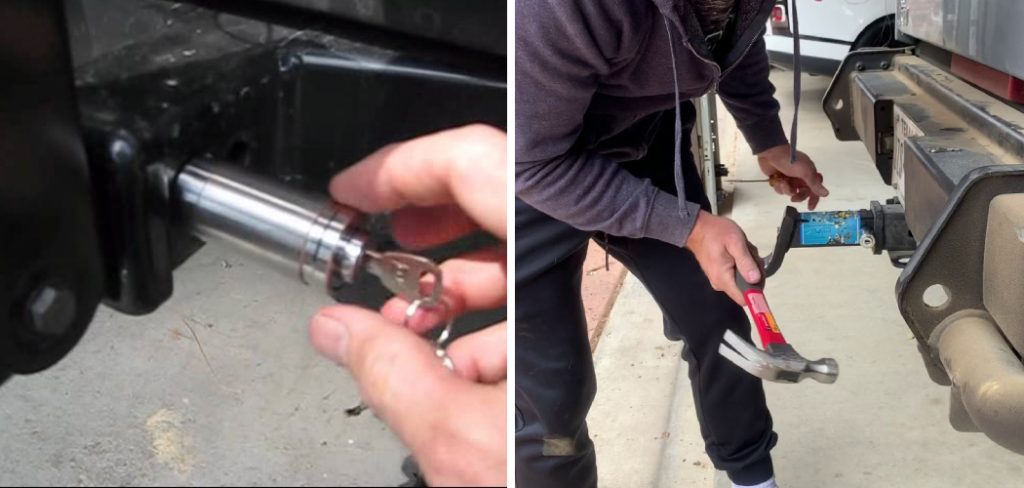
The first step in removing your trailer hitch lock is locating it. Generally, trailer hitches are attached to the back of your vehicle and can be found on either side. Look for a metal ring connected to the tow bar. This is where you’ll find the lock that you need to remove. It’s important to note that the lock can also be located on the front of your vehicle, depending on its make and model.
Step 2: Insert the Tow Bar Key (if Applicable)
If your trailer hitch lock has a tow bar key, insert it into the lock and turn it until you feel resistance. This will unlock the shackle. If your trailer hitch doesn’t have a tow bar key, skip this step and move on to step three. But if your trailer hitch lock does have a tow bar key, make sure to keep it safe—you’ll need it for the next step. If the tow bar key doesn’t unlock your trailer hitch, you may need to proceed to step three.
Step 3: Apply Wd40 Lubricant
If the lock is stuck, it’s likely due to corrosion and rust buildup. To help loosen it up, apply a generous amount of lube such as WD-40 onto the shackle and wait for a few minutes before proceeding. This will help reduce friction. You can also try using a hammer to gently tap the shackle if it’s particularly stuck, but make sure to be careful not to damage it in the process. It may take a few attempts to get the shackle free.

Step 4: Use a Ratchet and Socket Set
Once the lock has been sufficiently lubricated, use your ratchet and socket set to remove it from the tow bar. Insert the appropriate size socket into the shackle and gently work the ratchet back and forth until you hear a click. This indicates that the lock has been released. This may take a few attempts, so be patient. You may need to use a little bit of force while you’re doing this, but make sure not to push too hard or else you might damage the lock.
Step 5: Use a Hammer (Optional)
If your lock is still stuck despite using WD-40, you may need to use a hammer to help remove it. Be sure to use caution when doing this as too much force can damage the trailer hitch or worse, your vehicle. Insert the socket onto the shackle and gently tap the ratchet with the hammer until you hear a click. This should help loosen the lock and release it from your trailer hitch. It may take a few attempts, so don’t be discouraged if it doesn’t come off on the first try.
Step 6: Remove Lock
Once you’ve released the lock, remove it from your vehicle’s tow bar and set it aside for disposal. Be sure to take proper safety precautions when handling the lock as it may contain sharp edges. Otherwise, you’re all set! Your trailer hitch lock has been safely removed. It’s now time to move on to installing a new one. This process is similar to removing a trailer hitch lock but with some additional steps.
Step 7: Clean Tow Bar
Once you’ve removed the lock, it’s important to clean the tow bar before attaching a new one. Use a dry cloth and use caution when cleaning, as any leftover debris from the old lock can damage your vehicle or worse, someone else’s.
This will help keep the tow bar free from rust and debris. It’s also important to note that this step isn’t necessary if you’re reusing the same lock, as it should already be clean and free from debris. But if you do plan on reusing the lock, it’s still a good idea to give it a thorough cleaning before attaching it back onto your vehicle.

Step 8: Install New Lock
Now that your tow bar is nice and clean, it’s time to install your new lock. Secure the shackle on the key side of the trailer hitch and insert the socket onto the other end. Once you’ve done this, use a ratchet and gently work the lock until you hear a click. This indicates that it’s properly in place and ready to use. It’s important to note that if the lock is too tight, it may be difficult to insert the socket. In this case, try using a hammer to gently tap the socket until it’s securely in place.
Step 9: Test Lock
Before taking your vehicle out on the road, it’s important to test your trailer hitch lock. To do this, insert the key into the lock and turn it gently back and forth. If you don’t feel any resistance, this is a sign that the lock is securely in place and ready to use. However, if you do feel resistance, this indicates that the lock is too loose and may need to be tightened. To adjust the tension of your trailer hitch lock, use a screwdriver or similar metal tool to tighten the shackle until it’s secure.
Step 10: Re-check Tow Bar
Once you’ve tested your trailer hitch lock, it’s important to re-check the tow bar for any signs of damage or corrosion. If everything looks good, you’re ready to go. It’s also important to note that this step isn’t necessary if you’ve already cleaned the tow bar before installing the lock. But it’s still a good idea to give it a quick once-over just to be sure.
Step 11: Dispose of the Old Lock
Once you’ve installed your new lock, it’s important to properly dispose of the old one. Take your old lock to a recycling center or contact your local waste management facility for details on how to safely dispose of these items. Always practice proper safety when handling and disposing of the old lock, as it may contain sharp edges. Once you’re done, you’ve officially removed and replaced your trailer hitch lock. Congratulations! You can now hit the road knowing that your trailer is safely secured to your vehicle.
Following these steps on how to remove a trailer hitch lock will help you safely and effectively unlock your trailer with confidence. With the right tools and materials, a bit of patience, and some careful maneuvering, you can get your vehicle back out on the road in no time!
Related Tips & Tricks
- If you’re not sure how to install a trailer hitch lock, consult your vehicle’s owner manual for instructions.
- To prevent rust and corrosion buildup in the future, use a lubricant or silicone gel on the shackle of your lock regularly.
- If you find yourself stuck with an old trailer hitch lock that can’t be removed, consider hiring a professional locksmith to help.
- Be sure to always store your trailer hitch lock in a secure location when not in use. This will help prevent theft and unauthorized access.
Removing a trailer hitch lock doesn’t have to be a daunting task. With the right tools and materials, plus some patience and skill, you can quickly unlock your
Conclusion
In conclusion, removing a trailer hitch lock is no easy feat. With some patience and perseverance, however, you can have your hitch lock loosened in no time. Be sure to carefully read the instructions before beginning and use caution when using power tools or other hazardous tools while attempting the job. Keep in mind that in most cases, calling for professional assistance is recommended – a locksmith or mechanic might be able to help you out if it gets too difficult.
Fortunately, trailer hitch locks are designed with convenience and durability in mind. So don’t be discouraged if the lock seems to be stuck! Now that you’ve read our guide on how to remove a trailer hitch lock, we encourage you to give it a shot yourself and test out your DIY skills!
About
Safety Fic is a distinguished figure in the world of Diy design, with a decade of expertise creating innovative and sustainable Diy solutions. His professional focus lies in merging traditional craftsmanship with modern manufacturing techniques, fostering designs that are both practical and environmentally conscious. As the author of diy, Safety Fic delves into the art and science of Safety Fic-making, inspiring artisans and industry professionals alike.
Education RMIT University
(Melbourne, Australia) Associate Degree in Design (Safety Fic) Focus on sustainable design, industry-driven projects, and practical craftsmanship. Gained hands-on experience with traditional and digital manufacturing tools, such as CAD and CNC software.
Nottingham Trent University
(United Kingdom) Bachelor’s in diyfastly.com and Product Design (Honors) Specialized in product design with a focus on blending creativity with production techniques. Participated in industry projects, working with companies like John Lewis and Vitsoe to gain real-world insights.
Publications and Impact
In diy, Safety Fic his insights on indoor design processes, materials, and strategies for efficient production. His writing bridges the gap between artisan knowledge and modern industry needs, making it a must-read for both budding designers and seasoned professionals.