

Are you tired of looking at your old and worn-out Acura key fob case? Do you want to give your key fob a fresh look without buying a whole new one?
How to replace Acura key fob case is a simple process that can help restore the functionality and appearance of your key fob. Over time, constant use can lead to wear and tear, causing the case to crack, buttons to fade, or the structure to weaken. Instead of replacing the entire key fob, swapping the case is a cost-effective solution that ensures your key fob remains protected and easy to use.
This guide will walk you through the step-by-step process to replace your Acura key fob case effortlessly, saving you both time and money.
What Are the Benefits of Replacing Your Acura Key Fob Case?
Replacing your Acura key fob case offers many benefits, including:
- Restoring the Functionality of Your Key Fob: Over time, the buttons on your key fob may become less responsive due to wear and tear. Replacing the case can help improve the functionality of your key fob.
- Enhancing Safety: A cracked or damaged case can leave your key fob vulnerable to water damage, potentially affecting its ability to unlock or start your car. Replacing the case ensures that your key fob is appropriately protected.
- Improving Aesthetics: An old, worn-out key fob case can make your keys look unappealing. Replacing the case can give your key fob a new look, making it more pleasant to use and carry around.
- Saving Money: Replacing the entire key fob can be expensive. By only replacing the case, you can save money while maintaining your key fob’s functionality.
What Will You Need?
- Replacement Acura key fob case
- Small screwdriver (for opening the original case)
- Flathead screwdriver (for removing the battery)
Once you have these items, you are ready to begin the replacement process.
9 Easy Steps on How to Replace Acura Key Fob Case
Step 1. Open the Original Case:
Use the small screwdriver to remove the screws securing the original key fob case carefully. If your key fob does not have screws, you may need to use a flathead screwdriver to pry open the case along the seam gently.
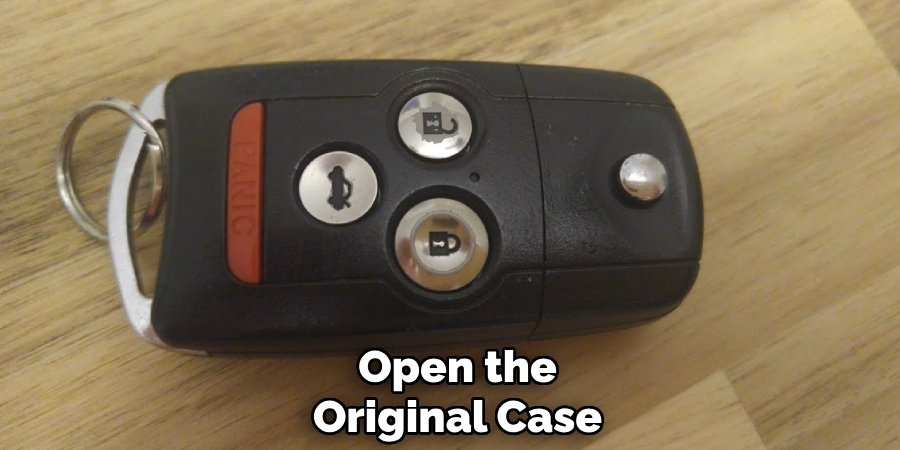
Be cautious when doing this to avoid damaging the internal components. Work slowly and patiently, applying enough pressure to open the case without cracking or breaking it safely. Once the case is open, set aside the screws (if any) and the top piece of the old case in a safe place where they will not get lost.
Step 2. Remove the Battery:
After opening the key fob case, locate the battery, which is usually housed in the center of the unit. Use a flathead screwdriver or your fingers to lift and remove the battery carefully. Be gentle to avoid scratching or damaging the battery compartment, as this will be reused in the new case.
Take note of the battery’s orientation—observe the positive (+) and negative (-) sides—so you can insert it correctly into the replacement case. If the battery appears worn out or corroded, this is a good time to replace it with a new one of the same type, ensuring optimal functionality for your key fob once the replacement process is complete. Set the battery aside in a safe spot to prevent it from rolling away or getting misplaced.
Step 3. Transfer the Internal Components:
With the battery removed, carefully remove the key fob’s internal components, such as the circuit board and any other small pieces, from the old case. Use caution and precision to avoid damaging these sensitive parts. Inspect the components for dirt or dust, and gently clean them with a soft cloth if necessary.
Once removed, place the components into their corresponding slots in the new case, ensuring they are correctly aligned and securely seated. Double-check that none of the parts are loose, as this can affect the functionality of the key fob.
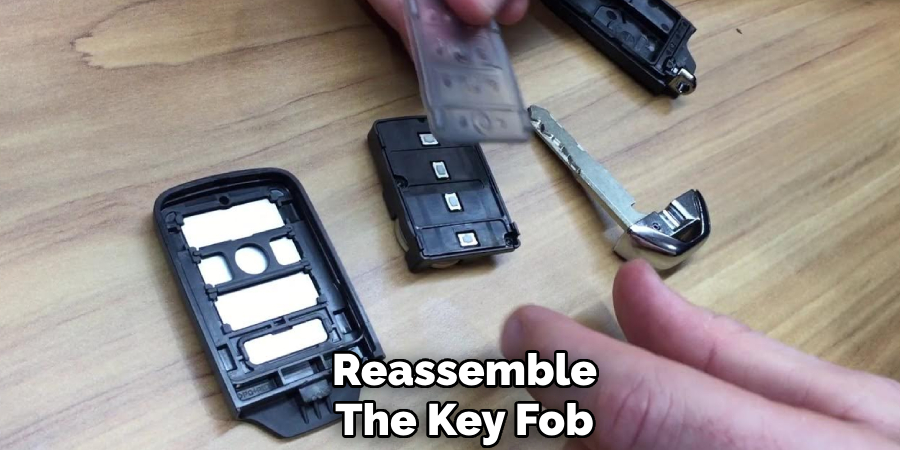
Step 4. Assemble the Key Fob:
Once all the internal components are securely in place within the new case, carefully attach the two halves of the key fob together. Align them properly and press them firmly until you hear or feel them snap into place.
Ensure there are no gaps between the pieces and the case is tightly sealed. If your key fob uses screws, reinsert them and tighten them with the appropriate screwdriver. This step ensures the key fob is assembled correctly and ready for use.
Step 5. Test the Key Fob:
After assembling the key fob, the final step is to test its functionality. Stand close to your vehicle and press the buttons to confirm they work as intended. Check all features, such as locking, unlocking, and any additional functionalities like remote start.
If the key fob does not respond, double-check the battery placement and ensure all components were reassembled correctly. If issues persist, consider consulting your vehicle’s manual or seeking professional assistance. Testing the key fob is essential to ensure it functions effectively and reliably.
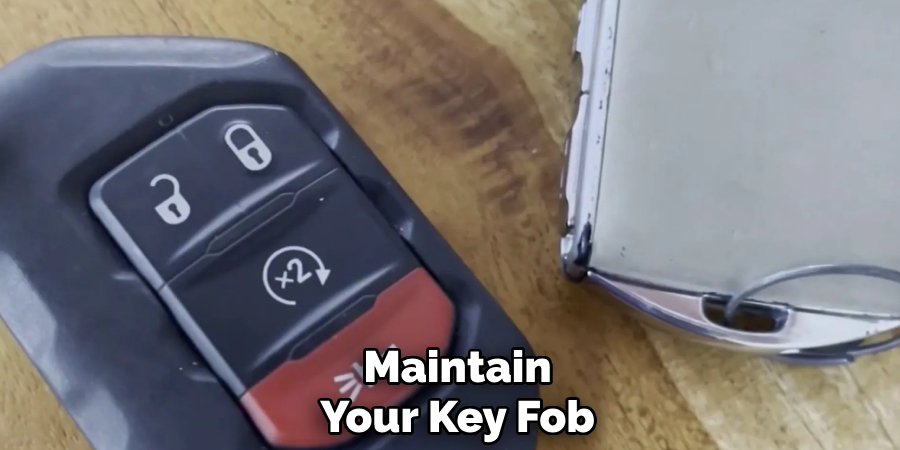
Step 6. Maintain Your Key Fob:
Regular maintenance of your key fob can prolong its lifespan and ensure consistent performance. Keep the key fob clean by wiping it with a soft, dry cloth to remove dirt and debris. Avoid exposing it to extreme temperatures or moisture, as these conditions can damage its internal circuitry.
Additionally, replace the battery promptly when it shows signs of fading, such as reduced range or delayed response. Proper care and maintenance of your key fob will help you avoid unexpected issues and ensure it remains a reliable tool for your vehicle.
Step 7. Program Your Key Fob:
If you have replaced the key fob battery or purchased a new key fob, it may need to be reprogrammed to work with your vehicle. Refer to the vehicle’s manual for specific instructions, as the process can vary by make and model. Typically, programming involves turning the ignition key, pressing particular buttons on the dashboard, or using the key fob itself.
Ensure you follow the steps carefully to avoid errors. If you experience difficulties, consult a professional locksmith or your vehicle’s dealership for assistance. Proper programming is critical for the key fob to interact seamlessly with your car’s security system.
Step 8. Keep a Spare Key Fob:

Having a spare key fob can save you from the inconvenience of being locked out or losing your only key. After successfully replacing your key fob case, consider purchasing another one for backup. You can program it yourself or have a professional do it for you.
Keep the spare key fob in a safe and easily accessible place so you can quickly retrieve it in case of an emergency.
Step 9. Personalize Your Key Fob:
Once your key fob is successfully replaced and programmed, take the time to personalize it to suit your preferences. Personalization can be practical or aesthetic, depending on your needs.
For example, you can use a key fob cover or case in your favorite color, style, or material for added protection and to differentiate your key fob from others. Some covers also offer enhanced grip or waterproof features, increasing durability. If you often misplace your keys, consider adding a Bluetooth tracker or keyring attachment that matches your taste.
Lastly, you can program specific functions, such as custom unlock settings or proximity key features, if your vehicle supports them. Personalizing your key fob makes it unique and enhances its convenience and usability.
By following these steps, you can easily replace your key fob case and maintain its functionality for years to come.
5 Things You Should Avoid
- Using Excessive Force: When prying open the key fob case, avoid using excessive force as this can damage the internal components or crack the casing.
- Ignoring the Battery Orientation: Make sure to note the correct orientation of the battery before removing it. Installing the battery improperly can cause the key fob to malfunction.
- Using Improper Tools: Do not use sharp or unsuitable tools such as knives to open the key fob case, which can lead to injuries or damage.
- Failing to Handle Components Carefully: The internal circuitry and battery are delicate. Avoid touching them directly with your hands or exposing them to static electricity, which could cause damage.
- Skipping Documentation or Instructions: Avoid replacing the key fob case without consulting the owner’s manual or relevant instructions for your Acura model, as every key fob may have subtle differences in design.
By avoiding these common mistakes, you can ensure your Acura key fob’s proper functioning and longevity.
Conclusion
How to replace Acura key fob case is a straightforward process when approached with care and the right tools.
By following the steps outlined in this guide and avoiding common mistakes, you can successfully replace your key fob case without complications. Taking the time to handle the components gently, adhering to the instructions specific to your Acura model, and ensuring correct assembly will help maintain the functionality of your key fob.
Remember, attention to detail and proper preparation are key to completing the replacement effectively.
About
Safety Fic is a distinguished figure in the world of Diy design, with a decade of expertise creating innovative and sustainable Diy solutions. His professional focus lies in merging traditional craftsmanship with modern manufacturing techniques, fostering designs that are both practical and environmentally conscious. As the author of diy, Safety Fic delves into the art and science of Safety Fic-making, inspiring artisans and industry professionals alike.
Education RMIT University
(Melbourne, Australia) Associate Degree in Design (Safety Fic) Focus on sustainable design, industry-driven projects, and practical craftsmanship. Gained hands-on experience with traditional and digital manufacturing tools, such as CAD and CNC software.
Nottingham Trent University
(United Kingdom) Bachelor’s in diyfastly.com and Product Design (Honors) Specialized in product design with a focus on blending creativity with production techniques. Participated in industry projects, working with companies like John Lewis and Vitsoe to gain real-world insights.
Publications and Impact
In diy, Safety Fic his insights on indoor design processes, materials, and strategies for efficient production. His writing bridges the gap between artisan knowledge and modern industry needs, making it a must-read for both budding designers and seasoned professionals.