

Replacing a Kwikset door lock is a relatively simple process that can significantly improve your home’s security or give your door a fresh appearance. There are several reasons why you might need to replace a Kwikset lock. Perhaps you’ve lost your keys, are looking to upgrade to a more secure locking system, or need to swap out a malfunctioning or worn-out lock.

Whatever the reason, knowing how to replace Kwikset door lock components can save you time and money while ensuring safety. This guide will walk you through the step-by-step process of removing the old lock, installing a new Kwikset door lock, and ensuring proper alignment and a secure fit to provide peace of mind. Replacing your Kwikset lock with just a few tools and the right instructions can be quick and hassle-free.
Tools and Materials Needed
Before beginning the process of replacing your Kwikset door lock, gathering all the necessary tools and materials is essential. Having everything ready will make the task smoother and more efficient.
Essential Tools:
- Screwdriver (Phillips or flathead, depending on the lock model)
- Tape measure (for checking compatibility)
- Allen wrench (if required)
- Power drill (optional, for quicker screw removal)
Replacement Materials:
- New Kwikset lock set (handle and deadbolt, if applicable)
- Spare screws (in case the original ones are damaged)
- Lubricant (such as WD-40, for smoother installation)
Safety Gear:
- Gloves (for hand protection)
- Safety glasses (if drilling is necessary)
Tips Before Starting:
- Check the lock model and door thickness to ensure that the new lock is compatible with your door.
- Keep the old lock’s screws in a small container to avoid misplacing or losing them.
- Ensure that all tools and materials are within easy reach before you begin the installation process.
By preparing properly, you can make the lock replacement process quick, safe, and efficient.
How to Replace Kwikset Door Lock: Removing the Old Kwikset Lock
Step 1: Unscrew the Interior Plate
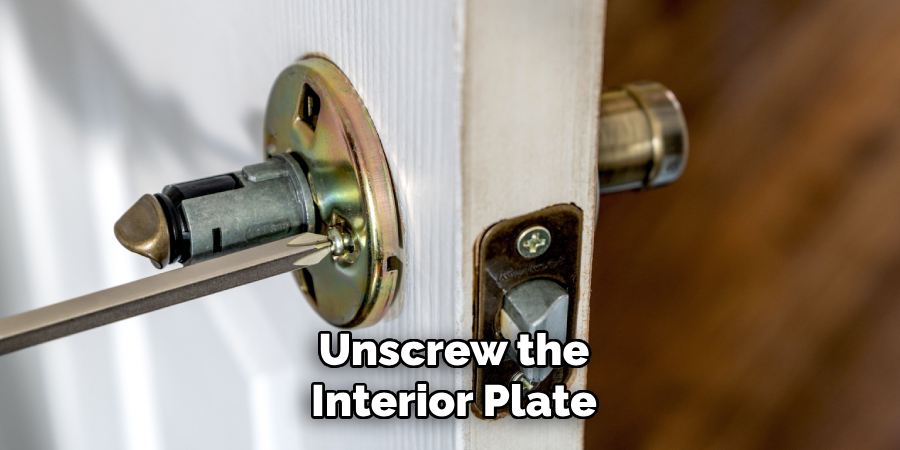
Locate the screws on the interior side of the lock, typically found on the handle or knob. Use a screwdriver to remove these screws gently. Once the screws are out, carefully pull off the interior handle or knob to expose the lock mechanism inside.
Step 2: Detaching the Exterior Handle/Knob
With the interior screws removed, you should now be able to push the exterior handle or knob out of the door. Apply slight pressure to detach it fully, ensuring that you don’t damage the surrounding hardware during the process.
Step 3: Removing the Latch Assembly
Next, focus on the latch, which is located on the edge of the door. Unscrew the latch from the side of the door using an appropriately sized screwdriver. Once the screws are removed, slide the latch assembly out carefully from the edge of the door.
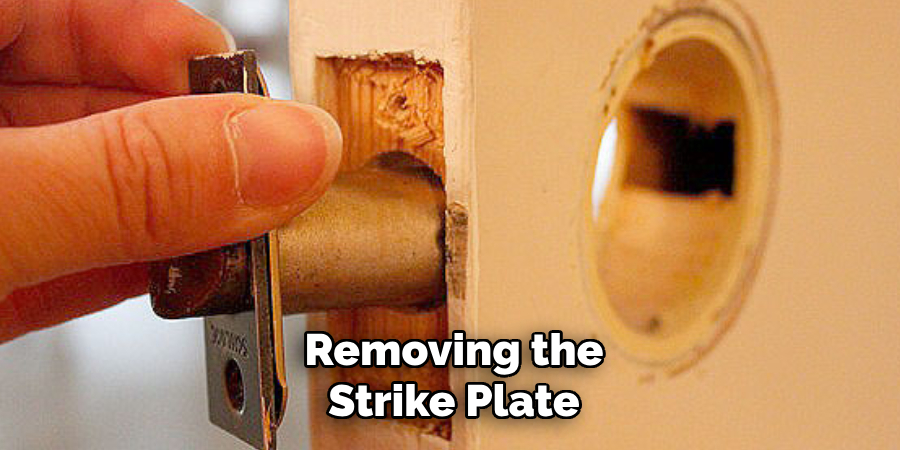
Step 4: Removing the Strike Plate
If you are replacing the strike plate, locate it on the door frame. Unscrew the strike plate and remove it gently. Be cautious not to strip the screws or damage the surrounding wood.
Pro Tip
Please take note of the orientation and positioning of the old latch and components while removing them. This will make aligning and installing the new Kwikset lock much easier.
Preparing the Door for the New Lock
Step 1: Cleaning the Lock Area
Before installing the new Kwikset lock, ensure the lock area is clean and free of dust and debris. Use a dry cloth or a soft brush to wipe out the door’s borehole and edge. Removing debris ensures a smoother installation process and prevents any obstructions during use.
Step 2: Checking Fit and Alignment
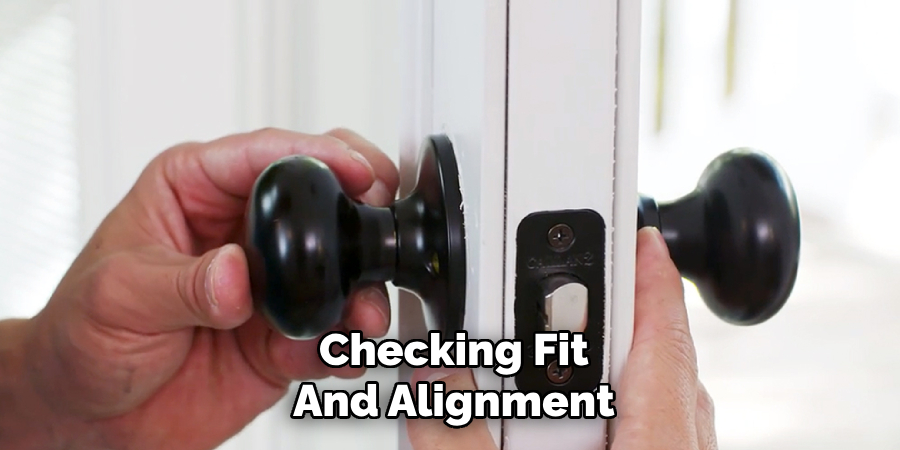
Measure the diameter of the door’s borehole to confirm compatibility with the new lock. Most Kwikset locks fit standard borehole sizes, but verifying this is important. Additionally, check the backset—this is the distance from the door’s edge to the center of the borehole. Ensure it matches the new lock’s requirements, as this is essential for proper alignment and functionality.
Step 3: Adjusting the New Lock (if needed)
Some Kwikset locks are equipped with adjustable latches that can fit backsets of 2-3/8 inches or 2-3/4 inches. If your door’s specifications differ, adjust the latch accordingly. Refer to the manufacturer’s instructions to adjust without damaging the latch or lock components.
Step 4: Pre-Lubricating the Lock Mechanism
Apply a small amount of lubricant, such as graphite or silicone-based lubricants, to the latch mechanism. This step ensures smoother lock operation over time and reduces wear on internal components. Avoid using excessive lubricant, as it may attract dust and dirt.
Installing the New Kwikset Lock
Step 1: Installing the New Latch
Begin by sliding the latch into the borehole on the door, ensuring that the curved side of the latch faces the door frame. This orientation is crucial for the proper operation of the lock mechanism. Once the latch is in place, use the provided screws to secure it to the door. Keep the latch aligned horizontally to ensure smooth functionality during use.
Step 2: Attaching the Exterior Handle/Knob
Take the exterior handle or knob and align its spindle through the latch hole. The spindle should pass through the latch and extend to the other side of the door. Hold the exterior handle securely in place to prevent misalignment as you prepare to attach the interior components.
Step 3: Securing the Interior Handle/Knob
Position the interior handle or knob on the opposite side of the door, aligning it correctly with the spindle and latch mechanism. Insert the screws through the interior plate, threading them into the exterior handle. Use a screwdriver to tighten the screws evenly. Be cautious not to overtighten, as this could cause misalignment or damage to the lock components.
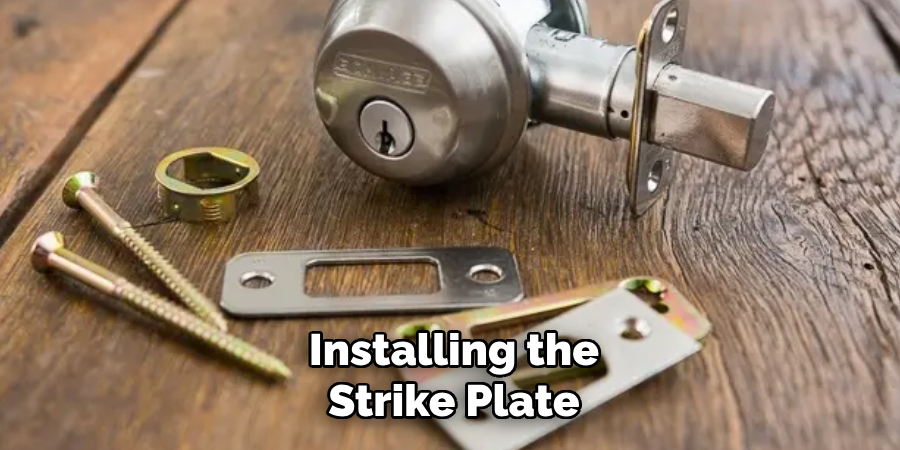
Step 4: Installing the Strike Plate
Finally, place the strike plate on the door frame, ensuring that it lines up with the latch. Once positioned correctly, secure the strike plate with screws, tightening them firmly to keep the latch properly engaged.
Pro Tip: Before tightening all screws ultimately, test the handle and latch to ensure smooth operation. This simple check will help you identify and correct any alignment issues before finalizing the installation.
Replacing a Kwikset Deadbolt
Step 1: Removing the Old Deadbolt
Begin by unscrewing and removing the interior thumb turn from the door. Once detached, carefully pull the exterior cylinder out of the door to fully remove the old deadbolt. Ensure that all components are set aside for proper disposal or storage.
Step 2: Installing the New Deadbolt
Start by inserting the new latch assembly into the edge of the door, ensuring the latch face sits flush with the surface. Next, attach the exterior cylinder to the door, aligning it precisely with the interior mechanism. Secure the assembly by tightening the screws firmly but without over-tightening. Finally, test the thumb turn to ensure it operates smoothly for both locking and unlocking.
Step 3: Testing the Deadbolt Functionality
After installation, lock and unlock the door several times to verify correct functionality. This step helps ensure all parts are properly aligned and operating efficiently.
Common Issue: Inspect the latch alignment with the strike plate if the deadbolt does not extend or retract fully. Adjust and reposition as needed to achieve a smooth operation. Double-check all screws for secure fastening to prevent future alignment issues.
Maintenance Tips for Your Kwikset Lock
Regular maintenance is essential to keep your Kwikset lock functioning optimally and to prolong its lifespan.
- Regular Cleaning: Wipe down the lock and handle with a damp cloth to remove dirt, dust, and fingerprints. Avoid using harsh chemicals that can damage the finish.
- Lubrication: Apply a lock-safe lubricant to the keyway and internal mechanism once every 6-12 months. This ensures smooth operation and prevents sticking or jamming.
- Inspecting for Wear: Periodically check all screws for tightness and inspect the lock for signs of wear. Tighten loose screws or replace worn components promptly to avoid further issues.
- Key Check: Test your key regularly to ensure it inserts and turns smoothly in the lock. Replace bent or damaged keys to prevent unnecessary strain on the mechanism.
By following these simple steps, you can ensure the reliability and longevity of your Kwikset lock.
Conclusion
Replacing a Kwikset door lock is a straightforward process that involves removing the old lock, preparing the door, installing the new components, and conducting thorough tests to ensure proper functionality. By learning how to replace Kwikset door lock mechanisms, you can improve your home’s security, enhance its appearance, and maintain reliable performance. Always refer to the manufacturer’s instructions for your specific lock model to ensure accuracy during installation. Don’t forget to test the lock thoroughly before relying on it for security. These steps will help you achieve a safe and functional upgrade for your door hardware.
About
Safety Fic is a distinguished figure in the world of Diy design, with a decade of expertise creating innovative and sustainable Diy solutions. His professional focus lies in merging traditional craftsmanship with modern manufacturing techniques, fostering designs that are both practical and environmentally conscious. As the author of diy, Safety Fic delves into the art and science of Safety Fic-making, inspiring artisans and industry professionals alike.
Education RMIT University
(Melbourne, Australia) Associate Degree in Design (Safety Fic) Focus on sustainable design, industry-driven projects, and practical craftsmanship. Gained hands-on experience with traditional and digital manufacturing tools, such as CAD and CNC software.
Nottingham Trent University
(United Kingdom) Bachelor’s in diyfastly.com and Product Design (Honors) Specialized in product design with a focus on blending creativity with production techniques. Participated in industry projects, working with companies like John Lewis and Vitsoe to gain real-world insights.
Publications and Impact
In diy, Safety Fic his insights on indoor design processes, materials, and strategies for efficient production. His writing bridges the gap between artisan knowledge and modern industry needs, making it a must-read for both budding designers and seasoned professionals.