
Transporting items on the roof of your vehicle can be a convenient way to maximize space during road trips or when carrying cumbersome cargo. However, knowing how to secure items to a roof rack is essential to ensure safety and prevent damage to both the cargo and your car. This guide provides comprehensive steps on using various securing methods, protective padding, and regular checks, equipping you with the necessary techniques to keep your load stable and intact throughout your journey.

Understanding Roof Racks
Roof racks come in various types, each suited to different vehicle designs and transport needs. The fixed-point roof rack attaches directly to fixed mounting points on the vehicle roof, providing a sturdy and streamlined option. On the other hand, raised rail roof racks attach to raised rails that run along the length of the roof, often found on SUVs and station wagons, offering flexibility in mounting positions. Flush rail roof racks mount to flush rails, which sit snugly against the roof, providing a sleek look without sacrificing functionality. Gutter roof racks clamp onto the gutters along the edges of older vehicles, making them versatile and easy to install.
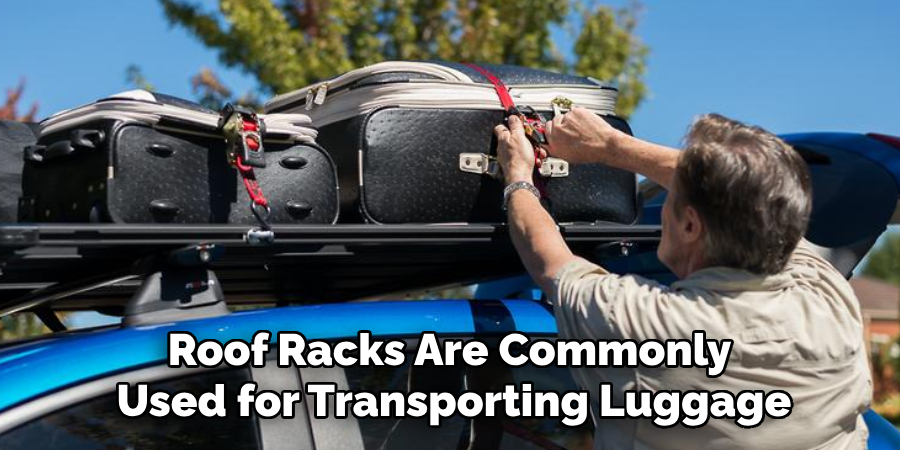
Roof racks are commonly used for transporting luggage, sports equipment like bikes and kayaks, and building materials such as ladders and timber. They allow for more interior space for passengers and provide a safe way to carry bulky items.
Choosing the right roof rack for your vehicle and transportation needs is crucial. Consider factors like the weight of the items you’ll be transporting, the frequency of use, and compatibility with your vehicle. A well-chosen roof rack enhances your vehicle’s load-carrying capability and ensures safety and convenience on the road.
Tools and Materials Needed
Securing items to a roof rack effectively requires the right tools and materials. The essential tools you will need include a tape measure to ensure accurate placement of your items, a utility knife for cutting through straps or padding, and a pair of scissors for trimming excess material.
Regarding materials, you’ll need tie-down straps, either ratchet or cam buckle straps, depending on your preference and the nature of the load. Bungee cords and rope are handy for additional security, ensuring items remain firmly attached to the roof rack. Protective padding, such as foam blocks or towels, is crucial for preventing scratches and dents on both your vehicle and the items being transported. A cargo net is particularly useful for securing smaller or loose items that might shift during transit.
Optional accessories like bike racks, cargo boxes, and kayak carriers provide additional convenience and versatility, particularly for special use cases.
Preparing for Securing Items
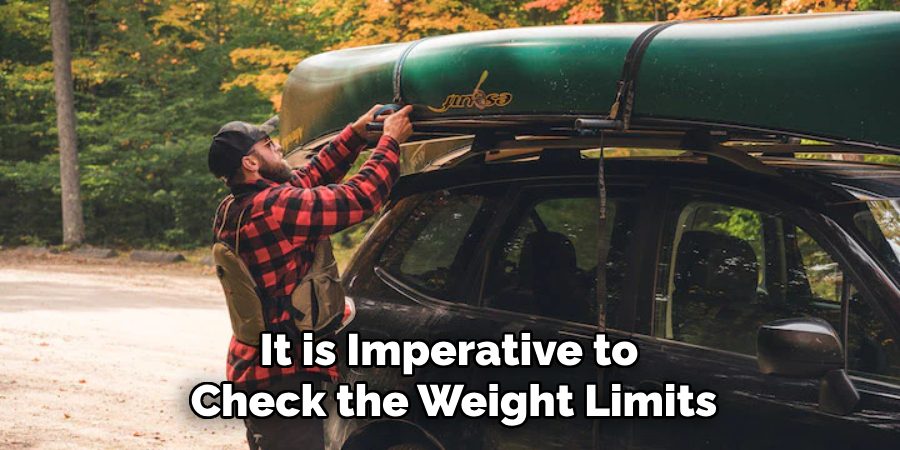
Before you start securing items to your roof rack, it is imperative to check the weight limits of both the rack and your vehicle’s roof. Refer to your vehicle’s manual and the manufacturer’s guidelines to ensure you do not exceed these limits. Overloading can lead to potential accidents or damage to your vehicle’s roof.
Once the weight limits are confirmed, focus on distributing the weight evenly across the roof rack to avoid any imbalance that could cause handling issues while driving. Imbalanced loads can negatively affect vehicle stability, increasing the risk of tipping or swaying, especially during turns or sudden maneuvers.
Also, ensure that the items you’re transporting are clean and dry. Dirt and moisture can make surfaces slippery, causing the items to shift during transport and potentially becoming dangerous projectiles. Dry items are less likely to grow mold or rust during the journey, ensuring they arrive in good condition.
Taking the time to properly prepare by checking weight limits, distributing weight evenly, and ensuring items are clean and dry sets a strong foundation for safely transporting your cargo. Following these steps minimizes risks and enhances your journey’s safety and efficiency.
How to Secure Items to A Roof Rack: Using Tie-Down Straps
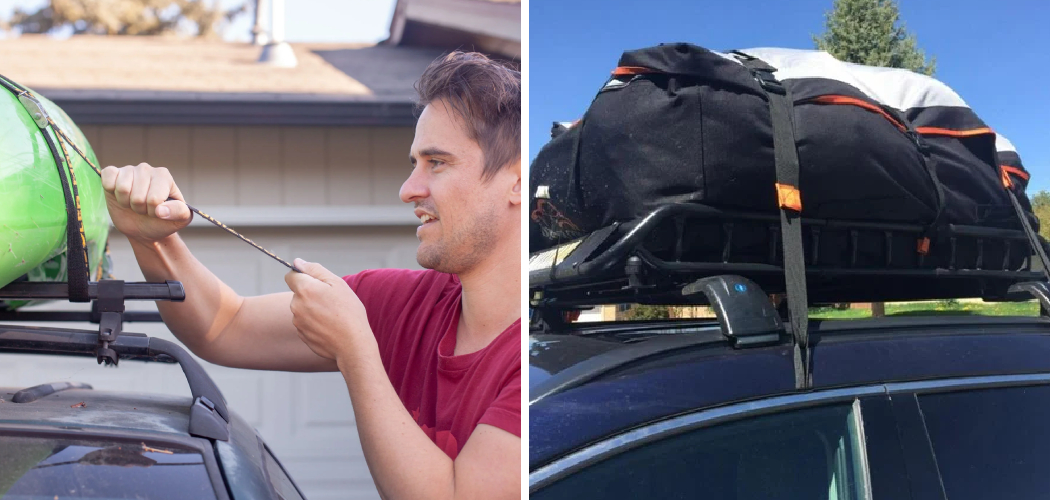
Tie-down straps are essential for securing items to your roof rack, and selecting the appropriate type is critical for a safe and efficient transport. Ratchet straps are ideal for heavier loads, offering a tight and secure hold with minimal effort. On the other hand, cam buckle straps are perfect for lighter items, providing ample security without the risk of excessive tightening.
Once you have chosen the appropriate type of strap, the next step is to position them over the items on your roof rack. Begin by laying the straps flat across the cargo, ensuring they cover a wide enough area to distribute pressure evenly and prevent any movement during transit. Thread the strap through the roof rack’s attachment points or designated anchor spots, pulling the strap end through the buckle mechanism.
Tightening the straps securely is crucial, but it is equally important to avoid over-tightening. Over-tightening can damage both the roof rack and the items you are transporting. Use the ratcheting mechanism to incrementally tighten the strap until it is snug but not excessively tight for ratchet straps. For cam buckle straps, pull the strap end through the buckle and cinch it until it holds the load firmly. The goal is to achieve a secure fit without exerting excessive force that could lead to damage.

After tightening the straps, it’s important to check the load’s stability. Gently shake the items to ensure they are securely fastened and do not shift. If any movement is detected, readjust and tighten the straps as necessary. Conducting this check ensures that your cargo is stable and safe for travel, reducing the risk of accidents or damage during your journey.
How to Secure Items to A Roof Rack: Using Bungee Cords and Ropes
Bungee cords and ropes are versatile tools for securing items to your roof rack, offering flexibility and strength for various types of cargo. When selecting bungee cords or ropes, prioritize those made of strong, weather-resistant materials to ensure they can withstand different environmental conditions and provide reliable performance over time.
Begin by securely hooking or tying the bungee cords or ropes around the items and the roof rack. Ensure the cords are placed at strategic points to evenly distribute and stabilize the load’s weight. When using bungee cords, hook the ends to stable anchor points on either side of the cargo and roof rack. If you employ ropes, use strong knots, such as the bowline or trucker’s hitch, to maintain a secure hold.
Once the cords or ropes are in place, it’s important to ensure there are no loose ends. Loose ends can flap in the wind, damaging the cargo and your vehicle’s exterior. To avoid this, tuck excess lengths of bungee cords or ropes or secure them with additional knots or ties.

Finally, double-check all connections for security. Applying gentle pressure to the cargo and observing any movement can help identify areas that may need further tightening or adjustment. Ensuring all connections are secure enhances safety, keeping your items firmly in place throughout the journey.
Adding Protective Padding
When transporting items on your roof rack, adding protective padding is essential to prevent scratches and dents on both the cargo and your vehicle. Placing padding between the roof rack and the items creates a crucial barrier, absorbing shocks and reducing friction during transit.
Foam blocks are an excellent choice for padding because they can conform to different shapes and effectively cushion the load. Alternatively, using thick towels or blankets can provide a similar level of protection while also being readily available and easy to adjust. Specialized padding materials designed specifically for roof racks are also an option, offering maximum protection and durability.
Securing the padding in place is as important as the padding itself. Add additional straps or bungee cords to securely hold the padding against the cargo and roof rack. Ensure that the padding covers all contact points where the load could potentially rub against the rack or vehicle, minimizing the risk of damage. Check that all padding is firmly in place before heading out, making adjustments as necessary to maintain a stable and protected setup.
By incorporating proper padding techniques, you safeguard both your cargo and vehicle, ensuring they arrive at your destination in pristine condition.
Securing Small or Loose Items
Using a cargo net is an effective method for securing small or loose items on your roof rack, ensuring they remain in place during transit. Start by carefully draping the cargo net over the items, ensuring it fully covers your load. The net should be large enough to extend over all edges of the cargo, providing comprehensive coverage and preventing any items from shifting or falling out.
Once the net is positioned, fasten it tightly to the roof rack’s anchor points. Most cargo nets have hooks or clips designed to easily attach to the rack’s structure. Make sure to distribute the securing points evenly around the perimeter of the rack for optimal stability. Pull the net snugly, ensuring a tight fit against the cargo, which helps keep everything firmly in place during the journey.
After securing the cargo net, double-check all connections to confirm they are tightly fastened and stable. It’s crucial to ensure that all items are entirely under the net, with no loose ends or protruding parts that could come loose. Give the loaded items a gentle shake to ensure they do not shift. If any items move, readjust the net and secure points as needed. This final check helps prevent accidents and ensures your cargo remains secure throughout your trip.

Final Checks and Safety Tips
Performing a final inspection of your roof rack load is essential to ensure all items are securely fastened. Begin by visually examining each strap, bungee cord, and net connection, verifying their tightness and stability. Gently shake the cargo to confirm that nothing shifts or moves.
Before embarking on a long journey, drive around your neighborhood. This brief test allows you to identify any issues with shifting or loosening of your load. After this initial drive, recheck all securing points and adjust as needed to enhance stability.
During long trips, regularly inspect the load, especially after making stops. Vibrations and movements can cause fastenings to loosen over time, so periodic checks help maintain safety. By routinely reassessing your cargo’s security, you can minimize the risk of accidents and ensure that your items remain firmly in place throughout your journey.
Conclusion
In conclusion, understanding how to secure items to a roof rack is crucial for safe and efficient travel. By carefully selecting and employing the appropriate securing methods, such as bungee cords, ropes, and cargo nets, and incorporating protective padding, you can ensure that your cargo remains stable and undamaged throughout your journey. Regular inspections and adjustments further enhance security, minimizing the risk of accidents. By following these guidelines, you can confidently transport your items, knowing they are securely fastened to your roof rack.