

Are you having trouble with your vehicle’s knock sensor? Do you want to ensure that it is functioning correctly?
How to test knock sensor is an essential step in diagnosing engine performance issues or potential malfunctions in your vehicle’s sensor system. The knock sensor plays a critical role in detecting engine knocking or pinging, which is caused by abnormal combustion in the engine cylinders. By identifying these issues, the sensor helps the engine control unit (ECU) adjust the timing and fuel mixture, ensuring optimal performance and preventing engine damage.
Regularly testing the knock sensor can help maintain your vehicle’s efficiency, reduce emissions, and extend the life of the engine. This guide will walk you through the steps to effectively test a knock sensor and diagnose potential problems.
What Are the Causes of Knocking in an Engine?
There are several different reasons why your engine may be knocking, but the most common cause is spark knock. This occurs when the air-fuel mixture ignites before it’s supposed to, causing a rapid increase in pressure inside the cylinder and creating a knocking noise.
Other possible causes of engine knocking include:
- Low Octane Fuel: Using a lower octane fuel than recommended for your vehicle may result in pre-ignition and engine knocking.
- Carbon Buildup: Over time, carbon deposits can build up inside the combustion chamber, leading to hot spots that can cause knocking.
- Faulty Knock Sensor: A malfunctioning knock sensor can send incorrect signals to the engine computer, resulting in improper timing and potential knocking.
What Will You Need?
To diagnose and fix engine knocking, you may need the following tools and materials:
- Diagnostic Scan Tool: This is used to check for any error codes related to the knock sensor or engine timing.
- Torque Wrench: You may need this to tighten spark plugs or other components as per the manufacturer’s specifications.
- Spark Plug Socket: This specialized socket will help you remove and install spark plugs without damaging them.
- Replacement Parts: Depending on the cause of your engine knocking, you may need to replace certain parts, such as spark plugs, ignition coils, or the knock sensor.
- Carbon Cleaner: If carbon buildup is causing the knocking, a carbon cleaner can help remove deposits from inside the combustion chamber.
8 Easy Steps on How to Test Knock Sensor
Step 1. Locate the Knock Sensor:
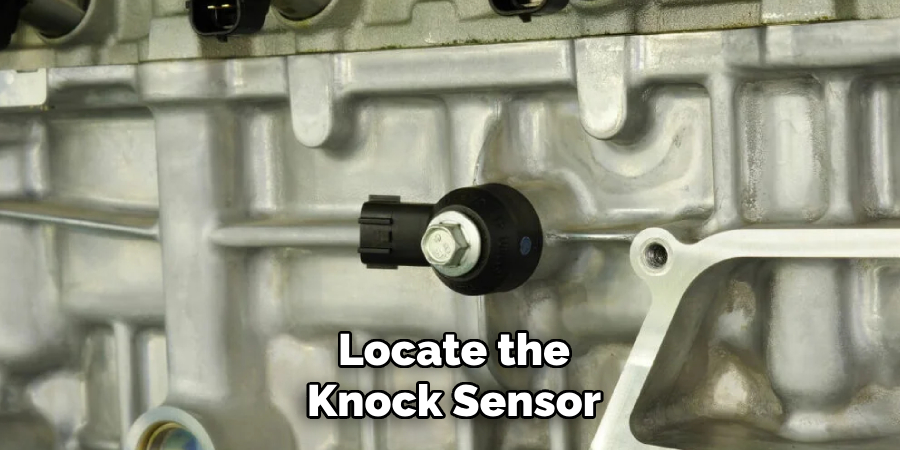
The first step in testing your knock sensor is identifying its location within your vehicle. The knock sensor is typically mounted on the engine block, cylinder head, or intake manifold. Refer to your vehicle’s service manual to pinpoint the location, as it can vary depending on your car’s engine type and make. Look for a small, threaded sensor connected to a wiring harness. Ensure the engine is off and cooled down before starting this procedure to prevent accidental injuries or burns as you investigate the sensor’s placement.
Step 2: Inspect the Knock Sensor for Damage or Wear
Once you have located the knock sensor, carefully inspect it for any visible signs of damage or wear. Look for cracks, corrosion, or loose connections on the sensor or wiring harness. Pay attention to any discoloration or burnt marks, which could indicate electrical issues. If the sensor or its connections appear damaged, it may need to be replaced. Ensuring the sensor is good condition is crucial for accurate engine performance monitoring. If unsure about its condition, consult a professional mechanic for further evaluation.
Step 3: Test the Sensor
Using a multimeter, test the sensor to ensure it is functioning correctly. First, refer to the vehicle’s service manual for the correct voltage or resistance specifications for the sensor. Set the multimeter to the appropriate setting, and connect the probes to the sensor’s terminals or wiring harness as the manual indicates.
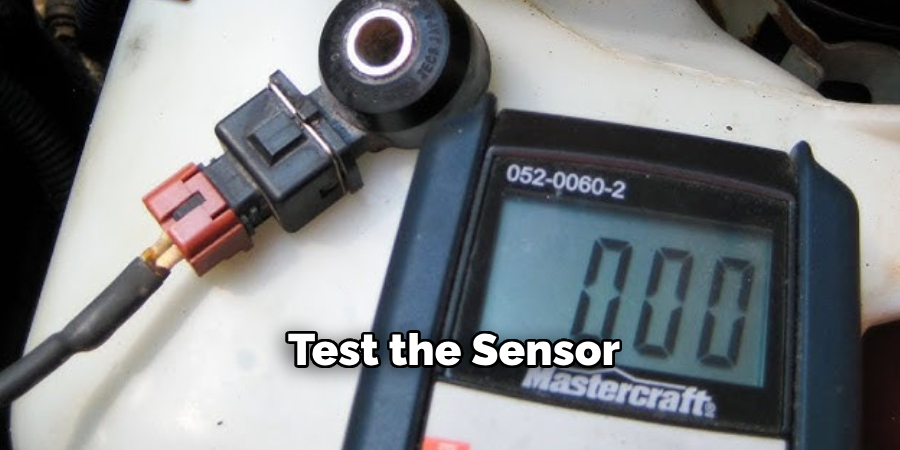
Compare the readings on the multimeter with the specified values. If the readings are outside the recommended range, it is likely that the sensor is faulty and requires replacement. Always exercise caution when handling electrical components, and disconnect the battery before testing to avoid accidental short circuits.
Step 4: Reinstall or Replace the Sensor
After completing the testing process, determine whether the sensor needs replacement or can be reinstalled. If the sensor functions correctly, carefully reinstall it by securing it back into position and reconnecting any disconnected wiring or harness. Ensure all connections are tight and secure. If the sensor is faulty, replace it with a new one that matches the manufacturer’s specifications. Once the replacement is complete, reconnect the battery and test the system to verify proper functionality.
Step 5: Perform a Final Inspection

After testing the system, conduct a thorough visual inspection to ensure everything is in proper order. Double-check all connections, fasteners, and mounting points to confirm they are secure and aligned correctly. Look for any loose components, damaged wires, or signs of wear that may need attention. This final inspection helps guarantee the sensor and related systems are functioning reliably and safely.
Step 6: Document the Process and Results
Record all steps taken during the installation, testing, and inspection processes. Include detailed notes on the system’s performance, any issues encountered, and how they were resolved. This documentation will serve as a reference for future maintenance and troubleshooting. Additionally, ensure any necessary adjustments made during the process are logged for accuracy and accountability.
Step 7: Final Approval and Handover
After completing the installation and documentation, obtain final approval from the appropriate stakeholders or authorities. Conduct a final walkthrough or demonstration to ensure all requirements have been met and the system is fully operational. Once approved, hand over the system to the responsible team or individual, along with all relevant documentation, user manuals, and maintenance schedules. Ensure that any questions are addressed and provide contact information for continued support.

Step 8: Post-Implementation Review and Feedback
Conduct a post-implementation review to evaluate the project’s success and identify any areas for improvement. Gather feedback from stakeholders, end-users, and team members to assess whether project objectives were met and to highlight any challenges faced during the process. Document lessons learned and incorporate them into future projects to enhance efficiency and effectiveness.
By following these steps, you can ensure your project’s smooth and successful implementation.
5 Things You Should Avoid
- Using Improper Tools
Avoid using tools or equipment that are not designed for testing knock sensors. This can lead to inaccurate readings, potential damage to the sensor, or even harm to the vehicle’s engine.
- Testing on a Cold Engine
Always ensure the engine is sufficiently warmed up before testing the knock sensor. A cold engine may not provide accurate results, leading to incorrect conclusions.
- Neglecting Manufacturer Guidelines
Failing to follow the manufacturer’s specific testing procedures can result in improper diagnostics. Always refer to the vehicle’s service manual for the recommended process.
- Ignoring Preliminary Checks
Skipping preliminary inspections, such as checking for obvious loose connections or wiring issues, can cause unnecessary troubleshooting steps and lead to incorrect fault identification.
- Applying Excessive Force
When handling or removing the knock sensor, avoid using excessive force as this can damage the sensor or the surrounding components, leading to costly repairs. Always use caution and the correct tools.
By avoiding these common mistakes, you can ensure a smooth and successful knock sensor replacement process.
How to Work a Knock Sensor?
A knock sensor is a vital component in a vehicle’s engine system, responsible for detecting and preventing harmful engine knocking or pinging. It is designed to monitor the vibrations produced by the engine and send signals to the engine control unit (ECU) if any knocking occurs. The ECU then adjusts the ignition timing, fuel-to-air ratio, and other parameters to prevent damage to the engine.
To properly work a knock sensor, follow these steps:
- Locate the Knock Sensor: In most vehicles, the knock sensor is near the engine block or cylinder head.
- Disconnect the Negative Battery Cable: Before working on any electrical components, it is essential to disconnect the negative battery cable to avoid any accidents.
- Remove the Sensor: Once located, carefully remove the knock sensor from its housing using an appropriate size wrench or socket.
- Clean the area: Before installing a new knock sensor, thoroughly clean the surrounding area to avoid any debris entering the engine.
- Install New Knock Sensor: Carefully install the new knock sensor and tighten it to manufacturer specifications.
- Reconnect Battery Cable: After installation, reconnect the negative battery cable and start your vehicle to ensure that the knocking has been eliminated.
Can You Drive With a Bad Knock Sensor?
It is not recommended to drive with a bad knock sensor as it can cause more serious engine problems and potentially lead to engine failure. The knock sensor detects abnormal vibrations or detonation in the engine, which can cause damage if not addressed promptly.
Suppose your vehicle’s check engine light is on, and you suspect a faulty knock sensor. In that case, it is best to have it diagnosed and replaced by a professional mechanic before continuing to drive your vehicle.
Conclusion
How to test knock sensor is a straightforward process that requires attention to detail and the right tools.
First, you should use an OBD-II scanner to check for any diagnostic trouble codes (DTCs) related to the knock sensor. This will help confirm if the sensor is malfunctioning. Next, visually inspect the sensor and its wiring for any signs of damage or corrosion. If further testing is needed, you can use a multimeter to measure the sensor’s resistance and compare it to the manufacturer’s specifications.
Finally, gently tap near the engine with a tool and monitor the sensor’s output to see if it responds appropriately. If any irregularities are identified, the knock sensor may need to be replaced to ensure the engine operates efficiently and safely.
About
Safety Fic is a distinguished figure in the world of Diy design, with a decade of expertise creating innovative and sustainable Diy solutions. His professional focus lies in merging traditional craftsmanship with modern manufacturing techniques, fostering designs that are both practical and environmentally conscious. As the author of diy, Safety Fic delves into the art and science of Safety Fic-making, inspiring artisans and industry professionals alike.
Education RMIT University
(Melbourne, Australia) Associate Degree in Design (Safety Fic) Focus on sustainable design, industry-driven projects, and practical craftsmanship. Gained hands-on experience with traditional and digital manufacturing tools, such as CAD and CNC software.
Nottingham Trent University
(United Kingdom) Bachelor’s in diyfastly.com and Product Design (Honors) Specialized in product design with a focus on blending creativity with production techniques. Participated in industry projects, working with companies like John Lewis and Vitsoe to gain real-world insights.
Publications and Impact
In diy, Safety Fic his insights on indoor design processes, materials, and strategies for efficient production. His writing bridges the gap between artisan knowledge and modern industry needs, making it a must-read for both budding designers and seasoned professionals.