

Are you having issues with your temperature sensor? Are you unsure if it’s working properly? In this guide, we will show you how to test temp sensor with multimeter.
Testing a temperature sensor with a multimeter is a straightforward process that helps ensure the sensor functions correctly. Temperature sensors are vital in various systems as they monitor and regulate temperature to maintain optimal performance. Over time, these sensors may degrade or fail, affecting the accuracy of temperature readings. You can diagnose issues such as open circuits, short circuits, or abnormal resistance values using a multimeter.
This guide will walk you through the basic steps to test a temperature sensor using a multimeter, enabling you to effectively identify and address potential problems.
What Are the Benefits of Testing a Temperature Sensor Using a Multimeter?
Before we dive into the steps for testing a temperature sensor using a multimeter, let’s first discuss why this process is essential. Here are some of the benefits of regularly testing your temperature sensors:
- Ensures Accurate Readings: As mentioned earlier, temperature sensors can degrade or fail over time. By regularly testing them using a multimeter, you can ensure they provide accurate readings.
- Identifies Potential Issues: A multimeter allows you to check for any open circuits or short circuits in the sensor’s wiring. This helps identify potential issues before they lead to more significant problems.
- Saves Time and Money: Regularly testing your temperature sensors can save you time and money in the long run. You can avoid costly repairs or replacements by identifying any faulty sensors early on.
- Improves Safety: Faulty temperature sensors can lead to inaccurate readings and unsafe operating conditions. Regularly testing them using a multimeter ensures that they function correctly and helps prevent potential safety hazards.
- Maintains Equipment Efficiency: Temperature sensors are crucial in preserving equipment efficiency. By regularly testing them, you can ensure that they provide accurate data to your control systems, allowing optimal operation and energy efficiency.
What Will You Need?
To test your temperature sensors, you will need a few key tools:
- Multimeter: This is the main tool for testing and measuring electrical properties, such as voltage, resistance, and continuity.
- Thermometer: A thermometer can be used to compare the readings from your temperature sensor to ensure accuracy.
- Reference Temperature Source: Any object or substance with a known and stable temperature can be used as a reference point in your tests.
Once you have these tools, you can test your temperature sensors with the following steps.
9 Easy Steps on How to Test Temp Sensor With Multimeter
Step 1. Prepare Your Tools and Workspace:
Before starting the testing process, ensure you have all the tools mentioned earlier, such as a multimeter, thermometer, and a reference temperature source. Organize these tools in a clean and clutter-free workspace. Working in a well-lit, dry, and safe environment is essential to prevent any accidents or errors during the procedure.

If applicable, check your multimeter to ensure it functions properly by performing a quick self-test or calibration. Additionally, if you are using a thermometer, confirm that it is in good working condition and has accurate readings. Gather any documentation or user manuals for your sensor and tools, as these can be immensely helpful throughout the testing process. By preparing your tools and workspace adequately, you can ensure a smooth and efficient testing process with minimal disruptions.
Step 2. Turn Off the Power:
Before beginning any testing, ensuring the power supply to the device or system is completely turned off is critical. This step is essential for your safety and to prevent damage to the equipment you are working on. Start by identifying and switching the primary power source to the “off” position. For added safety, disconnect the device from its power supply by unplugging it or turning off the corresponding circuit breaker. Use a voltage tester or similar tool to confirm that no residual electricity remains in the system before proceeding further.
Step 3. Set the Multimeter:
Once you have ensured that the power source is safely disconnected, the next step is to prepare your multimeter for use. Begin by identifying the specific measurement you need for your task—commonly, this could include voltage, current, or resistance. Turn the dial on the multimeter to the appropriate setting corresponding to the required measurement type. Be sure also to select the correct range for the measurement if your multimeter is not auto-ranging.
For instance, when measuring household voltage, you would choose the AC voltage setting, typically indicated by a “V” with a wavy line above it. Similarly, for DC voltage measurements (such as in batteries), select the “V” with a straight line above it. Verify that your leads are properly connected—insert the black lead into the “COM” port and the red lead into the corresponding port depending on your measurement (e.g., volts, ohms, or amps). Double-check these configurations to ensure accurate readings and prevent possible multimeter damage.
Step 4. Measure Ambient Resistance:
To measure the ambient resistance of the temperature sensor, set your multimeter to the appropriate resistance (ohms) range. Touch the multimeter leads to the sensor’s terminals, ensuring a solid connection. If you are unsure of the expected resistance range, refer to the sensor’s datasheet or manufacturer specifications.

The ambient resistance reading should correspond to the sensor’s resistance at the current room temperature. Compare the measured resistance to the expected value to confirm the sensor functions correctly. If the reading deviates significantly, this may indicate a fault in the sensor, such as damage or calibration issues.
Step 5. Test with Reference Temperature:
Testing with a reference temperature is essential to ensure the sensor’s accuracy and functionality. Begin by setting up a controlled environment to adjust the temperature to a specific, known value. This can be achieved using a temperature calibration chamber, a water bath, or a similar apparatus, depending on the sensor type and operating range. Allow the sensor to stabilize in the reference temperature environment for a sufficient time, ensuring it acclimates fully to the set temperature.
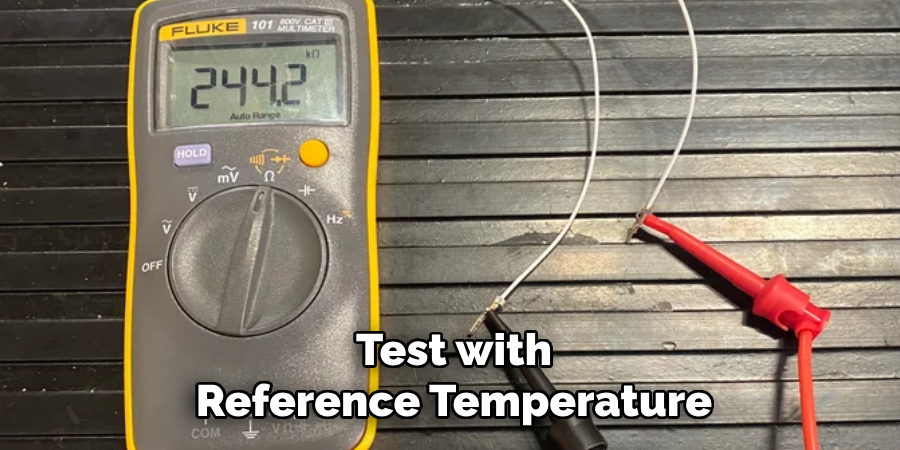
Once stabilized, measure the sensor’s resistance or output according to its specified operating procedure. Compare this measurement with the expected value in the manufacturer’s datasheet or calibration curve. Any significant deviation could point to potential issues such as sensor drift, contamination, or physical damage. It may also indicate the need for recalibration. Document all findings thoroughly for future reference and consistency checks in applications where the sensor’s precision is critical.
Step 6. Record the Reading:
Accurately recording the sensor’s readings is essential to ensure data reliability and traceability. Use a standardized format or logging system to document the reading, including relevant details such as the date, time, environmental conditions, and other factors that may influence the measurement. It is also advisable to note the specific settings or configurations of the sensor during the reading process, as these can impact its performance.
If the data is being logged digitally, verify that the system captures and stores the readings without any errors. For manual recordings, double-check your entries for typos or miscalculations. Consistency is critical, so always follow an established protocol when documenting readings. This attention to detail is significant for applications requiring high precision, as any discrepancies in the recorded data could lead to operational inefficiencies or safety concerns.
Step 7. Check for Consistency:
Ensuring consistency in your processes is vital for maintaining accuracy and minimizing errors that could compromise the quality of your work. Regularly review your documentation practices to confirm that data is recorded in a standardized format, whether you’re working with digital tools or manual logs. Cross-reference entries when possible to detect anomalies or patterns that may indicate an issue. Establish clear guidelines for team members, offering training to ensure everyone understands the documentation protocol. Consistency also extends to the tools and equipment used—always verify that these are calibrated and functioning correctly to support accurate recordings.
Step 8. Inspect for Damage or Wear:
Regular inspections for damage or wear are crucial to maintaining the functionality and safety of equipment or systems. Begin by thoroughly examining all components for visible signs of deterioration, such as cracks, corrosion, fraying, or discoloration. Pay close attention to areas that endure high stress or frequent use, as these are often the first to exhibit wear.
Use appropriate tools or testing equipment to assess internal damage that may not be immediately apparent. Document your findings meticulously, noting the nature and location of any identified issues. Acting promptly on repairs or replacements can prevent minor defects from escalating into significant failures, reducing downtime and potential hazards.
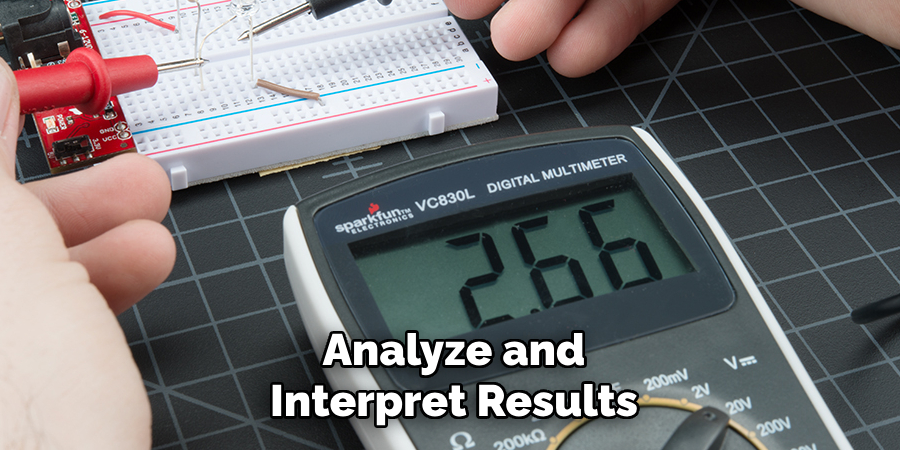
Step 9. Analyze and Interpret Results:
After collecting all data during the inspection process, it’s essential to analyze and interpret the results thoroughly to draw meaningful conclusions. Review the documented findings to identify patterns, anomalies, or recurring issues. Compare the results against established benchmarks, performance standards, or historical data to determine whether the system operates within acceptable parameters. When interpreting results, consider factors such as wear and tear, environmental influences, or operational stress that may have contributed to any observed irregularities. If applicable, use diagnostic tools or software to support and validate your analysis.
By following these steps, you can effectively troubleshoot and diagnose issues with your system, helping to ensure its proper functioning.
Conclusion
To conclude, how to test temp sensor with multimeter is a straightforward process that requires careful attention to detail and proper handling of the device.
Begin by ensuring that the sensor and the multimeter are disconnected from any power source to avoid hazards. Set the multimeter to the appropriate resistance (ohms) setting, and connect the probes to the sensor terminals. Compare the resistance readings to the specifications provided by the manufacturer to determine if the sensor is functioning correctly. If the sensor exhibits resistance values outside the acceptable range, it may be faulty and require replacement.
This method not only helps ensure the accuracy of your temperature readings but also contributes to your system’s overall efficiency and safety.
About
Safety Fic is a distinguished figure in the world of Diy design, with a decade of expertise creating innovative and sustainable Diy solutions. His professional focus lies in merging traditional craftsmanship with modern manufacturing techniques, fostering designs that are both practical and environmentally conscious. As the author of diy, Safety Fic delves into the art and science of Safety Fic-making, inspiring artisans and industry professionals alike.
Education RMIT University
(Melbourne, Australia) Associate Degree in Design (Safety Fic) Focus on sustainable design, industry-driven projects, and practical craftsmanship. Gained hands-on experience with traditional and digital manufacturing tools, such as CAD and CNC software.
Nottingham Trent University
(United Kingdom) Bachelor’s in diyfastly.com and Product Design (Honors) Specialized in product design with a focus on blending creativity with production techniques. Participated in industry projects, working with companies like John Lewis and Vitsoe to gain real-world insights.
Publications and Impact
In diy, Safety Fic his insights on indoor design processes, materials, and strategies for efficient production. His writing bridges the gap between artisan knowledge and modern industry needs, making it a must-read for both budding designers and seasoned professionals.