

A lock nut is a critical component used to secure fasteners in place, preventing them from loosening over time due to vibration or movement. Designed with features like nylon inserts or distinct threading, lock nuts are essential in applications where stability and safety are paramount. Properly tightening a lock nut is crucial to ensure the reliable operation of machinery, equipment, or structures, as loose components can lead to malfunctions, accidents, or damage.

Learning how to tighten a lock nut effectively is an important skill, especially for those working in construction, automotive repair, or household maintenance. This article aims to provide a clear, step-by-step guide to tightening a lock nut using the right tools and techniques. By following these guidelines, you can ensure a secure fit and maintain the integrity of your projects or equipment.
Understanding Lock Nuts and Their Function
What is a Lock Nut?
A lock nut is a specialized type of nut designed to keep bolts or screws securely fastened, even in scenarios where vibration or repeated stress might normally loosen them. Unlike regular nuts, lock nuts include added features to resist loosening, making them essential in many industries and applications.
Types of Lock Nuts
- Nylon Insert Lock Nut: This type of lock nut incorporates a nylon insert at one end, which creates friction with the bolt threads to prevent loosening. Its design ensures reliability in environments with moderate levels of vibration.
- Jam Nut: A thinner nut used alongside a standard nut. Tightened against the regular nut, it locks the assembly in place and prevents the nuts from loosening over time.
- Flange Lock Nut: Equipped with a built-in washer-like flange, this type provides additional grip and a wider surface area, distributing pressure evenly and enhancing stability.
Why Lock Nuts Are Used
Lock nuts are vital in applications where accidental loosening could compromise safety or functionality. They are commonly employed in machinery, automotive systems, and home fixtures to prevent loosening caused by vibrations, ensuring a secure fit and reliable performance. This makes them indispensable in critical safety applications.
Tools and Materials Needed
Essential Tools
- Wrench or Socket Set (appropriate size for the lock nut): These are crucial for gripping and turning the nut, ensuring proper tightening or loosening.
- Torque Wrench (for precise tightening): This tool allows you to tighten the lock nut to the manufacturer’s specified torque, avoiding over-tightening or under-tightening that could compromise the connection.
- Penetrating Oil (optional, in case of rusted or stuck parts): Helpful for loosening nuts that have become rusty or difficult to turn over time.
- Adjustable Wrench (for various nut sizes): A versatile tool for handling multiple lock nut sizes when the exact size wrench is unavailable.
- Safety Gloves and Goggles (for protection while working): Essential for protecting your hands and eyes from debris, sharp edges, or accidental slips.
Materials
- Lock Nut (appropriate size for the bolt): Choose a lock nut that fits securely with the specific bolt to ensure a reliable connection.
- Lubricant or Anti-seize (optional): Apply to threads for smoother tightening and to prevent future rust or corrosion.
Having the right tools and materials on hand will streamline installation or maintenance tasks, helping ensure safety, efficiency, and reliability in your work.
Preparing the Lock Nut and Work Area
Proper preparation is crucial for ensuring a secure and reliable connection when working with lock nuts. Follow these steps to prepare both the lock nut and the surrounding work area effectively:
Step 1: Cleaning the Bolt and Nut
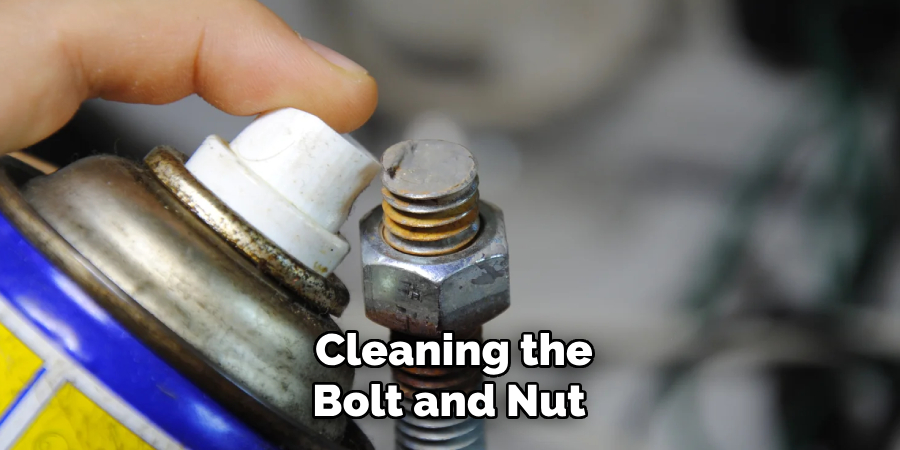
Before tightening, clean any dirt, debris, or rust from the bolt and nut. Contaminants can impact the grip and efficiency of the connection. Use a wire brush or a clean cloth to wipe down the threads thoroughly. For stubborn rust or grime, apply a cleaning solution or rust remover, then dry the components completely to ensure no residue remains.
Step 2: Inspecting the Lock Nut
Examine the lock nut for any visible damage or defects. Check the threads for signs of wear, bending, or stripping, as these issues can compromise the connection’s security. If using a lock nut with a nylon insert, inspect the insert to confirm it is intact and undamaged. Discard and replace any lock nut that shows excessive wear or deformation.
Step 3: Positioning the Lock Nut
Align the lock nut with the matching bolt or threaded rod and begin threading it by hand. Turn the nut slowly and ensure it moves smoothly onto the bolt. Proper alignment of the threads is critical to avoid cross-threading, which can damage both the nut and bolt. Hand-tighten the lock nut until it is snug, leaving further tightening to the appropriate tools during the final assembly.
How to Tighten a Lock Nut: Tightening the Lock Nut
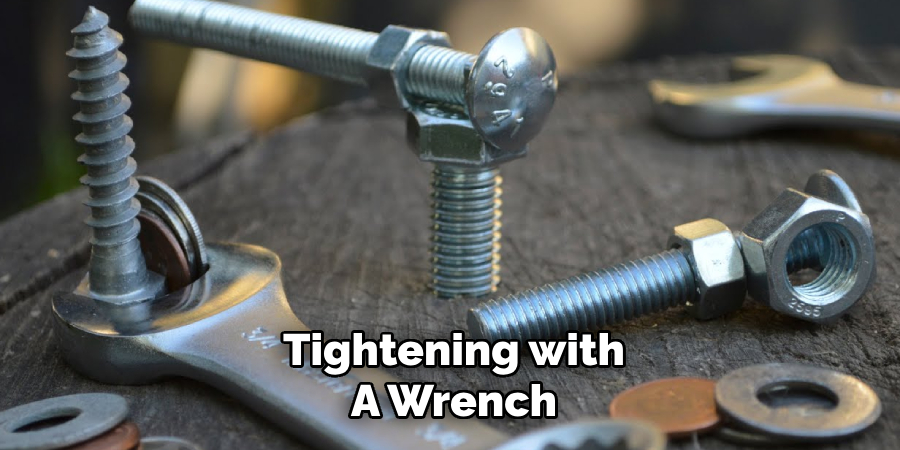
Step 1: Tightening with a Wrench
Use the appropriate size wrench to tighten the lock nut. Apply steady, even pressure while turning to ensure the nut tightens uniformly and securely. If you are using a socket wrench, confirm that the socket fits snugly over the lock nut to avoid slippage or rounding of the nut’s edges. Carefully monitor your progress to maintain control and prevent over-tightening.
Step 2: Using a Torque Wrench (Optional)
For situations requiring precise torque specifications, such as in machinery assembly or automotive applications, it is recommended to use a torque wrench. Refer to the manufacturer’s guidelines or technical documents for the recommended torque value. Once determined, set the torque wrench accordingly and tighten the lock nut until the wrench produces a clicking sound, indicating the desired torque has been achieved. Following this step ensures optimal performance and safety of the assembly.
Step 3: Double-Checking for Proper Tightness
After completing the primary tightening, inspect the lock nut for security. Ensure it is firmly in place but not excessively tight, as over-tightening can put undue stress on the threads or deform the lock nut. Gently wiggle or apply slight pressure to verify the nut won’t loosen with vibration or operational use. If necessary, perform a final adjustment to balance secure placement and thread integrity perfectly.
How to Tighten a Lock Nut: Securing the Lock Nut
Step 1: Ensuring Proper Lock Nut Engagement
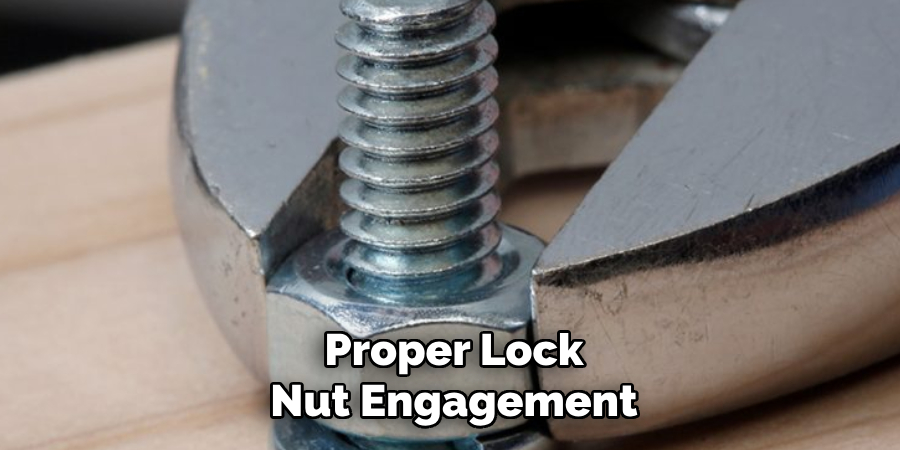
For nuts with nylon inserts, carefully ensure the nylon insert is fully engaged with the bolt threads. This engagement creates friction that prevents the nut from loosening during use. For jam nuts, tighten the top nut firmly against the lock nut, creating a mechanical lock that secures both nuts. Proper alignment and engagement are critical in maintaining the stability of the assembly.
Step 2: Additional Techniques for Extra Security
To further enhance security, consider using a thread-locking adhesive, such as Loctite, on the bolt threads. These adhesives are designed to create a strong bond that resists loosening, particularly in environments prone to high vibration levels. Additionally, incorporating lock washers alongside the lock nut can bolster the connection by increasing the grip and distributing tension evenly. These supplementary steps prevent accidental loosening and ensure long-term durability for critical assemblies. Always follow manufacturer guidelines when applying adhesives or using additional fastening components.
Troubleshooting Common Issues
Stripped Threads or Worn Lock Nut
If the lock nut is stripped, replacing it with a new one is essential to maintain proper tightening and prevent failure. Continuing to use a worn lock nut may compromise the assembly’s integrity. For damaged threads, utilize a thread repair tool, such as a tap and die set, to restore the functionality of the bolt or nut. This step ensures a secure connection without replacing the entire component.
Lock Nut Not Tightening Properly
When a lock nut is not tightening correctly, first inspect the alignment of the threads to ensure they are properly engaged. Examine the components for debris, dirt, or rust that may obstruct the process, and clean the threads thoroughly before reattempting. If the lock nut is stuck or rusted, applying a penetrating oil can help loosen it and enable appropriate tightening. Always verify that the components are in good condition during this process.
Over-Tightening Issues
Avoid over-tightening the lock nut, as excessive force can damage the nut, bolt, or adjacent components. Utilize a torque wrench to apply the specified torque value recommended by the manufacturer, ensuring a secure yet safe connection. Taking these precautions helps to maintain the performance and longevity of the assembly.
Maintenance Tips for Lock Nuts
Regular Checks
Periodically inspect lock nuts, particularly in high-vibration environments, to ensure they remain secure. Loose or compromised lock nuts can lead to failures in critical connections, so regular checks are essential for both safety and performance.
Lubrication
Apply a suitable lubricant, such as anti-seize, to the threads of the lock nuts. This prevents rust formation and makes future removal easier, especially in environments prone to moisture or corrosive elements. Proper lubrication also minimizes wear during use.
Replacing Worn Lock Nuts
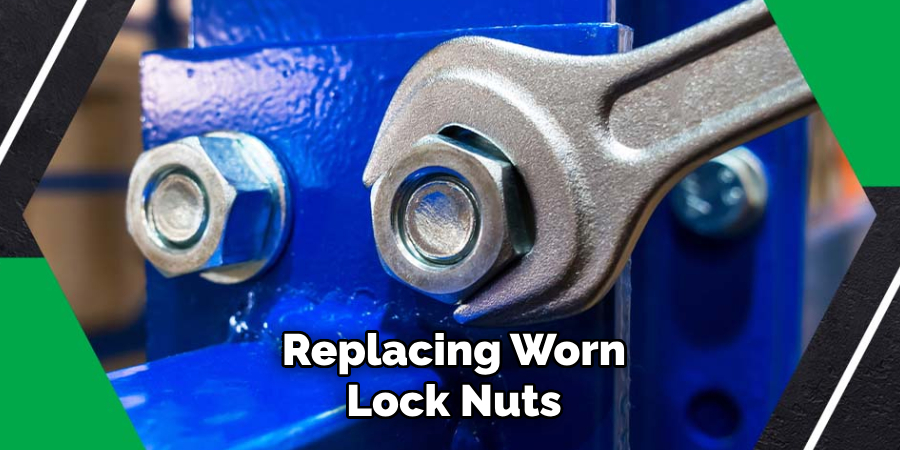
Lock nuts with nylon inserts should be replaced when the inserts appear worn or damaged. A compromised insert can no longer provide adequate resistance to loosening, potentially leading to connection failure. Regular replacement ensures reliable fastening and maintains the assembly’s structural integrity. Always use lock nuts designed for your specific application and follow the manufacturer’s recommendations.
Conclusion
Properly tightening lock nuts is a crucial step in maintaining the safety and effectiveness of your equipment. Understanding how to tighten a lock nut ensures secure fastening, prevents loosening under vibration, and extends the longevity of your assembly.
Always follow the recommended steps, including using the right tools and checking for proper engagement to achieve optimal results. Periodic inspections are equally essential to identify wear or damage, ensuring continued reliability. By prioritizing maintenance and proper techniques, such as those described, you can avoid connection failures and costly repairs while keeping your equipment in excellent working condition.
About
Safety Fic is a distinguished figure in the world of Diy design, with a decade of expertise creating innovative and sustainable Diy solutions. His professional focus lies in merging traditional craftsmanship with modern manufacturing techniques, fostering designs that are both practical and environmentally conscious. As the author of diy, Safety Fic delves into the art and science of Safety Fic-making, inspiring artisans and industry professionals alike.
Education RMIT University
(Melbourne, Australia) Associate Degree in Design (Safety Fic) Focus on sustainable design, industry-driven projects, and practical craftsmanship. Gained hands-on experience with traditional and digital manufacturing tools, such as CAD and CNC software.
Nottingham Trent University
(United Kingdom) Bachelor’s in diyfastly.com and Product Design (Honors) Specialized in product design with a focus on blending creativity with production techniques. Participated in industry projects, working with companies like John Lewis and Vitsoe to gain real-world insights.
Publications and Impact
In diy, Safety Fic his insights on indoor design processes, materials, and strategies for efficient production. His writing bridges the gap between artisan knowledge and modern industry needs, making it a must-read for both budding designers and seasoned professionals.