

The LiftMaster keypad is a modern, user-friendly solution for seamless garage door operation. This device provides a convenient way to open and close your garage door without relying on a traditional remote. Instead, access is granted through a secure, unique code entered directly on the keypad. Among its various advantages, it offers quick access to your garage, eliminates the need to carry bulky remotes, and enhances security by allowing you to customize and change your code as needed.

This article aims to provide a comprehensive step-by-step guide on how to use LiftMaster keypad effectively. From initial setup to daily usage tips, you’ll learn how to get the most out of this smart device while ensuring optimal performance and safeguarding your home’s security. With this guide, mastering your LiftMaster keypad will be easier than ever.
Understanding the LiftMaster Keypad Features
What is a LiftMaster Keypad?
A LiftMaster keypad is a wireless entry system designed to simplify access to your garage. Users can open and close the garage door without traditional remotes or keys by entering a personal code. It is compatible with LiftMaster garage door openers and many other systems, making it a versatile solution for modern homeowners. The keypad is mounted outside the garage, providing seamless and secure entry without additional hassle.
Key Features of the Keypad
One of the standout features of the LiftMaster keypad is its backlit buttons, which ensure easy visibility even at night or in low-light conditions. This practical design makes it convenient for those arriving home in the dark. The keypad also incorporates advanced security measures, such as rolling codes.

These codes change automatically after each use, reducing the risk of unauthorized access and enhancing the overall safety of your home. Additionally, for flexibility, the keypad allows you to create temporary access codes for visitors, service providers, or delivery personnel. These temporary codes can be set and deleted easily, offering convenient control over who can enter your garage. These features make the LiftMaster keypad a secure, user-friendly solution for modern garage access.
Materials and Tools Needed
Required Items
- LiftMaster keypad (either model 877LM, 878LM, or others, depending on your garage door opener).
- Your LiftMaster garage door opener (ensure it is compatible with the keypad).
- A step ladder (if installing the keypad high on a wall).
- A power drill (if needed for mounting).
- A screwdriver for securing the keypad in place.
- Fresh batteries for the keypad (if they are omitted).
Tools for Configuration
- User manual for both the LiftMaster opener and the keypad.
- Pen and paper to note down security codes and settings.
Before beginning the installation process, confirm that you have all the materials and tools to ensure a smooth setup. Verify compatibility between the keypad and your garage door opener by consulting the respective manuals, and take a moment to read through the installation instructions. Having the required tools readily available minimizes interruptions and helps you complete the process efficiently.
How to Use Liftmaster Keypad: Installing the LiftMaster Keypad
Step 1: Choosing the Installation Location
Mount the keypad outside the garage door, about 5-6 feet above the ground for easy access. This height ensures that it is convenient to use for most individuals. Also, choose a location sheltered from extreme weather conditions, such as direct rain or intense sunlight. Proper placement will help maintain the keypad’s functionality and extend its lifespan. Avoid placing it too close to the edge of the door to prevent interference with the door’s operation.
Step 2: Mounting the Keypad

Using a power drill, create holes in the wall where the keypad will be mounted. Refer to the included installation template for the correct measurements. Based on the type of wall surface, secure the keypad using the provided screws or wall anchors for added stability. Ensure the keypad is mounted straight and aligned for optimal usability. Once mounted, double-check that it is securely fastened and does not wobble.
Step 3: Inserting Batteries
Locate the battery compartment on the back of the keypad and open it carefully. Insert the required fresh batteries, ensuring the positive (+) and negative (-) terminals are aligned correctly with the marked indicators. Using fresh batteries helps avoid initial power issues. Once the batteries are in place and secured, close the battery compartment firmly to protect it from dust and moisture. Confirm that the keypad powers on by pressing a key to test the response.
Programming the LiftMaster Keypad
Step 1: Resetting the Keypad (if necessary)
If you are setting up a new keypad or resetting an old one, locate the “Learn” button on your garage door opener motor. Press this button until the light blinks, indicating the previous programming has been cleared. Next, press the “#” key on the keypad to ensure all prior settings are fully erased.
Step 2: Entering the Programming Mode
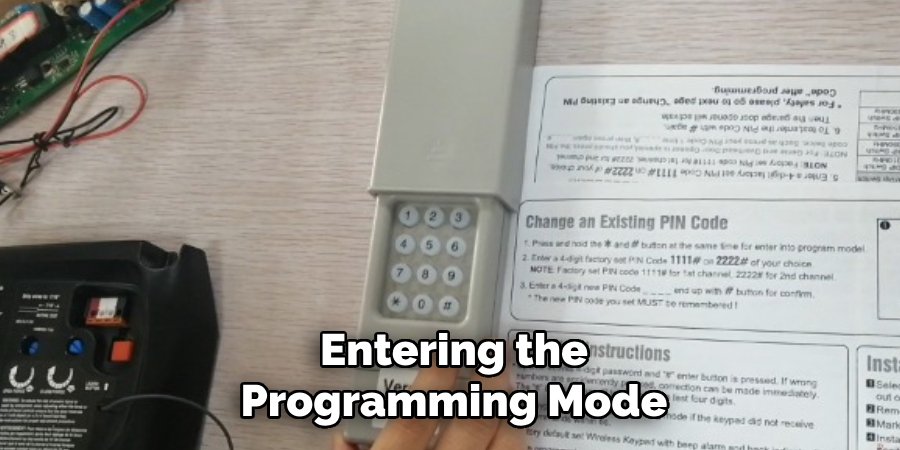
Once the reset is complete, proceed to program your personal access code. Carefully enter your chosen 4-digit Personal Identification Number (PIN) on the keypad. After entering the code, press the “Enter” key. If entered correctly, the keypad will display a green light. This signal confirms that the keypad has successfully entered programming mode and is ready for the next steps.
Step 3: Syncing the Keypad with the Garage Door Opener
Return to the opener motor and press the “Learn” button to pair the keypad with your garage door opener. Within 30 seconds of pressing this button, go back to the keypad and re-enter your 4-digit PIN code, then press the “Enter” key. Observe the garage door opener’s lights; they should blink or flash briefly, indicating that the sync process has been completed successfully. Once synced, test the keypad by entering your PIN and ensuring the garage door opens or closes as intended.
Using the LiftMaster Keypad
Step 1: Accessing the Garage Door
To open the door, simply enter your 4-digit PIN code followed by the “Enter” button. The garage door should open automatically, provided the opener is connected and functioning properly. If the door does not open, check the connection between the keypad and the garage door opener and ensure the PIN code entered is correct.
Step 2: Closing the Garage Door
To close the door, enter the same 4-digit PIN code and press “Enter.” Be observant as the door closes; it will automatically reverse if it detects an obstruction or encounters a safety issue, such as an object in its path. Ensure the area around the garage door is clear to avoid interruptions during this process.
Step 3: Temporary Access Codes
For added convenience, you can create temporary access codes for guests, service workers, or deliveries. To do this, access the programming menu on the keypad and enter a specific code that you wish to use temporarily. These codes can be configured to expire after a set period or after a single use, providing limited and secure access to your garage. Temporary codes are handy for maintaining security while still accommodating entry for trusted visitors.
Troubleshooting Common Issues
Keypad Not Responding

If the keypad is unresponsive, check the batteries to ensure they are fresh and correctly installed. Dead or improperly placed batteries are the most common cause of this issue. Also, inspect for any interference from nearby electronic devices, such as wireless routers or baby monitors, as these can disrupt the signal between the keypad and the garage door opener.
The PIN Code Isn’t Working
When your PIN code isn’t working, carefully re-enter the code to ensure it was input correctly. If the issue persists, verify that the garage door opener is within range and operating as expected. Additionally, confirm that the PIN code has not been changed or removed during reprogramming.
Keypad Not Syncing with Garage Door Opener
If your keypad fails to sync with the garage door opener, revisit the programming process step by step. Press the “Learn” button on the garage door opener within the designated time frame according to the manufacturer’s instructions. If syncing issues continue, refer to the LiftMaster user manual for further guidance or contact customer support for assistance.
Enhancing Security with the LiftMaster Keypad
Using a Strong PIN Code
To maximize the security of your LiftMaster keypad, it is essential to select a strong 4-digit PIN code. Avoid using predictable combinations like birthdays, anniversaries, or simple numeric sequences such as “1234” or “0000.” Instead, opt for more random combinations that are harder for others to guess. Additionally, make it a habit to update your PIN regularly. This practice ensures that your security remains intact even if your original PIN is compromised.
Using Rolling Codes
The LiftMaster keypad employs rolling code technology to enhance security. The code transmitted by the keypad dynamically changes with each use, meaning the same code is never reused. This feature ensures that even if someone manages to intercept a previous code, they cannot use it to gain unauthorized access to your garage. This mechanism provides an extra layer of protection against digital intrusions.
Disabling and Reprogramming the Keypad
If you suspect that your security has been compromised, take immediate action by disabling and reprogramming the keypad. Reprogramming allows you to reset the access code, ensuring that any potential vulnerabilities are addressed. Follow the instructions in the user manual to securely disable or reprogram the keypad, keeping your garage and home safe from unauthorized entry.
Conclusion
Understanding how to use LiftMaster keypad is essential for maximizing its convenience and security benefits. Begin by carefully following the installation guide to set up the keypad, ensuring it is securely and correctly mounted. Next, program your preferred access code, enabling seamless operation for authorized users. For troubleshooting, refer to the manual to resolve any issues efficiently. Regularly update your PIN code and perform routine system tests to maintain optimal functionality. By incorporating these steps, you can confidently rely on the LiftMaster keypad to enhance the safety and accessibility of your home or garage.
About
Safety Fic is a distinguished figure in the world of Diy design, with a decade of expertise creating innovative and sustainable Diy solutions. His professional focus lies in merging traditional craftsmanship with modern manufacturing techniques, fostering designs that are both practical and environmentally conscious. As the author of diy, Safety Fic delves into the art and science of Safety Fic-making, inspiring artisans and industry professionals alike.
Education RMIT University
(Melbourne, Australia) Associate Degree in Design (Safety Fic) Focus on sustainable design, industry-driven projects, and practical craftsmanship. Gained hands-on experience with traditional and digital manufacturing tools, such as CAD and CNC software.
Nottingham Trent University
(United Kingdom) Bachelor’s in diyfastly.com and Product Design (Honors) Specialized in product design with a focus on blending creativity with production techniques. Participated in industry projects, working with companies like John Lewis and Vitsoe to gain real-world insights.
Publications and Impact
In diy, Safety Fic his insights on indoor design processes, materials, and strategies for efficient production. His writing bridges the gap between artisan knowledge and modern industry needs, making it a must-read for both budding designers and seasoned professionals.